
- Chain 5, slip stitch in next space (between stitches).
The Crochet Pattern
Face Base (Skin-Tone Section)
- Foundation Ring:
- With skin-tone yarn, ch 5.
- Join with sl st to the first chain, forming a ring.
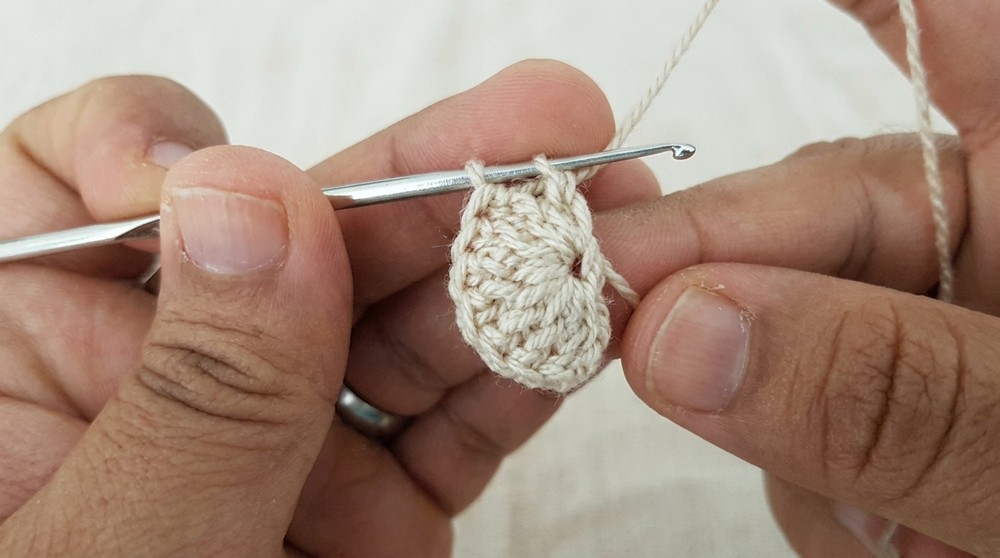
- Round 1: Forming the Face
- Ch 3 (counts as first dc).
- Work 8 dc into center of ring—counting starting ch-3 gives you 9 dc.
Save
- On the 9th dc, stop with 2 loops remaining; drop skin-tone yarn, pick up white, yarn over with white to complete the last dc.
Beard and Base Edge (White Section)
- Round 2: White Beard Base
- With white yarn, work 9 dc (one into each stitch around).
- Join with sl st to top of starting ch-3.
Save
- Round 3: Sculpting the Beard
- Ch 3, dc in next st, 2 dc in next st (increase).
- Work 2 hdc into the next two stitches.
- Finish with 2 dc in each of the last two stitches.
- Ch 3, sl st in the same base st to create a beard tip / edge.
Beard Appliqué Loops
- Round 4: Adding Beard Loops
- Working between stitches of the white row:
- Ch 5, sl st in first space.
- Repeat: ch 5, sl st between next pair of stitches.
- Continue across the beard base for a loopy, textured effect.
- At the end, ch 1, sl st into 3rd chain, ch 1, and fasten off.
- Weave in any white and skin-tone ends at the back of the work.
- Working between stitches of the white row:
Save
Santa’s Hat (Red Section)
- Attaching Red Yarn
- With red yarn, make a slip knot.
- Attach to rightmost double crochet (top edge above face).
- Row 1: Hat Foundation
- Sc in each dc along the top edge, stopping before the chain-3 loops at each side.
- Do not crochet into corner chains.
- Rows 2–5: Shaping and Decreasing
- Row 2:
- Ch 1, turn.
- Sc across row.
- Row 3 (Begin Decreases):
- Ch 1, skip first st, sc across to last st, sc in last st.
- Rows 4–5:
- Repeat: ch 1, skip first st, sc across, sc in last st, turning each row.
- As you proceed, the hat tapers toward a point.
- When only one stitch remains, finish with sc, ch 1, cut red yarn, and pull through.
- Row 2:
Hat Pom-Pom
- White Pom-pom at Hat Tip
- With white yarn, make a slip knot.
- Attach to peak of hat with a sc.
- Work a total of 4 sc into the tip/peak.
- Ch 1, cut and weave in any ends, hiding them into the pom-pom or along back.
Save
Santa’s Nose
- Crochet the Nose (Skin-Tone yarn)
- Ch 4.
- Into 4th chain from hook, work 4 dc.
- Bring end around and join to the first chain with a sl st (forms small circle).
- Ch 1, cut yarn, leaving some tail for attaching.
- Weave in end or set aside for gluing.
Save
Assembly & Finishing Touches
- Attach Nose:
- Using universal craft glue, affix the nose at the center of the face.
- Sew Eyes:
- Thread a sewing needle with black thread.
- Stitch one small black pearl securely above the nose for each eye.
- Final Finishing:
- Weave in and secure all loose yarn ends along the back of the applique.
- Check all components for secure attachment.
Save
Finished Size
- Completed appliqué measures approximately 5–6 cm across, depending on yarn and hook.
- Appropriately sized for embellishing home decor, gifts, or accessories.
Conclusion and Ending Words
This Santa Claus appliqué captures traditional holiday spirit through careful color placement, shaping, and embellishment. The sequential addition of face, beard, dimensional loops, and a pointed hat creates a playful yet recognizable figure suitable for seasonal applications. Embellishments such as a crocheted nose and beaded eyes add depth and warmth, ensuring the finished piece is endearing no matter the setting. The applique’s compact form and solid construction ensure it will retain its charm after repeated use. Whether made as a single ornament or in multiples for gifts, this project highlights both foundational crochet techniques and the value of finishing touches. Each completed Santa carries with it the time and attention to detail that handmade decorations offer, making it a memorable addition to holiday celebrations.
Save
Pin0 Shares
