
Join. (22 + 6 + 18 + 18 + 6 = 70 sc)
Rnd B: Sl st in each of the 22 back sts, which keeps the back flat for sewing. Then (sc in next st, in next st) 24 times across the front 48 sts. Join. (70 sts used, 24 picots)
Fasten off.
Filet Heart Appliqué (Cream, Make 3)
Row 1: Ch 7, dc in 5th ch from hook (the skipped ch count as dc + ch 1), ch 1, skip next ch, dc in last ch. Turn. (2 mesh)
Row 2: Ch 4 (counts as dc + ch 1 throughout), dc in the first dc at the base of the ch. Ch 1, dc in next dc; repeat across, working the last dc in the turning ch. Ch 1, dc in that same st. Turn. (4 mesh)
The increase sets at each end add 1 mesh per side, for 2 more mesh per row.
Row 3: Repeat Row 2. (6 mesh)
Row 4: Repeat Row 2. (8 mesh, 9 dc)
Rows 5–6: Ch 4, skip ch-sp, dc in next dc. Ch 1, dc in next dc; repeat across. Turn. (8 mesh each row)
Label the 9 dc of Row 6 as d0–d8, where d0 is the turning ch.
Row 7 (top dip): Ch 4, dc in d1, ch 1, dc in d2, ch 1, hdc in d3, sc in d4, hdc in d5, ch 1, dc in d6, ch 1, dc in d7, ch 1, dc in d8. (15 sts and spaces, symmetrical around the center sc)
Don’t fasten off.
The heart now measures 4 x 3.5 in (10.2 x 8.9 cm).
Edging Rnd 1: Work sc around the edge as follows:
- 3 sc in the top of the Row 7 turning ch (corner)
- 1 sc in each of the next 5 sts and spaces
- sc3tog over the hdc, sc, and hdc
- 1 sc in each of the next 5 sts and spaces
- 3 sc in the last dc (corner)
- 2 sc in each row end of Rows 6–1 (12 sc)
- Across the bottom point: 1 sc in the next foundation ch, 3 sc in the center foundation ch (the base of the middle dc), 1 sc in the next foundation ch (5 sc)
- 2 sc in each row end of Rows 1–6 up the other side (12 sc)
Join. (17 top + 12 + 5 + 12 = 46 sc)
Edging Rnd 2: Sc in next st, (sc, picot) in next st; repeat around. Join. (46 sts used, 23 picots)
Fasten off and leave a 24 in (61.0 cm) tail. The finished heart is 4.5 x 4 in (11.4 x 10.2 cm).
Hanging Strap (Cream, Make 1)
Ch 41.
Row 1: Sc in 2nd ch from hook and in each ch across. Turn. (40 sc)
Rows 2–3: Ch 1, sc in each st. Turn. (40 sc each row)
The strap measures 10 x 0.7 in (25.4 x 1.8 cm). Leave long tails at both ends.
Make All Pieces
- Peach: 1 panel, 3 pockets
- Cream: 3 hearts, 3 pocket rims, 1 strap, and 2 border rounds
Layout from top to bottom on the 90-row panel:
Joining
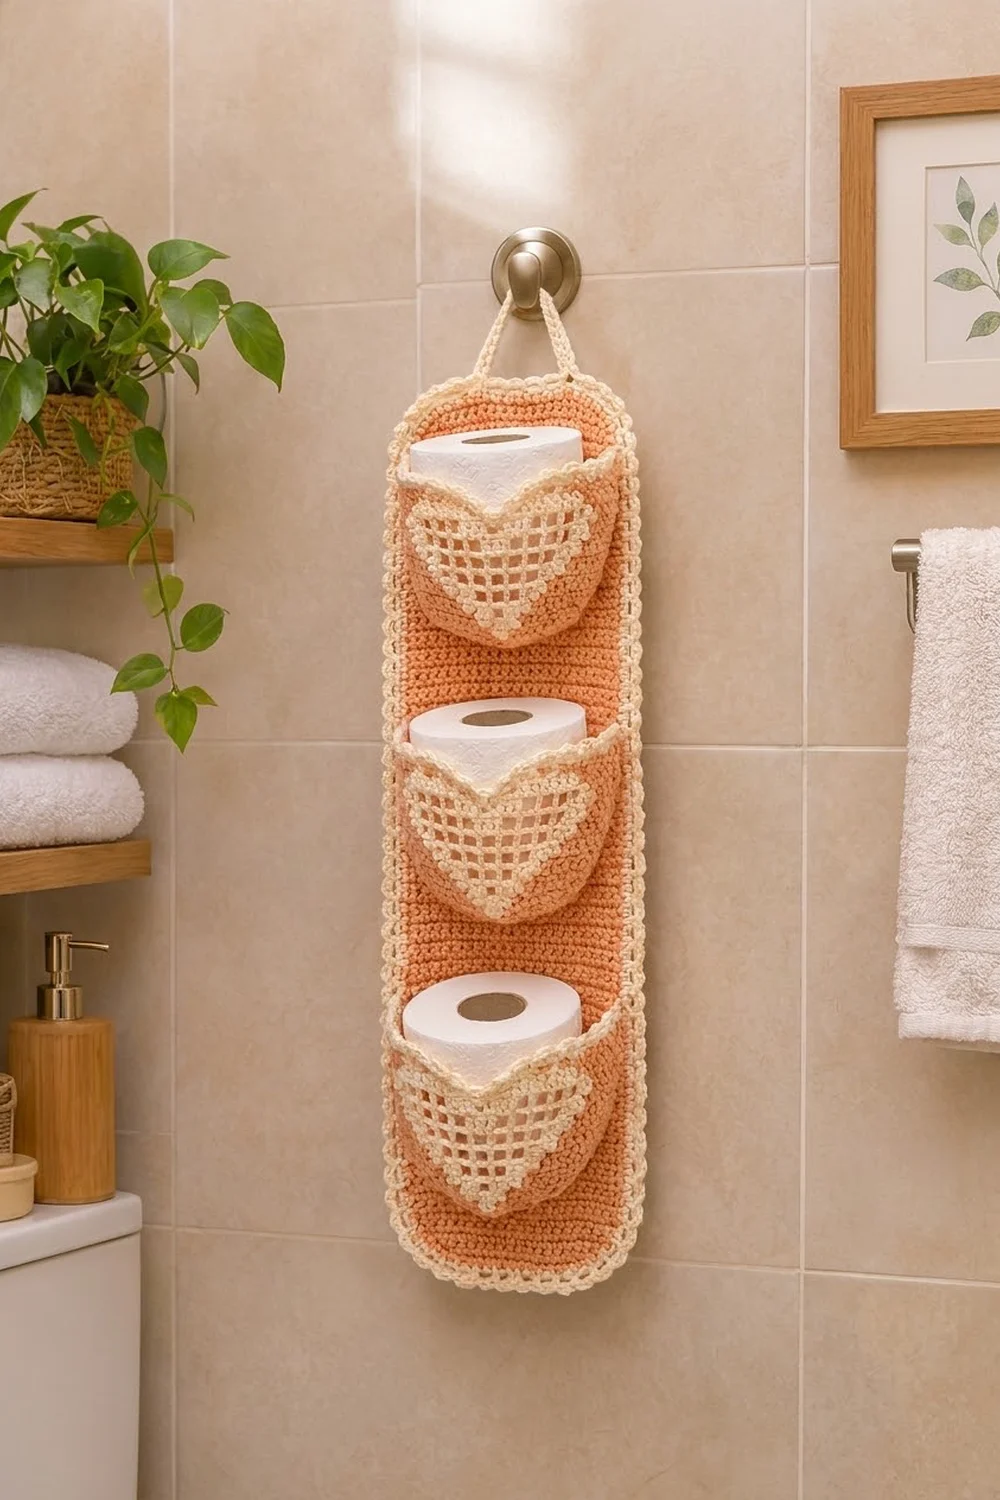
Hearts to pockets: Center each heart on the front of a pocket. Place the heart’s top dip directly under the pocket’s center dip, about 0.25 in (0.6 cm) below the rim, so the heart lobes follow the pocket lobes. Pin all around. Whipstitch through the back bumps of the Edging Rnd 1 stitches, leaving the picots free. Keep the stitches small and snug so the mesh lies flat without puckering.
Pockets to panel: Each pocket’s 22 back sts line up 1-to-1 with the panel’s 22 sts, and its 18 wall rounds line up with 18 panel rows.
- Pin the fold line (Rnd 10) of Pocket 1 along Row 6 of the panel, matching the back sts to panel sts 1–22.
- Whipstitch the base’s back edge to Row 6, one pocket st to one panel st.
- Sew each side edge of the back wall up panel columns 1 and 22, one round to one row, through Row 23.
- Sew the 22 sl sts of the rim back to the top of Row 23.
Sew through panel stitches, not row ends, so the row ends stay open for the border.
Repeat with Pocket 2 (fold on Row 33, rim at Row 50) and Pocket 3 (fold on Row 60, rim at Row 77).
Use firm, even tension. If you pull too hard, the panel will narrow behind the pockets.
Checkpoint: The panel should still lie at 5.5 in (14.0 cm) wide behind every pocket.
Border
Border gauge: 4 sc per 1 in (2.5 cm) along every edge.
The 18 rows per 4 in (10.2 cm) don’t match the 16 sts per 4 in (10.2 cm), so on the long sides you work 8 sc for every 9 row ends. The border count comes only from the panel, because the pockets sit on the surface and add no edge stitches.
Rnd 1 (peach): Join at the top right corner.
- Top edge: 3 sc in the first st, sc in the next 20 sts, 3 sc in the last st (26 sc).
- Long side: 80 sc over the 90 row ends (skip every 9th row end).
- Bottom edge: same as the top (26 sc).
- Second long side: 80 sc.
Join. (2 x 26 + 2 x 80 = 212 sc)
Mark the center sc of each corner group. Not counting these 4 corner sts, each short side has 22 sc and each long side has 82 sc. Check: 4 + 2 x 22 + 2 x 82 = 212.
Rnd 2 (cream): Sc in each st, working 3 sc in each marked corner st and moving the marker up to the center. Each side gains 2 sts: 24 per short side and 84 per long side, plus 4 corners. Join. (4 + 48 + 168 = 220 sc)
Rnd 3 (cream): Crab stitch in each st around. Join. (220 crab sts) Fasten off.
The three rounds add 0.5 in (1.3 cm) per side. So 5.5 + 1 = 6.5 in (16.5 cm) wide and 20 + 1 = 21 in (53.3 cm) tall.
The math works because 80 sc over 20 in (50.8 cm) and 22 sc over 5.5 in (14.0 cm) both equal 4 sts per inch, the same as the body gauge. The corner increases let the edge turn without cupping.
Strap: Sew each strap end to the back of the panel. Overlap each end 1 in (2.5 cm) below the top edge, with its outer edge 1 in (2.5 cm) in from the side edge.
Final Blocking
- Spray the whole piece lightly with water until it’s damp but not soaked.
- Lay the panel face up on the mat and pin it to 6.5 x 21 in (16.5 x 53.3 cm).
- Pin each heart open so the mesh squares are even and the picots point outward.
- Stuff each pocket with a rolled towel or a toilet roll in a plastic bag so it dries in a round shape.
- Shape the lobes with your fingers.
- Let it dry completely, at least 24 hours.
Final Quality-Control Checklist
- Panel is 6.5 x 21 in (16.5 x 53.3 cm) and straight-sided.
- Border counts were 212, 220, and 220.
- All three pockets have 66-st walls, 18 rounds tall.
- Each rim has 70 sts and 24 picots.
- Each heart has 8 mesh at its widest, 46 edging sc, and 23 picots.
- Hearts are centered, with their dips under the pocket dips.
- Pocket fold lines sit on Rows 6, 33, and 60.
- The strap is secure and the loop hangs centered.
- All ends are woven in through solid sc, not through the mesh.
Troubleshooting
- Base curls up like a bowl: Your increases are too tight. Go up a hook size for the base only.
- Oval ends look pointy: Shift the increase position by 1 st on alternate rounds.
- Pocket too narrow for a roll: Check that the front is 44 sts. A tight wall can be blocked wider while damp.
- Heart sides are lopsided: Make sure every increase row starts with a ch 4 and ends with (ch 1, dc) in the same st.
- Mesh squares are tall rectangles: Keep the ch-1 spaces relaxed, or use a smaller hook for the dc only.
- Border ripples: Skip one more row end per side. If it pulls, skip one fewer.
- Panel sags under weight: Sew the pocket sides all the way up, not only at the base and rim.
Care
Hand wash in cool water with mild soap, and press out the water in a towel. Reshape the pockets and dry flat.
Final Notes
Everything in this pattern follows one measurement chain. The 4-st-per-inch gauge makes a 22-st panel 5.5 in (14.0 cm) wide, and each pocket’s 22-st back matches it stitch for stitch. A 66-st cup gives each roll 44 front stitches. The 212-to-220-st border brings the panel to 6.5 x 21 in (16.5 x 53.3 cm). Check each stage as you go, and the finished holder will hang straight and hold its shape.
Happy crocheting!
