
This hanging holder stacks three bell-shaped pockets, one above the other, on two slim green straps that meet at a wooden ring. Each pocket holds one standard toilet roll. The lower body is solid sage-green single crochet that flares out toward a wide, flat base, so each pocket looks like a small bell.
The top of each pocket is a cream lace band of stacked V-stitches, finished with a soft scalloped edge. A cream crocheted cord tied into a bow sits at the center front of each pocket, just below the lace. The sage and cream colors feel festive without being loud, so the holder suits a holiday bathroom and still looks good the rest of the year.
The pattern uses US crochet terms. The finished holder measures about 25.5 in (64.8 cm) from the top of the ring to the bottom of the lowest pocket. It is about 6.5 in (16.5 cm) wide at its widest point. Each pocket is 5 in (12.7 cm) tall with a 6 in (15.2 cm) base.
Construction is simple. You work each pocket in the round, starting with a flat circle base, and shape the bell body with two decrease rounds. Then you add the cream lace band. Finally, you make three slip-stitch cord bows and two long straps. You sew the straps to the sides of the pockets and fold them around the ring.
Finished Size and Construction
- Finished size: about 25.5 in (64.8 cm) long x 6.5 in (16.5 cm) wide
- Skill level: Easy-intermediate
- Terminology: US crochet terms
- Yarn weight: Worsted (#4), cotton or cotton blend
- Hook: 5.0 mm (US H-8)
- Number of pieces: 3 pockets, 3 bows and 2 straps, plus 1 purchased ring
- Layout: 1 column of 3 pockets, stacked vertically
- Pocket size: 6 in (15.2 cm) base diameter, 5 in (12.7 cm) tall
- Size before lace band: green body 3.2 in (8.1 cm) tall
- Lace band depth: 1.8 in (4.6 cm), including the scallops
Materials
Choose a smooth worsted-weight cotton. Cotton holds the bell shape, stands up to bathroom humidity and shows V-stitch lace clearly. Acrylic also works, but the pockets will be softer and may sag under the weight of a roll. Avoid fuzzy or highly textured yarn, which hides the lace lattice.
- Sage green: 100 g, about 170 m (186 yd)
- Cream: 50 g, about 85 m (93 yd)
Tools:
- 5.0 mm (US H-8) crochet hook
- One 3 in (7.6 cm) wooden ring (a sturdy metal ring of the same size also works)
- Tapestry needle
- 4 to 6 locking stitch markers
- Scissors and a tape measure
- Rust-proof pins and a blocking mat
These quantities include a margin of about 25 percent for gauge differences, swatching and sewing tails.
Abbreviations (US Terms)
- ch: chain
- sl st: slip stitch
- sc: single crochet
- dc: double crochet
- sc2tog: single crochet 2 together
- BLO: back loop only
- sp: space
- st(s): stitch(es)
- rnd(s): round(s)
Special stitch: V-stitch (V). Work (dc, ch 1, dc) in the same stitch or space.
Gauge and Checkpoints
Gauge: 14 sc x 15 rnds = 4 in (10.2 cm) in sc worked in the round.
Make one complete pocket before you start the others. That first pocket is your real gauge swatch, and it also shows you whether a roll fits.
Checkpoints:
- After Rnd 11, the base measures 6 in (15.2 cm) across and lies flat.
- After Rnd 23, the green body stands 3.2 in (8.1 cm) tall and the opening measures about 4.9 in (12.4 cm) across.
- After the lace band, the pocket is 5 in (12.7 cm) tall.
- A standard roll is about 4.25 in (10.8 cm) wide and 4.5 in (11.4 cm) tall. It should slide in with a little room to spare.
If your base is too big, switch to a 4.5 mm hook. If it is too small or cups upward, switch to a 5.5 mm hook. Fix your gauge before you work the body, because every later count depends on the 66-stitch base.
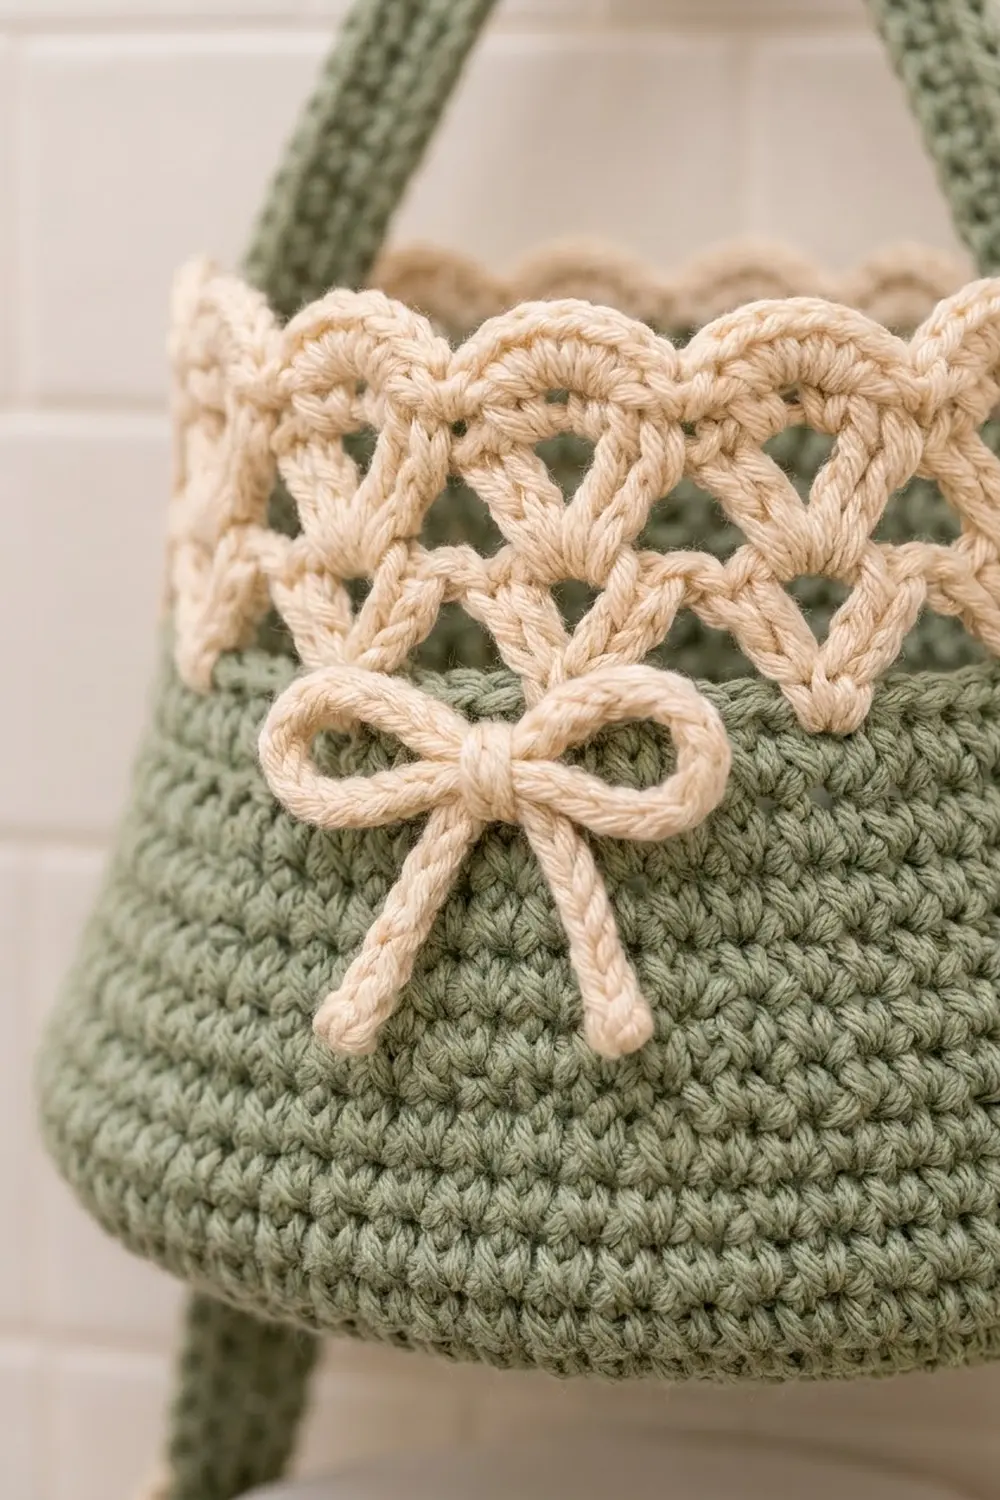
Pocket (Make 3)
Base
With sage green, work in continuous rounds. Place a marker in the first stitch of each round and move it up as you go.
Rnd 1: Make a magic ring, 6 sc in ring. (6 sts)
Rnd 2: 2 sc in each st around. (12 sts)
Rnd 3: Sc 1, 2 sc in next st 6 times. (18 sts)
Rnd 4: Sc 2, 2 sc in next st 6 times. (24 sts)
Rnd 5: Sc 3, 2 sc in next st 6 times. (30 sts)
Rnd 6: Sc 4, 2 sc in next st 6 times. (36 sts)
Rnd 7: Sc 5, 2 sc in next st 6 times. (42 sts)
Rnd 8: Sc 6, 2 sc in next st 6 times. (48 sts)
Rnd 9: Sc 7, 2 sc in next st 6 times. (54 sts)
Rnd 10: Sc 8, 2 sc in next st 6 times. (60 sts)
Rnd 11: Sc 9, 2 sc in next st 6 times. (66 sts)
The base now measures 6 in (15.2 cm) across. At 14 sc per 4 in, 66 sts make a circumference of about 18.9 in (48.0 cm), which matches a 6 in circle.
Bell Body
Rnd 12: Sc in BLO of each st around. (66 sts) This round makes a crisp fold between the base and the wall.
Rnds 13–15: Sc in each st around. (66 sts)
Rnd 16 (decrease): Sc 9, sc2tog 6 times. (60 sts)
Rnds 17–19: Sc in each st around. (60 sts)
Rnd 20 (decrease): Sc 8, sc2tog 6 times. (54 sts)
Rnds 21–23: Sc in each st around. (54 sts)
Sl st in the next st to smooth out the step at the end of the round. Fasten off the green.
The two decrease rounds pull the wall inward, so the pocket is wider at the base than at the top. This gentle taper creates the bell shape. Stacking the decreases directly above each other gives clean lines. If you want the decreases completely hidden, offset them by 4 sts instead. Before moving on, set the pocket on the table. It should stand upright on its own with the wall leaning slightly inward.
Lace Band and Scallop Edge
The lace band works as each pocket’s border. You work it directly onto the 54 green stitches of Rnd 23.
Border gauge: One V-stitch repeat covers 3 sts, which is about 0.86 in (2.2 cm). Since 54 ÷ 3 = 18, the band holds exactly 18 repeats with nothing left over.
