
- Rnd 1: MR, 6 sc. (6)
- Rnd 2: Inc in each st around. (12)
- Rnd 3: Sc BLO in each st around. (12)
- Rnd 4: Sc in each st around. (12)
- Rnd 5: Sc 3, inc 3 times. (15)
- Rnd 6: Sc BLO in each st around. (15)
Fasten off and leave a 12 in (30.5 cm) tail. Flatten the cap so it is 2.1 in (5.3 cm) wide.
Loop: Join gold at one side of Rnd 2 and ch 8. Sl st into the opposite side of Rnd 2, then work 12 sc over the chain. Fasten off.
Tab (Make 3, Lavender)
- Row 1: Ch 6, sc in the 2nd ch from the hook and in each ch across. (5)
- Rows 2–20: Ch 1, turn, sc in each st across. (5)
- Row 21: Ch 1, turn, sc 2, ch 1, skip 1 st, sc 2. (4 sc + 1 ch-sp)
- Row 22: Ch 1, turn, sc 2, sc in the ch-sp, sc 2. (5)
- Rows 23–24: Ch 1, turn, sc in each st across. (5)
Fasten off. Each tab is 1.4 in x 6 in (3.6 cm x 15.2 cm), with a buttonhole near one end.
Back Panel (Plum)
- Row 1: Ch 57, sc in the 2nd ch from the hook and in each ch across. (56)
- Rows 2–24: Ch 1, turn, sc in each st across. (56)
Do not fasten off. The panel is now 16 in x 6 in (40.6 cm x 15.2 cm).
Make All Pieces
- Plum: 1 back panel, 2 pocket bodies
- Lavender: 1 pocket body, 3 pocket rims, 3 tabs
- Gold: 3 caps with loops
Layout, front view:
Border
Border gauge is the same as the body: 3.5 sts per inch along the top and bottom edges, and 1 sc per row end along the sides. The side counts below include both corner center stitches.
Rnd 1: Continue from the panel’s last stitch.
– Top edge: 3 sc in the first st, 1 sc in each of the next 54 sts, then 3 sc in the last st.
– Down the side: 1 sc in each of 22 row ends (Rows 23 to 2).
– Bottom edge: 3 sc in the first foundation ch, 1 sc in each of the next 54 ch, then 3 sc in the last ch.
– Up the other side: 1 sc in each of 22 row ends.
– Sl st to the first sc.
This is a conversion round. The top and bottom are each 56 stitches worked one per stitch + 2 extra corner stitches = 58. Each side is 24 row ends + 2 extra corner stitches = 26. Total: 2 x 58 + 2 x 26 − 4 shared corner centers = 164.
Rnd 2: Ch 1, sc in each st around, with 3 sc in each corner center st. Sl st to join.
Each side gains 2 stitches: top and bottom are 60 each, and the sides are 28 each. Total: 2 x 60 + 2 x 28 − 4 = 172, which is 164 + 8 ✓. Fasten off.
Why the math works: The border is worked on one piece only, so the top edge starts from 1 panel x 56 stitches. Nothing is added except the corners. Two border rounds add 0.5 in (1.3 cm) on every side. That turns 16 x 6 in into 17 x 7 in (43.2 x 17.8 cm). As a check, 60 top stitches at 3.5 per inch is 17.1 in, which matches.
Joining
Use whipstitch and the matching yarn tails. Join stitch to stitch, one-to-one.
Pockets: Pin each pocket so its back center seam faces the panel. Sew the 16 back stitches of Rnd 29 (8 on each side of the seam) to 16 stitches of panel Row 18, one stitch to one stitch:
- Left plum pocket: Row 18, sts 1–16
- Lavender pocket: Row 18, sts 21–36
- Right plum pocket: Row 18, sts 41–56
That leaves 4-stitch gaps (sts 17–20 and 37–40) between the pockets. Check that 16 + 4 + 16 + 4 + 16 = 56. Counting the two border stitches at each end, the pocket centers sit 2.9 in (7.4 cm) from each edge and 5.7 in (14.5 cm) apart. Because the pockets bulge to 6.0 in (15.2 cm), they gently touch, just as in the finished piece.
Next, sew a vertical line of running stitches from the rim down the back center of each pocket, through Rnds 11–25, into the panel. This stops the pockets from tipping forward. The pocket bottoms will hang about 0.5 in (1.3 cm) below the panel.
Caps: Center a cap above each pocket’s back rim, with the loop pointing up. Overlap the rim by 0.25 in (0.6 cm) and whipstitch around the cap through the panel.
Tabs: Center one tab above each cap. Sew the end without the buttonhole to the back of the panel, overlapping it by 1 in (2.5 cm). Sew a button on the front of the panel so the buttonhole lands on it after the tab wraps over the rod.
Keep your sewing tension snug but not puckered: the panel must stay flat. Size checkpoint: after joining, the panel should still measure 17 in (43.2 cm) across.
Final Blocking
- Lightly mist the whole holder with water.
- Pin the panel flat to 17 x 7 in (43.2 x 17.8 cm).
- Stuff each pocket with a toilet roll wrapped in a plastic bag to set the round shape.
- Gently pinch the bobbles outward so they sit evenly.
- Smooth the rims so they are level.
- Let everything dry completely, then remove the rolls and pins.
Final Quality-Control Checklist
- Panel is 17 x 7 in (43.2 x 17.8 cm) and square at the corners.
- Each pocket has 7 bobble rounds, with all bobbles on the outside.
- Rims are 1.25 in (3.2 cm) deep and level.
- Pocket attachment lines are 16 stitches each, with 4-stitch gaps.
- Caps are centered and their loops stand upright.
- Buttons line up with the buttonholes.
- A roll fits each pocket easily.
- All tails are woven in securely.
Troubleshooting
- Bobbles show on the inside: You missed a turn. Bobble rounds must be worked with the inside of the pocket facing you.
- Base cups or ruffles: Check your counts, then change the hook size.
- Roll is too tight: Your gauge is tight. Go up half a hook size.
- Panel waves along the sides: Your border tension is loose. Work the border with a hook half a size smaller.
- Pockets lean forward: Add a second vertical tacking line.
- Tabs stretch: Use cotton, or work the tabs with a smaller hook.
Care
Hand wash in cool water and lay flat to dry, reshaping the pockets around rolls. Do not tumble dry.
Final Notes
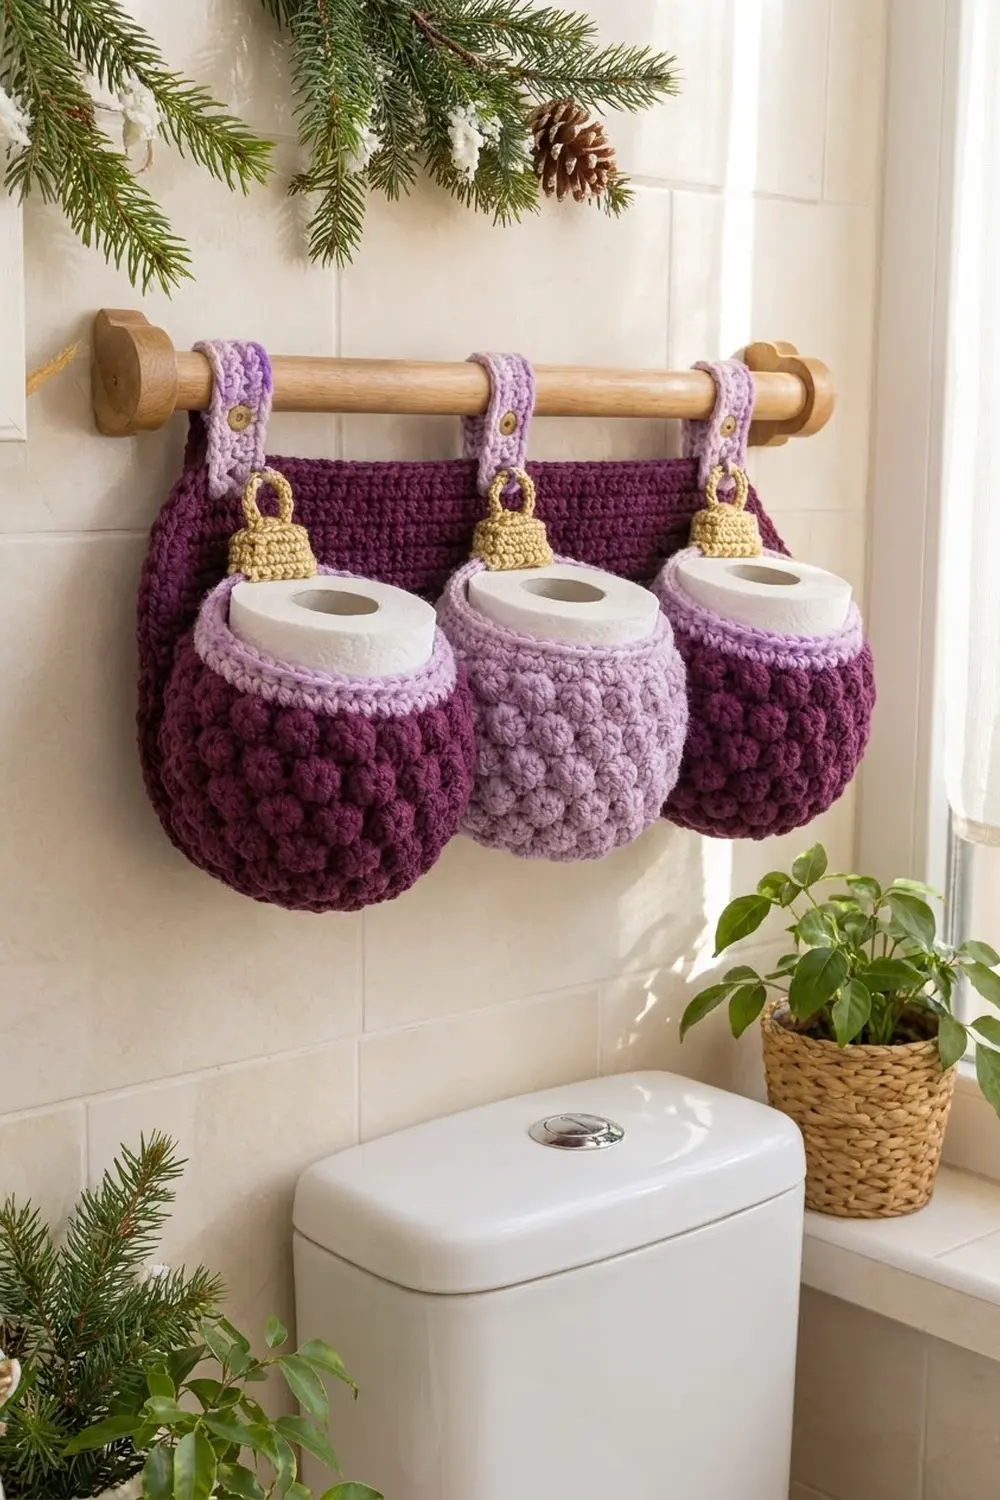
The measurement chain is simple. Check gauge at 3.5 sts per inch. The base should be 5.5 in (14.0 cm) and the body should bulge to 6.0 in (15.2 cm). The panel goes from 16 x 6 in (40.6 x 15.2 cm) to 17 x 7 in (43.2 x 17.8 cm) with the border. The pockets are sewn 16 stitches each, with 4-stitch gaps. If each checkpoint matches, your three sugarplum ornaments will hang evenly and hold a roll each.
Happy crocheting!
