
The Patchwork Christmas Ornament Appliqué Pattern is a charming sewing project that brings together the warmth of handmade decorations, the creativity of patchwork, and the timeless beauty of Christmas traditions. Whether you enjoy decorating your home for the holidays or creating meaningful handmade gifts, this festive appliqué design offers a wonderful opportunity to work with colorful fabrics, decorative stitching, and simple quilting techniques. One of the most appealing features of this project is its versatility, allowing beginners and experienced sewists to experiment with different Christmas prints, fabric combinations, and ornament shapes. The finished design can become part of a decorative wall hanging, a festive table runner, a quilted pillow, or a personalized holiday fabric panel. With careful fabric selection and a little patience, even small scraps of cotton can become beautiful Christmas ornaments that capture the joyful spirit of the season.
Creating a Christmas ornament fabric appliqué is also an excellent way to explore traditional sewing techniques while developing your own decorative style. Patchwork involves joining smaller pieces of fabric to create a larger design, while appliqué is the process of attaching fabric shapes to a background material. When these two techniques are combined, they produce decorative motifs with interesting colors, textures, and patterns. For this tutorial, the ornaments will feature coordinated Christmas fabrics, rounded shapes, decorative caps, and optional embroidered details. The project can be adapted to match classic red-and-green holiday decorations, elegant gold-and-cream arrangements, or playful combinations of pink, blue, and silver. Each fabric choice changes the personality of the finished piece, making the Patchwork Christmas Ornament Appliqué Pattern an enjoyable project for anyone who loves creative sewing.
Advertising
Another reason to try this handmade Christmas sewing pattern is that it can be completed using basic materials commonly found in a sewing room. Cotton fabric, coordinating thread, lightweight fusible web, a background panel, and ordinary sewing tools are enough to create an attractive decoration. You do not need an expensive embroidery machine or complicated quilting equipment to achieve a polished result. The instructions below explain how to prepare the fabric, create the ornament templates, assemble the patchwork sections, secure the appliqué shapes, and finish the design with attractive stitching. Measurements are provided in centimeters, while sewing terminology follows common practices used in the United States. By following each stage carefully, you can create a festive fabric decoration that looks beautiful on its own or becomes part of a larger Christmas quilting project.
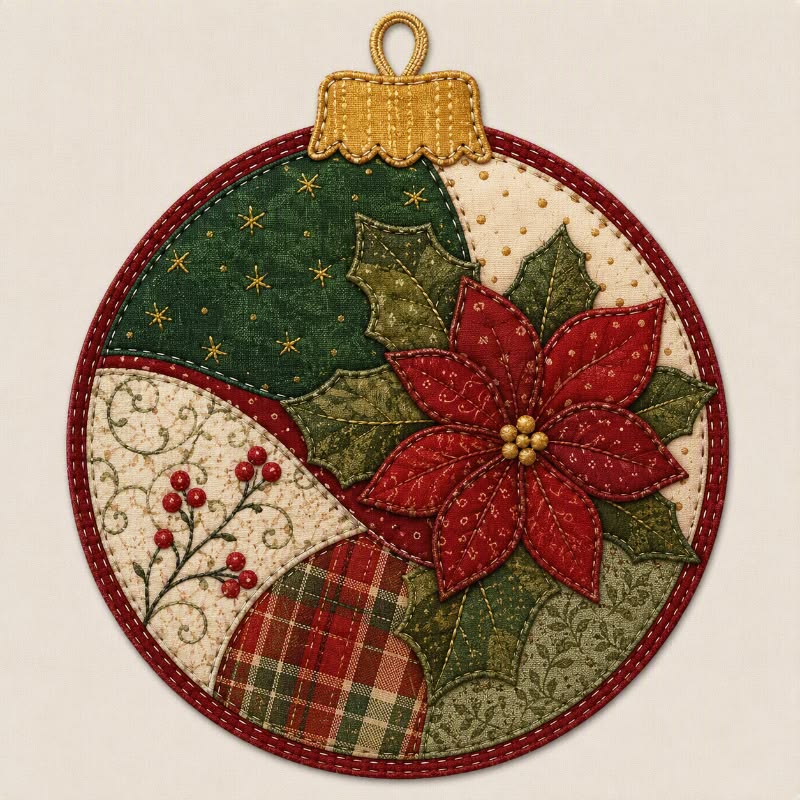
Materials and Fabric Preparation for the Patchwork Christmas Ornament Appliqué Pattern
The first step in creating your Patchwork Christmas Ornament Appliqué Pattern is choosing fabrics that complement one another. Quilting cotton is especially suitable because it is easy to cut, press, and sew without excessive stretching. Select three or four Christmas-themed fabrics featuring patterns such as snowflakes, stars, holly leaves, candy stripes, or traditional holiday checks. A combination of small and medium prints usually works better than using several large patterns together, particularly when working with small ornament shapes. For a classic Christmas appearance, combine red, forest green, cream, and gold. If you prefer a modern design, consider dusty pink, sage green, pale blue, and soft silver. The goal is to create enough contrast between the ornaments and the background so that every decorative detail remains visible.
For a beginner-friendly version, prepare a finished fabric panel measuring approximately 30 cm × 30 cm. Cut the main background fabric to 32 cm × 32 cm, allowing a 1 cm seam allowance around the edges. You will also need assorted fabric scraps measuring at least 12 cm × 12 cm for the ornament bodies, small pieces of contrasting fabric for the ornament caps, and narrow fabric strips for optional patchwork details. Prepare a piece of lightweight batting measuring 32 cm × 32 cm and a backing fabric of the same size if you plan to turn the appliqué into a quilted wall panel. Additional supplies include fusible web suitable for fabric appliqué, an iron, fabric scissors, a rotary cutter, a cutting mat, a quilting ruler, sewing pins or clips, and matching embroidery or sewing thread.
Before cutting the ornament pieces, wash the cotton fabrics if you normally prewash your quilting materials. This helps remove manufacturing finishes and reduces the possibility of uneven shrinkage after the finished project is cleaned. Allow the fabric to dry completely, then press each piece until it lies smooth and flat. Accurate pressing is particularly important when making patchwork Christmas decorations, because wrinkles can affect the shape and alignment of small appliqué pieces. If you are using metallic fabrics, specialty prints, or fusible materials, follow their care instructions and test the iron temperature on a small scrap first. A clean, properly prepared fabric surface makes cutting easier and helps the appliqué shapes maintain their intended dimensions throughout the sewing process.
Next, prepare the Christmas ornament appliqué templates. For this tutorial, create three ornament shapes: one round ornament measuring approximately 10 cm in diameter, one oval ornament measuring 8 cm wide and 12 cm tall, and one smaller round ornament measuring 7 cm in diameter. Draw the shapes on sturdy paper or lightweight template plastic, then cut them out carefully. For the ornament caps, create small rectangular or slightly curved shapes measuring approximately 2.5 cm wide and 1.5 cm tall. You can also prepare narrow hanging-loop templates if you want to include fabric loops rather than embroidered hanging strings. These dimensions are suggestions rather than strict requirements, so the shapes can be resized to suit the background panel or the intended final decoration.
Advertising
If you want the ornaments to feature traditional patchwork details, prepare several small fabric strips or geometric pieces before assembling the appliqué. For example, the largest round ornament can include two contrasting horizontal fabric sections, while the oval ornament can feature three vertical strips. Another attractive option is to create a miniature four-patch design inside one ornament using squares in alternating Christmas colors. When assembling these small patchwork units, use a consistent 0.6 cm seam allowance to reduce unnecessary bulk. Press the seams carefully after sewing, preferably toward the darker fabric when practical. The patchwork should be assembled into a fabric section large enough to accommodate the complete ornament template before the final ornament shape is cut.
Finally, organize the materials before beginning the sewing process. Keep the background fabric, ornament templates, fusible web, decorative fabrics, and thread within easy reach. Test a few stitches on a scrap fabric sandwich to determine which settings work best with your sewing machine. A straight stitch is useful for assembling patchwork sections, while a narrow zigzag or blanket stitch is excellent for securing appliqué edges. If you are new to fabric appliqué sewing, practice turning around a curved fabric edge before stitching the actual ornaments. This simple preparation helps you develop a steady sewing rhythm and makes the finished Christmas decoration look more balanced and professional.
How to Cut and Assemble the Christmas Ornament Patchwork Pieces
Begin by transferring the ornament templates onto the prepared fabrics. If you are using fusible web appliqué, trace the ornament outlines onto the paper side of the fusible web, following the manufacturer’s instructions. For symmetrical shapes such as circles and ovals, reversing the template is unnecessary, but directional designs should be traced in reverse when needed. Cut the fusible web slightly outside the traced lines, then fuse it to the wrong side of the chosen ornament fabric. Once the adhesive has cooled, cut precisely along the template outlines. Avoid cutting too quickly around curved sections, as smooth edges are essential for achieving a neat finished appearance. Repeat this process for all ornament bodies and their decorative caps.
For ornaments made with multiple patchwork fabrics, assemble the fabric sections before attaching the fusible web. A simple method is to sew two contrasting fabric rectangles together using a 0.6 cm seam allowance, press the seam flat, and then position the ornament template over the joined fabrics. Make sure the seam runs through the ornament in the desired direction. If you prefer a striped ornament, sew three or four narrow fabric strips together until the resulting patchwork section is large enough for the template. Press the assembled fabric carefully before applying the fusible web to the wrong side. This approach produces a true patchwork ornament appliqué, rather than simply placing separate fabric pieces next to one another on the background.
After cutting the ornament bodies, prepare the small decorative caps that represent the metal tops of traditional Christmas tree ornaments. These can be made from gold, silver, cream, or contrasting printed cotton fabric. Fuse a small piece of adhesive web to the wrong side of each cap fabric, then cut the cap shapes using the prepared templates. A cap measuring approximately 2.5 cm × 1.5 cm works well for the larger ornaments, while smaller caps can be used for the 7 cm design. You may add a tiny fabric tab at the top to imitate the attachment point for a hanging string. These small elements contribute significantly to the recognizable appearance of the Christmas ornament appliqué design.
Place the 32 cm × 32 cm background fabric on a clean, flat surface with the right side facing upward. Arrange the ornament bodies on the fabric without removing the fusible web backing paper at first. Position the largest ornament slightly below the center, then arrange the smaller shapes around it to create a balanced composition. Leave sufficient space between the ornaments for decorative hanging strings, embroidery, or quilting stitches. Try several arrangements before making a final decision. The ornaments can hang at different heights to create movement, or they can be positioned in a symmetrical arrangement for a more traditional look. This stage is an opportunity to personalize your Christmas patchwork wall hanging.
Once you are satisfied with the placement, lightly mark the ornament positions using a removable fabric marker. Peel the backing paper from the fusible web and return each ornament to its marked location. Follow the adhesive manufacturer’s instructions to fuse the shapes to the background, using a pressing cloth when appropriate. Lift and reposition the iron rather than sliding it across the fabric, because excessive movement may distort the appliqué pieces. Allow the adhesive to cool before handling the panel. Attach the decorative caps in the same manner, making sure they slightly overlap the upper edge of each ornament body. Proper fusing keeps the fabric shapes stable while you sew around their edges.
Before beginning the permanent appliqué stitching, inspect the entire design for loose edges, uneven placement, or unwanted wrinkles. Smooth any small areas that did not fuse completely, following the fusible web instructions. If your project includes tiny decorative fabric stars, bows, or geometric shapes, position them now so they can be stitched during the same sewing session. Avoid overcrowding the composition, especially if you are creating a smaller panel. The beauty of a handmade patchwork Christmas ornament pattern often comes from a thoughtful balance between colorful fabric, decorative stitching, and open background space. Taking a few extra minutes to review the arrangement will make the next stage easier and more enjoyable.
Step-by-Step Sewing and Appliqué Stitching Techniques
With the ornament shapes securely fused to the background, prepare your sewing machine for machine appliqué stitching. Install a suitable sewing needle, such as a universal 80/12 needle for ordinary quilting cotton, and thread the machine with a color that complements the fabric design. A narrow zigzag stitch is a practical choice for beginners because it secures the raw fabric edges while adding a decorative outline. Start with a stitch width of approximately 2 mm and a stitch length of 1.5 mm, then adjust the settings according to the thickness of your fabric and the desired appearance. Always test the stitch on a scrap before sewing the actual ornament panel. This helps prevent puckering and ensures that the stitches cover the fabric edges evenly.
Begin stitching around the largest ornament, working slowly along the curved outline. Position the zigzag so that one side of the stitch falls just inside the appliqué fabric and the other lands on the background fabric. This helps secure the raw edge and reduces fraying during normal handling. When sewing around a curve, stop occasionally with the needle lowered into the fabric, raise the presser foot, and rotate the panel slightly before continuing. Small adjustments create smoother curves than attempting to sew the entire ornament without stopping. If your sewing machine includes an open-toe appliqué foot, consider using it for improved visibility. Repeat the same process around the remaining ornament bodies.
After securing the main ornament shapes, stitch around the decorative caps using a matching or contrasting thread. A narrow blanket stitch is particularly attractive for this detail because it creates a handcrafted appearance similar to traditional hand appliqué quilting. If your machine does not offer a blanket stitch, a narrow zigzag or straight stitch can also work. When using a straight stitch close to a raw fabric edge, remember that some fraying may occur unless the fabric is adequately stabilized or the edges are turned under. For a more decorative finish, use metallic-look embroidery thread in gold or silver, provided it is compatible with your sewing machine. Adjust the needle and tension settings as recommended for specialty threads.
The next step is creating the hanging strings that visually connect the ornaments to the upper part of the panel. Use a removable fabric marker and a ruler to draw a straight or gently curved line from each ornament cap toward the top of the background. Stitch along these lines using a straight stitch, a narrow satin stitch, or a decorative embroidery stitch. You can also use hand embroidery with backstitch or stem stitch for a softer, more traditional appearance. Choose thread colors that coordinate with the ornament caps, such as gold, cream, dark green, or silver. These stitched lines give the impression that the fabric ornaments are hanging gracefully, making the Christmas ornament quilt appliqué more visually complete.
To add depth and texture, consider decorating the ornament bodies with additional embroidery or quilting details. Small stars, curved lines, snowflakes, and simple geometric patterns can be stitched directly onto the fabric. If the ornaments contain patchwork seams, decorative topstitching along those seams can emphasize the different fabric sections. Use a contrasting thread color when you want the stitching to stand out, or choose a matching thread for a subtle appearance. Beginners should start with simple lines or small motifs before attempting intricate free-motion quilting. The purpose of these embellishments is to enhance the original fabric design rather than cover it completely. A few carefully placed stitches often create a more elegant result than excessive decoration.
Once all the appliqué stitching is complete, examine the back of the panel and trim loose thread ends. Press the fabric gently from the wrong side using a pressing cloth and an appropriate iron temperature. If you plan to create a quilted decoration, place the backing fabric wrong side up, position the batting over it, and lay the appliquéd top right side up. Smooth the layers and secure them with quilting pins or temporary basting spray suitable for fabric. Quilt around the ornaments or add simple background quilting, keeping the layers flat as you work. This creates a soft, textured quilted Christmas appliqué panel that is suitable for wall decorations, festive pillows, or other seasonal sewing projects.
Finishing, Decorating, and Caring for Your Handmade Christmas Appliqué
After completing the appliqué and quilting, the final stage is preparing the panel for display or incorporating it into another sewing project. If you are making a Christmas patchwork wall decoration, trim the quilt sandwich to a neat 30 cm × 30 cm square, checking that the corners are square and the edges are straight. A rotary cutter and quilting ruler make this process easier, but fabric scissors can also be used with care. Before trimming, confirm that the finished composition has sufficient space around the ornament shapes. A balanced border helps frame the design and gives the decorative panel a more polished appearance. If you prefer a larger finished piece, add fabric borders before assembling the quilt sandwich.
To finish the outer edges, prepare a double-fold quilt binding from coordinating cotton fabric. For a small panel, cut binding strips approximately 6 cm wide and join them as needed to create enough length to surround the entire project. Fold the binding strip in half lengthwise with the wrong sides together and press. Align the raw edges of the binding with the raw edges of the quilted panel, then sew it in place using a 0.6 cm seam allowance. Fold the binding around to the back and secure it with hand stitches or machine stitching. Miter the corners carefully for a neat appearance. A red, green, cream, or gold binding can complement the Patchwork Christmas Ornament Appliqué Pattern beautifully.
If you want to hang the finished panel on a wall, add a simple fabric hanging sleeve to the back. Cut a rectangle of fabric approximately 25 cm wide and 8 cm tall, then finish the short edges with narrow hems. Fold the strip lengthwise with the wrong sides together and position it near the upper edge of the panel. Secure the sleeve to the backing without stitching through the decorative front, leaving enough room for a small wooden dowel or hanging rod. Alternatively, sew two small fabric loops to the upper corners. These options allow the handmade Christmas appliqué decoration to be displayed without damaging the finished fabric surface.
Another creative possibility is transforming the appliqué into a decorative holiday pillow. Instead of adding a hanging sleeve, use the completed fabric panel as the front of a pillow cover. For a pillow measuring approximately 30 cm × 30 cm, prepare a matching backing with an envelope closure or zipper. If using an envelope closure, cut two backing rectangles approximately 32 cm wide and 23 cm tall, hem one long edge of each piece, and overlap the hemmed edges to form the back. Place the pillow front and backing right sides together, sew around the perimeter using a 1 cm seam allowance, and turn the cover right side out. Insert a pillow form and gently shape the corners. The resulting Christmas ornament patchwork pillow adds a handmade touch to a sofa, chair, or guest room.
Proper care helps preserve the colors, stitching, and fabric texture of your completed project. If the panel contains ordinary cotton fabrics and washable batting, gentle washing may be appropriate, but always consider the requirements of every material used. Decorative metallic threads, delicate embellishments, and certain fusible products may require special handling. For a wall decoration, light dusting or careful spot cleaning is often sufficient. If washing is necessary, use cool water, a mild detergent, and a gentle cycle when compatible with the materials. Avoid harsh bleach and excessive heat, which may affect fabric colors or adhesive-backed appliqué details. Allow the finished piece to dry thoroughly before storing or displaying it again.
The Patchwork Christmas Ornament Appliqué Pattern can also inspire additional seasonal projects. Once you understand the basic process, experiment with different ornament sizes, fabric combinations, and background colors. Create a coordinated set of Christmas placemats, a long table runner featuring several hanging ornaments, or a collection of miniature appliqué blocks for a holiday quilt. You can also personalize the ornaments with embroidered initials, meaningful dates, or small fabric hearts. These details make handmade Christmas decorations especially suitable for thoughtful gifts. Most importantly, enjoy the creative process and allow each new project to reflect your own sewing style, favorite holiday colors, and personal Christmas traditions.
