
Fern Leaf (make 24)
Ch 25.
Side 1: Sl st in 2nd ch from hook and in the next 3 ch. This makes a stem of 4 sl sts.
Now work along the spine: Leaflet, then sl st in next 2 ch; repeat from * 9 more times. Use the leaflet sizes in this order:
– First 3: long
– Next 4: medium
– Last 3: short
This side ends at the last chain. (10 leaflets + 20 spine sl sts)
Tip leaflet: Ch 4, sl st in 2nd ch from hook, sc in next ch, hdc in next ch. (3 sts)
Side 2: Rotate the leaf and work into the free loops of the foundation chain. Sl st in next 2 loops, Leaflet; repeat from * 9 more times. Use the leaflet sizes in this order:
– First 3: short
– Next 4: medium
– Last 3: long
Sl st in the 4 stem loops and fasten off.
Total: 74 + 3 + 74 = 151 sts. The leaf measures 5 x 2.5 in (12.7 x 6.4 cm).
The leaflets on Side 2 sit one chain offset from those on Side 1, which gives the alternating look of a real fern.
Bead (make 36)
Rnd 1: Magic ring. Ch 2 (does not count), then 12 dc in the ring. Close the ring, leaving a small hole, and join. (12 dc)
Rnd 2: Ch 1, sc in next st, 2 sc in next st; repeat from * around. Join. (18 sc)
Fasten off. The bead measures 1 in (2.5 cm) across.
Tassel (make 12)
- Wrap yarn 30 times around the 3.5 in (8.9 cm) card.
- Tie the top of the bundle tightly with a 10 in (25.4 cm) strand. Leave both ends long; you’ll use them to tie the tassel onto the cord.
- Cut the bottom loops.
- Wrap a separate piece of yarn around the tassel 0.5 in (1.3 cm) below the top to form the neck. Knot it and bury the ends inside the tassel.
- Trim the tassel to 3 in (7.6 cm).
Make All Pieces
You need the following, all in sage green:
– 1 valance
– 24 flowers
– 24 leaves
– 36 beads
– 12 tassels
Strand layout (top to bottom; L = leaf, F = flower, B = bead, T = tassel)
Every strand uses 2 leaves, 2 flowers, 3 beads and 1 tassel.
Joining
Each strand is one continuous chain cord, worked from the top down. Where the cord meets a motif, it attaches at the motif’s top point, crosses the back of the motif, and continues from the motif’s bottom point.
Attachment points for each motif:
– Leaf: Sl st into the stem end. Sl st loosely from the WS through the center of each of the 24 spine chains. Ch 2, then sl st into the tip leaflet’s point.
– Flower: Sl st into the first sc of the 2-sc pair at one petal tip. Ch 17 loosely across the WS, then sl st into the matching sc on the opposite petal (the 5th petal along).
– Bead: Sl st into sc 1. Ch 4 across the WS, then sl st into sc 10.
To build a strand:
1. Leave an 8 in (20.3 cm) tail and make a slipknot.
2. Ch 10, which makes 2 in (5.1 cm) of cord. Place a marker in the first ch; this is the attachment ch.
3. Attach the first motif.
4. Between motifs, ch 5 to make 1 in (2.5 cm) of cord. Each strand has 7 of these 1 in cords.
5. After the last bead, ch 5 and fasten off. Thread the tassel’s tie ends through the last ch, knot them twice and bury the ends.
Keep the chains on the back of each motif slightly snug. If they’re too loose they sag below the motif, and if they’re too tight they cup the motif.
Make sure every motif faces RS out before you attach it. The flowers should hang from a petal tip, not from the gap between two petals.
Strand size check: 9 in (22.9 cm) of cord + 20 in (50.8 cm) of motifs + 3 in (7.6 cm) of tassel = 32 in (81.3 cm). Hang each strand and compare it to the first one. They should match within 0.5 in (1.3 cm).
The strands are attached to the valance in Border Rnd 2.
Border
Border gauge: 18 sc = 4 in (10.2 cm). On the side edges and points, work 2 sc in each dc row-end and 1 sc in each sc row-end.
In this border, the corner ch-1 sps are not counted in the side totals.
Rnd 1: With RS facing, join yarn in the free loop of the first foundation ch at a top corner.
1. Ch 1, then sc in each of the 180 free loops across the top. (Top: 180 sc)
2. Ch 1 for the corner.
3. Work 16 sc down the side of the valance body: 1 + (7 x 2) + 1.
4. Along the bottom, for each point: work 16 sc down the slope (8 rows x 2), then (sc, ch 2, sc) in the tip, then 16 sc up the next slope. (34 sc per point; bottom: 12 x 34 = 408 sc)
5. Work 16 sc up the other side.
6. Ch 1 for the corner, then join.
Total: 180 + 16 + 408 + 16 = 620 sc.
Rnd 2: Ch 1.
– Top: Sc in each sc across. (180 sc)
– Each corner: Work (sc, ch 1, sc) in the ch-1 sp. (2 sc)
– Each side: Sc in each sc. (16 sc)
– Each point: Sc in the next 17 sc. In the tip ch-2 sp, work: sc, ch 2, sl st through the marked attachment ch of the strand, ch 2, sc. Then sc in the next 17 sc. Attach the strands in layout order, 1 through 12. (34 + 2 = 36 sc per point; bottom: 432 sc)
Join and fasten off. Total: 620 + 4 + 24 = 648 sc.
Why the math works:
– 180 sts at 4.5 sts per inch equals 40 in. That’s the same width as the valance body, so the top edge lies flat without stretching.
– 180 sts also divides exactly into 12 points of 15 sts each, so each point gets its own strand.
– Each round adds 0.25 in (0.6 cm) on every edge. After two rounds the valance is 41 x 9 in (104.1 x 22.9 cm).
Final Blocking
- Soak the valance and all strands in cool water, then press out the water in a towel.
- Pin the valance to 41 x 9 in (104.1 x 22.9 cm). Keep the top edge straight and pin each point tip so it hangs straight down.
- Lay each strand out flat. Pin the flower petals into even curves, and spread the fern leaflets outward so they angle evenly.
- Pin each strand to 32 in (81.3 cm). Don’t stretch the cords.
- Fluff the tassels and let them hang over the edge of the mat.
- Let everything dry completely before you unpin it.
Final Quality-Control Checklist
- [ ] The valance measures 41 in (104.1 cm) wide, and the top edge is straight.
- [ ] All 12 points are 4 in (10.2 cm) deep and have a strand attached.
- [ ] The strands alternate A, B across the width.
- [ ] Every strand is 32 in (81.3 cm) long.
- [ ] All motifs face RS out.
- [ ] The cords on the backs of the motifs are hidden and lie flat.
- [ ] All tails are woven in, and the tassels are trimmed evenly.
Troubleshooting
- The valance top ruffles: Your Border Rnd 1 has too many sts. Make sure there are exactly 180 sc along the top.
- The points curl: Your dc2tog decreases are too tight. Work them more loosely, and block the points firmly.
- The flowers cup: Rnd 2 loops are too short or Rnd 3 is too tight. Check that the loops are ch 7 and keep the dc relaxed.
- The leaves twist: Your spine sl sts are too tight. Rework them more loosely and steam the leaf.
- The strands are uneven lengths: Count the cord chains. The top cord should be ch 10 and each connecting cord ch 5.
Care
Hand wash in cool water with a mild soap and dry flat, re-pinning the points and leaves. Don’t wring or tumble dry.
Final Notes
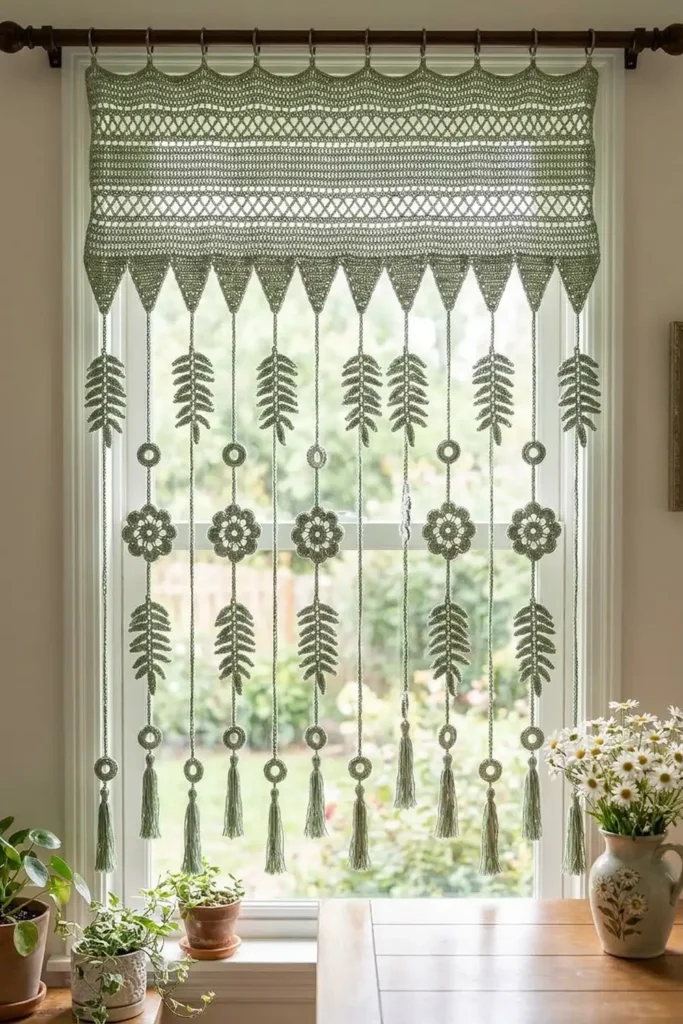
Everything in this curtain follows from a few key measurements:
– 18 sts = 4 in (10.2 cm) gives a 40 in (101.6 cm) valance body of 180 sts.
– Those 180 sts divide into 12 points of 15 sts each, so there are exactly 12 strands.
– The two border rounds bring the valance to 41 x 9 in (104.1 x 22.9 cm).
– Each 32 in (81.3 cm) strand brings the total length to 41 in (104.1 cm).
Check your measurements at each of these stages and the finished curtain will come out to the planned size.
Happy crocheting!
