
- Body: 1, in Petrol Teal
- Hanging ring: 1, in Petrol Teal
Layout (front view):
Hanging Ring
Rnd 1: Join the yarn around the 3 in (7.6 cm) ring with a sl st. Ch 1 and work 32 sc over the ring, pushing the stitches together as you go so none of the core shows. Sl st to the first sc to join. (32 sts)
If you can still see the core, add sc in multiples of 2 until it’s covered, and write down your final count.
Rnd 2: Ch 1, sl st in BLO of each sc around. Join. (32 sts)
This round rolls the front loops outward, which gives the ring its thick, rounded look. The ring should now measure 3.75 in (9.5 cm) across the outside and about 2.25 in (5.7 cm) across the inner opening.
Tab: Fold the ring so the join sits at the bottom. Join the yarn in the 3rd st to the right of the join.
– Row 1: Ch 1, sc in the BLO of the next 6 sts. Turn. (6 sts)
– Rows 2–5: Ch 1, sc in each st across. Turn. (6 sts)
The tab measures 2 in (5.1 cm) wide and about 1.75 in (4.4 cm) long. Fasten off and leave a 12 in (30.5 cm) tail for sewing.
Joining
You’ll finish the rim (next section) before joining. Here is the joining method so you can plan for it.
Method: Whipstitch with the yarn tail, through both loops.
Stitch-to-stitch logic: Flatten the body so the round joins sit at center back, then mark the 6 rim sts centered on that line (3 on each side of the join). Lay the tab inside the pouch so its last row sits 1 in (2.5 cm) below the top edge. Sew each of the 6 tab sts to 1 rim st, matching them one to one. Then sew the two side edges of the tab down to the inside wall.
Tension: Pull each stitch snug but not tight. If you pull too hard, the rim puckers into a V at the back.
Size checkpoint: When you hang the holder, the ring should stand about 3 in (7.6 cm) above the rim. The overall height should be about 11.5 in (29.2 cm).
Rim (Border)
Rim gauge: 3 sc rnds = 1 in (2.5 cm), and 36 sts = 12 in (30.5 cm) around.
When you flatten the pouch, the rim has 18 sts across the front and 18 across the back. Each quarter of the circle has 9 sts.
Rnd 18: Ch 1, sc in each st around. Join. (36 sts: 18 front / 18 back)
Rnd 19: Ch 1, sc in each st around. Join. (36 sts: 18 front / 18 back)
Rnd 20: Ch 1, sc in each st around, working a little more loosely. Fasten off with an invisible join. (36 sts: 18 front / 18 back)
Why the math works: Rnd 17 brought the count down to 36 by making 6 evenly spaced decreases twice. Since 36 divides evenly into halves (18) and quarters (9), the rim lies symmetrically when the pouch is flattened. You don’t add or remove any stitches in the rim, so it stays exactly 12 in (30.5 cm) around. Three straight rounds of sc above the decreases curve slightly inward, and that gives the rolled look of the sample.
The edge of the dispensing hole is Rnd 1 itself: 12 sc worked into the chain. It’s firm and needs no extra edging. Weave in all the ends on the inside.
Final Blocking
- Spritz the body lightly with water until it’s damp but not soaked.
- Stuff it firmly with a rolled towel or a bundle of plastic bags until it’s round.
- Gently push the shells into even, staggered columns with your fingers.
- Press the rim into a smooth circle 12 in (30.5 cm) around.
- Lay the ring flat and pat it into a true circle 3.75 in (9.5 cm) across.
- Let it air dry completely, about 24 hours, before you remove the stuffing.
- Check that the flat width is 8 in (20.3 cm) and the height is 8.5 in (21.6 cm).
Final Quality-Control Checklist
- The dispensing hole is about 1.25 in (3.2 cm) across and lets a bag through smoothly.
- The base is 16 in (40.6 cm) around at Rnd 7.
- All 7 shell rounds have exactly 8 shells.
- The shells sit staggered, with no two stacked straight on top of each other.
- The opening is 12 in (30.5 cm) around, and the rim is 3 rounds deep.
- The ring core is fully covered with 32 sc (or your adjusted count).
- The tab is centered at the back and sewn 1 in (2.5 cm) below the rim edge.
- All ends are woven in on the inside.
Troubleshooting
The bottom ruffles instead of cupping: Your tension on the base rounds is loose. Go down a hook size for Rnds 1–7 only.
The bottom is flat and pointed: You probably missed increases. Recount each round against the stitch counts above.
The shells lean or drift: Make sure each sc goes into the center (3rd) dc of a shell, and that each shell goes into an sc.
One shell is missing: The count for that round is under 48. Rip back and recount.
The rim flares: Work Rnds 18–20 with a hook one size smaller.
The ring core shows: Add 2 more sc in Rnd 1 and push the stitches together tightly.
The holder tips forward when hanging: Sew the tab lower, so its last row sits 1.25 in (3.2 cm) below the top edge.
Care
Spot clean if you can. If needed, hand wash in cool water, reshape it around a towel, and lay it flat to dry. Don’t put it in the dryer.
Final Notes
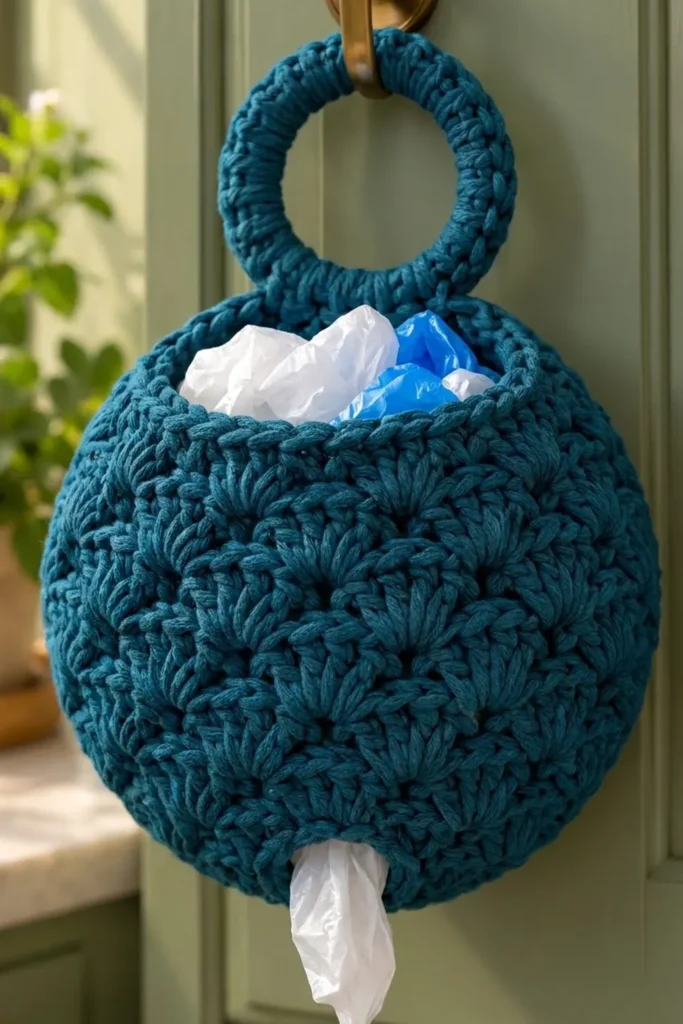
The measurement chain is simple. A 12-chain hole grows to 48 sts and 16 in (40.6 cm) around at the base. The 7 shell rounds hold that 48-stitch width up to about 7.75 in (19.7 cm). Two decrease rounds bring the opening to 36 sts and 12 in (30.5 cm). A 1 in (2.5 cm) rim finishes the top, and the covered ring 3.75 in (9.5 cm) across hangs it all. If you check each of those numbers as you go, your holder will finish at 8 in (20.3 cm) wide and 8.5 in (21.6 cm) tall.
Happy crocheting!
