
Ch 6 with pink. Row 1: dc in the fourth chain from the hook and in the next two chains . Turn. Row 2: ch 3, skip the first dc, dc in each of the next three stitches . The last dc goes into the top of the previous starting chain. Fasten off with a long sewing tail.
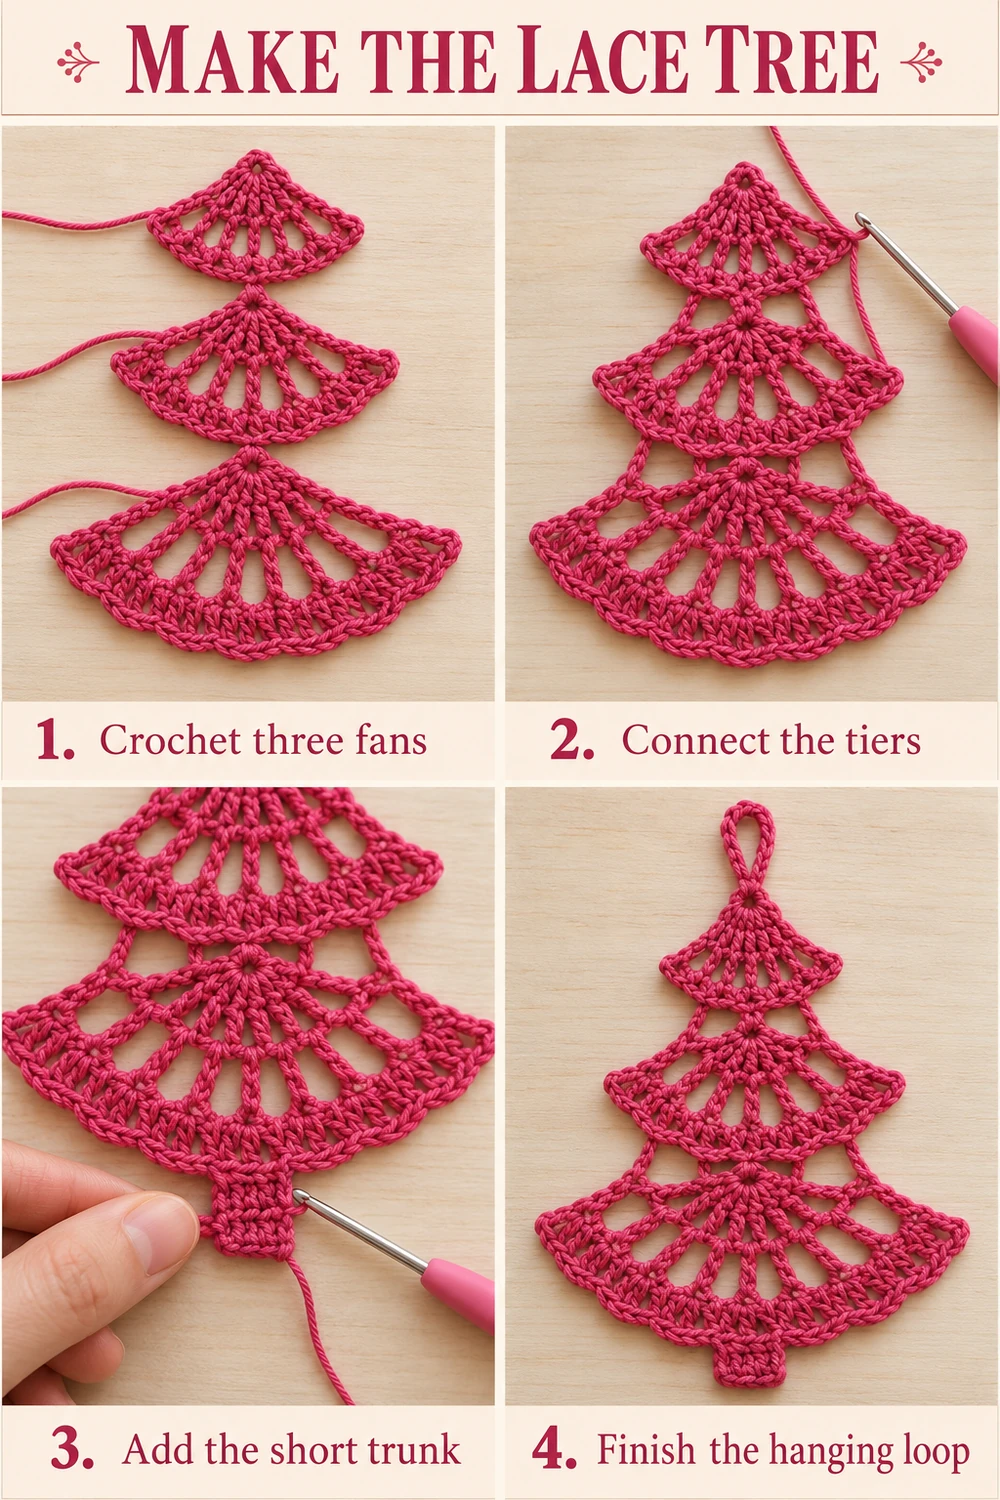
Center the short rectangle beneath the large fan. Sew the upper trunk edge to a short section of dense stitches around the middle of the fan’s lower edging, keeping the seam hidden on the back. Spread the seam across several sc rather than attaching the whole trunk to one open chain space.
Let the trunk project straight down from the tree center. It should be visibly shorter and narrower than the lowest fan. Weave in the beginning tail on the back of the rectangle.
7. Hanging Loop
Ch 25 with pink and fasten off with long tails. Fold the chain into a loop and sew both ends to the back of the small fan’s MR area, catching several dense loops in different directions. Make at least four passes before weaving in the ends.
Lift the ornament gently by the loop. Check that all three fans stay centered, both side bridges have matching lengths, and the trunk points down. Add a hidden sewing pass to any joint that moves excessively.
Finishing and Care
Give the assembled tree a final light blocking, pinning the tier corners and trunk squarely. Keep the chain bridges open without pulling them taut. Let the piece dry fully before displaying it.
For a firmer decoration, test fabric stiffener on a cotton sample and follow its label. Preserve the holes between tiers rather than filling them with stiffener. Spot-clean gently, reshape while damp, and dry flat. Store between tissue so the fan edges do not catch on other decorations. This is a hanging display ornament with a long loop; keep it away from young children and pets.
Questions and Tips
Can I work it in another color? Yes. Use the same yarn weight for the fans, bridges, and trunk to keep the proportions consistent. Raspberry pink matches the reference.
Why are the fans separate? This adaptation uses individual fans and sewn chain bridges to reproduce the open spaces clearly. It is not one continuous triangle.
Why is my tree leaning? Check that the center bridges attach to the middle sc of the upper fan and to the MR of the lower fan, then compare the lengths of the two side bridges. Pin everything before the final sewing passes.
Can I make it larger? Use a thicker yarn with a matching hook and sample the top fan first. The finished shape and hanging weight will change, so strengthen the loop attachment if needed.
Two Complete Tree Charts
Both chart images show the entire tree silhouette: all three fan foundations, their chain-edged curves, the six connecting chains, the short trunk, and the hanging loop. Dashed marks show sewing at the bridge ends. The finished tree photo is below each chart, in two different compositions. Use the written counts for each separate component.
More Free Christmas Crochet Patterns
- Pink Pearl Christmas Tree
- Lace Bell Ornament
- Wooden Bead Christmas Elf
Save This Pattern
Save this simple lace tree for your handmade Christmas decorations. Happy crocheting from Lovely Amigurumi!
Tutorial, Two Crochet Charts, and Pinterest Gallery
One step-by-step photo tutorial and two complete chart-above-photo guides appear first, followed by three Pinterest images. All six images are grouped here at the end.
More Free Crochet Patterns
Find your next handmade project with these lovely patterns.
Christmas Lace Star Crochet Pattern – Free Five-Point Ornament Guide
View Pattern →
Granny Stitch Gingerbread Crochet Pattern – Free Ornament Guide
View Pattern →
Blue Lace Snowflake Crochet Pattern – Free Ornament Guide
View Pattern →
CONTENT END 1
