
Row 10 (WS): Ch 1, sc 2, bo, sc 2, bo in the ch, sc 2, bo, sc 2, bo, sc 2, turn. (14 sts: 10 sc + 4 bo – bobbles in columns 3, 6, 9 and 12)
Row 11 (RS): Ch 1, sc in each st across, turn. (14 sts)
Part 4: Sides of the Hole
Work the two sides of the bowl separately for 7 rows.
Left side – Row 12 (WS): Ch 1, sc 2, bo, sc 2, turn. Leave the remaining 9 sts unworked. (5 sts)
Row 13 (RS): Ch 1, sc 5, turn. (5 sts)
Rows 14-18: Repeat Rows 12-13 twice, then Row 12 once, working only these 5 sts. (5 sts each)
Fasten off. Bobbles sit in column 3 on Rows 12, 14, 16 and 18.
Right side – Row 12 (WS): With the WS facing, skip the next 4 unworked sts of Row 11 (columns 6-9) and join cream in the next st. Ch 1, sc 2, bo, sc 2, turn. (5 sts – columns 10-14)
Rows 13-18: Work as for the left side. (5 sts each) Do not fasten off. Bobbles sit in column 12.
Check the hole: 4 sts x 7 rows, about 0.67 x 1.0 in (1.7 x 2.5 cm).
Part 5: Top of the Bowl
Row 19 (RS): Ch 1, sc 5 across the right side, ch 4, sc 5 across the left side, turn. (14 sts: 10 sc + 4 ch)
Row 20 (WS): Ch 1, sc 2, bo, sc 2, bo in next ch, sc 2, bo, sc 2, bo, sc2tog, turn. (13 sts: 8 sc + 4 bo + 1 sc2tog)
Row 21 (RS): Ch 1, sc2tog, sc 11. (12 sts: 11 sc + 1 sc2tog)
Fasten off. The two decreases round off the top right corner of the bowl. The top left corner stays square to hold the key ring.
Bobble count: 4 on the leg, 4 on Row 10, 8 on Rows 12-18 and 4 on Row 20, for 20 bobbles in total.
Measure now: 2.33 x 3.0 in (5.9 x 7.6 cm). Weave in all cream ends on the WS.
Part 6: Tulip Appliqué
Tulip head (burgundy): Ch 3.
Row 1: Sc in 2nd ch from hook and next ch, turn. (2 sts)
Row 2: Ch 1, 2 sc in each st, turn. (4 sts)
Row 3: Ch 1, sc 4, turn. (4 sts)
Row 4: Ch 1, sc in first st, ch-2 picot, sc in next st, ch-2 picot, sc in next st, sc in last st, ch-2 picot. (4 sc + 3 picots)
The three picots make the left, center and right petal tips. Fasten off, leaving a 10 in (25.4 cm) tail. The head is about 0.67 in (1.7 cm) wide.
Stem (green): Ch 5, sl st in 2nd ch from hook and in each ch across. (4 sl st) Fasten off, leaving an 8 in (20.3 cm) tail. The stem is about 0.5 in (1.3 cm) long.
Leaves (green, make 2): Ch 5. Sc in 2nd ch from hook, hdc in next 2 ch, then work (sc, ch 2, sc) in the last ch for the tip. Working in the free loops on the other side of the chain, hdc in next 2 ch, sc in next ch, sl st in first sc. (8 sts + ch-2 tip) Fasten off, leaving an 8 in (20.3 cm) tail. Each leaf is about 0.6 in (1.5 cm) long.
Set the appliqué parts aside. You sew them on after the border and blocking.
Border
Border gauge: Work 1 sc in each st along stitch tops and foundation chains, and 1 sc in each row end along the sides. Each outer corner gets 3 sc. The narrow notch between stem and leg gets 1 sc2tog.
Rnd 1 (burgundy, RS facing): Join burgundy in the first st of Row 21 (top right corner) and work:
- Top edge: 3 sc in first st, sc 10, 3 sc in last st. (16 sts)
- Left edge: 1 sc in each row end of Rows 20-2. (19 sts)
- Stem bottom: 3 sc in first free loop of the foundation ch, sc 3, 3 sc in last free loop. (9 sts)
- Inner stem edge and notch: 1 sc in each row end of stem Rows 2-7. Sc2tog over the Row 8 row end of the stem and the Row 8 row end of the leg. 1 sc in each row end of leg Rows 7-2. (13 sts)
- Leg bottom: 3 sc in first free loop, sc 3, 3 sc in last free loop. (9 sts)
- Outer leg edge: 1 sc in each row end of Rows 2-8. (7 sts)
- Under the bowl: 1 sc in each of the first 2 free loops of the Row 9 ch, 3 sc in the last free loop at the corner. (5 sts)
- Right edge of bowl: 1 sc in each row end of Rows 10-20. (11 sts)
Sl st to the first sc. (89 sts) Fasten off.
Hole edge (burgundy, RS facing): Join in the first unworked st of Row 11 at the bottom of the hole. Work 1 sc in each of those 4 sts (4), 1 sc in each row end of the right side, Rows 12-18 (7), 1 sc in each free loop of the Row 19 ch-4 (4), and 1 sc in each row end of the left side, Rows 18-12 (7). Sl st to the first sc. (22 sts) Fasten off.
You don’t need extra stitches at these corners because they turn inward. The visible hole is now about 0.5 x 0.75 in (1.3 x 1.9 cm).
Why the math works: Each sc row end is about 0.14 in (0.4 cm) tall and each sc is about 0.17 in (0.4 cm) wide. So 1 sc per st and 1 sc per row end match the edge closely, and the small difference is absorbed by the border tension. Three sc at each outer corner turn the 90-degree angle without cupping. The sc2tog at the notch prevents crowding where stem and leg sit only 1 st apart. The border adds about 0.17 in (0.4 cm) to each edge, so the width goes from 2.33 in to 2.67 in and the height from 3.0 in to 3.33 in.
Final Blocking
- Weave in all burgundy ends along the border on the WS.
- Lightly mist the letter with water. Do not soak it.
- Lay it RS up on the blocking board, using the grid to keep the stem straight.
- Pin each outer corner, the top right curve and the bottom of the leg so the letter measures 2.67 x 3.33 in (6.8 x 8.5 cm).
- Pin the hole into a neat rectangle. Do not press on the bobbles.
- Let it dry completely, for at least 4 hours.
- Unpin. Place the tulip head over Rows 4-8 of the lower stem, centered on columns 1-5. Put the green stem below it and angle one leaf up on each side of the stem.
- Sew each part down with its own tail, using small stitches through the outer loops so nothing shows on the back.
- Open the jump ring with the two pliers. Pass it through the top left corner of the border and Row 21 below it, add the key ring chain, and close the ring fully.
Final Quality-Control Checklist
- The letter measures 2.67 x 3.33 in (6.8 x 8.5 cm).
- Stem and leg rows have 5 sts; Rows 9, 10, 11 and 19 have 14; Row 20 has 13; Row 21 has 12.
- There are 20 bobbles, all popping out on the RS.
- The outer border has 89 sc and the hole border has 22 sc.
- Corners lie flat, with no ruffles or cupping.
- The hole is clear and square, about 0.5 x 0.75 in (1.3 x 1.9 cm).
- The tulip, stem and leaves are flat and secure.
- The jump ring is closed with no gap.
Troubleshooting
- Leg leans the wrong way: The sc2tog goes at the start of the RS row and the increase at the end. If you reverse them, the leg slants right.
- Bobbles sink to the back: Work them only on WS rows, and keep the sc after each bobble snug.
- Border ruffles along the sides: Your border tension is loose. Redo it a little tighter, or use a hook 0.25 mm smaller for the border only.
- Border cups at corners: Check that you worked exactly 3 sc in each corner.
- Notch puckers: Make sure the sc2tog spans the two Row 8 row ends.
- Hole looks lopsided: Count 7 rows on each side before you work Row 19.
- Tulip lifts at the edges: Add a few tacking stitches at the picot tips and leaf tips.
Care
Spot clean with a damp cloth and mild soap, then pin flat to dry. Don’t machine wash it, because the metal ring can snag the stitches.
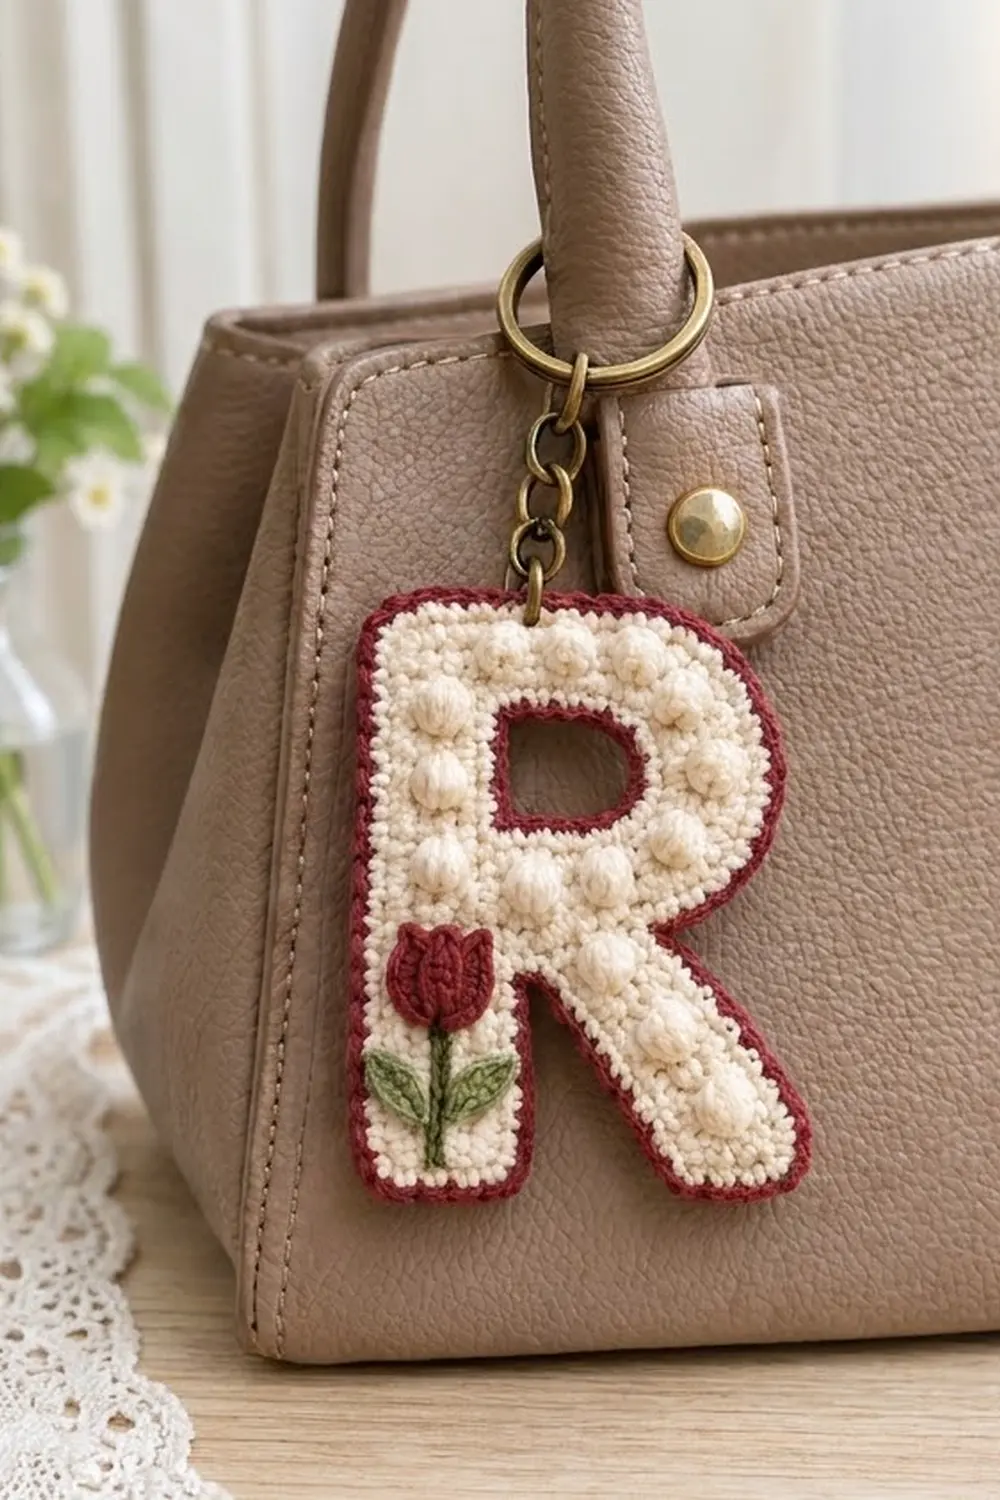
Final Notes
The measurement chain is simple. The 5-st stem and leg are 0.83 in (2.1 cm) wide. The 14-st body is 2.33 in (5.9 cm) wide and 21 rows make it 3.0 in (7.6 cm) tall. One burgundy border brings the letter to 2.67 x 3.33 in (6.8 x 8.5 cm). Check each step, and your R will come out flat, crisp and ready for your keys or bag.
