
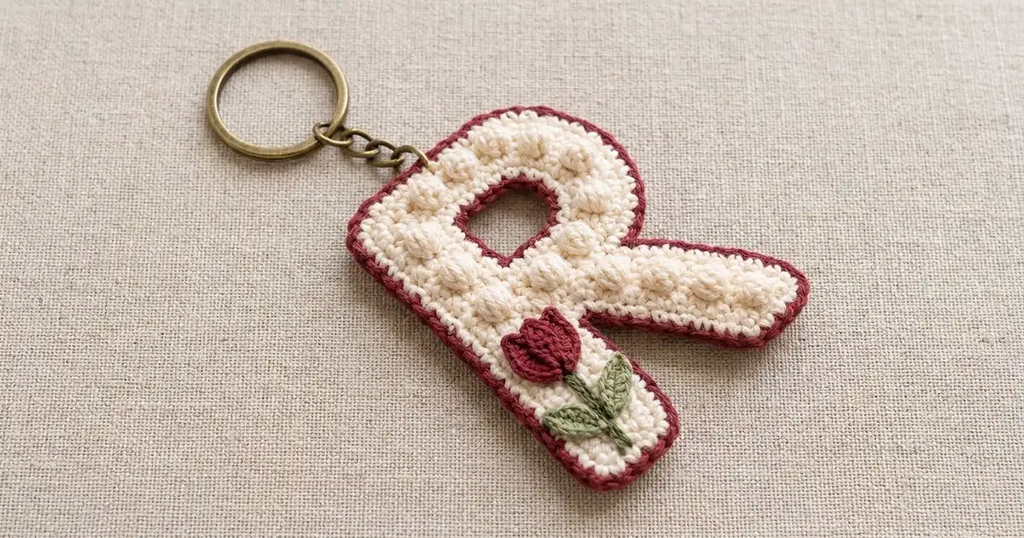
This little keychain is a crocheted capital “R” with a soft, pearly texture. The letter is worked in cream single crochet. Raised cream bobbles run in neat lines down the stem, around the bowl and along the slanted leg. The inside of the bowl is left as a real hole, so the letter is easy to read from across the room.
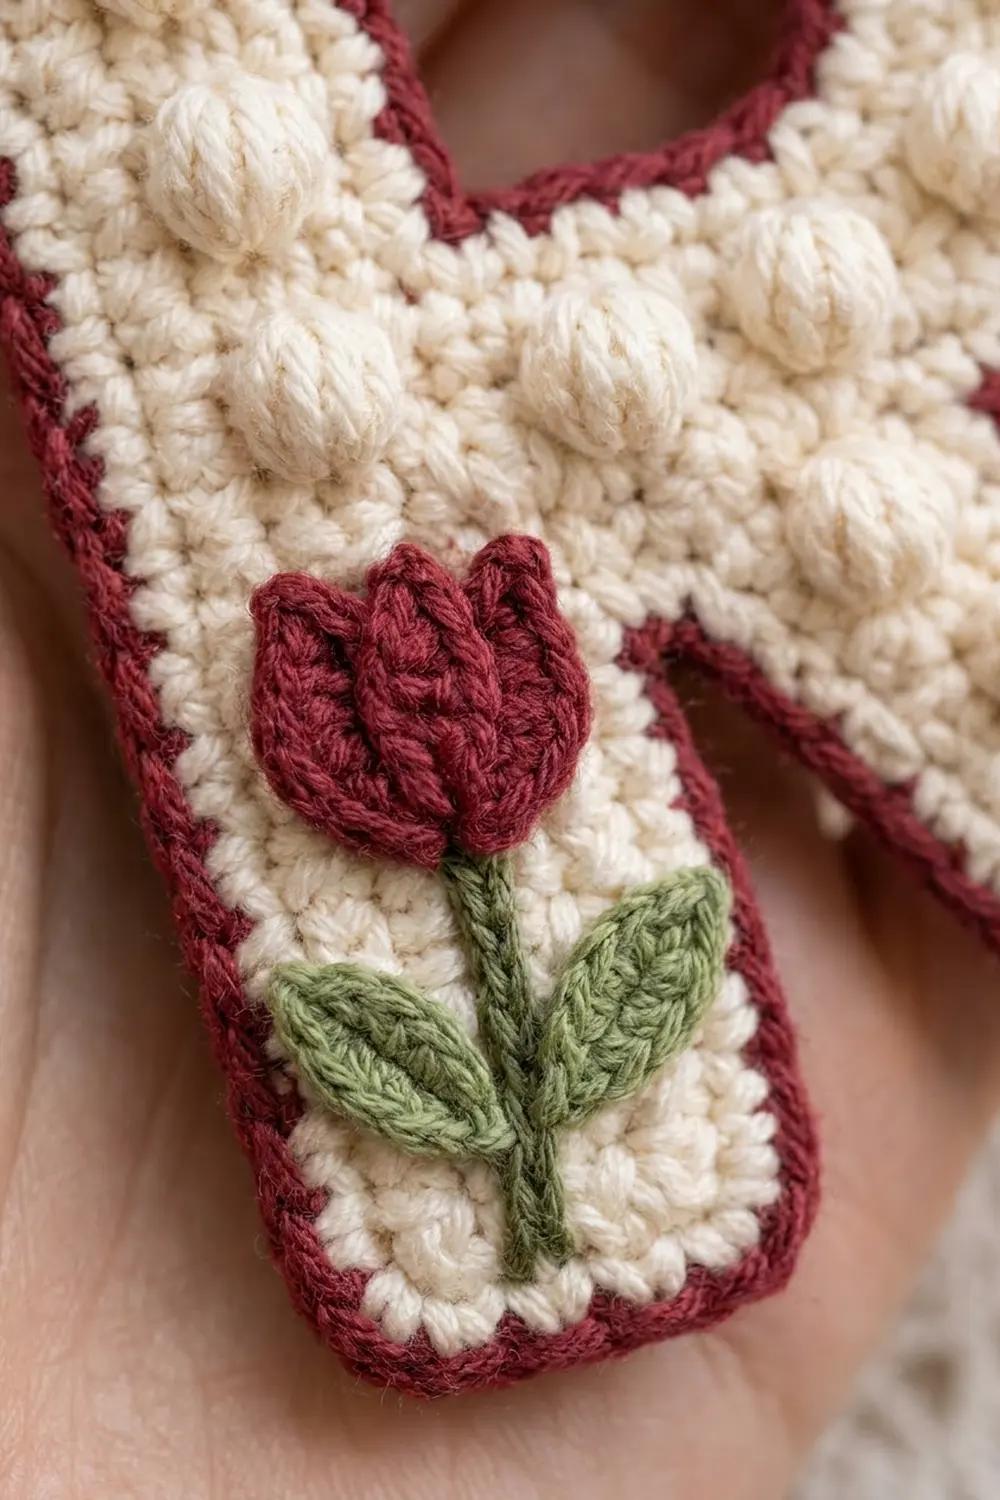
One round of burgundy single crochet outlines the whole letter and the inner hole. Low on the stem, a small burgundy tulip with a green stem and two pointed leaves is sewn flat over plain cream stitches. The colors are warm and vintage: cream, deep burgundy and sage green, finished with an antique-brass key ring.
The pattern uses US crochet terms. The finished letter measures 2.67 in wide x 3.33 in tall (6.8 x 8.5 cm), not counting the hardware.
The R is one piece, worked flat in rows from the bottom up. You make the lower stem and the slanted leg separately and join them in one row. Then you split the work around the hole and join it again across the top. A burgundy border goes around everything, and then you add the tulip pieces and the key ring.
Finished Size and Construction
- Finished size: 2.67 x 3.33 in (6.8 x 8.5 cm), without hardware
- Skill level: Intermediate
- Terminology: US
- Yarn weight: DK / light (3) cotton
- Hook: 3.25 mm (US D/3)
- Number of pieces: 1 letter, plus 4 small appliqué parts (tulip head, stem, 2 leaves)
- Layout: single letter, nothing to join
- Letter grid: 14 sts wide x 21 rows tall
- Size before border: 2.33 x 3.0 in (5.9 x 7.6 cm)
- Border depth: 1 round of sc, about 0.17 in (0.4 cm) on every edge
Materials
Use a smooth mercerized or combed cotton in DK weight, roughly 120 yd per 50 g. Cotton shows bobbles crisply and holds the letter shape. Avoid fuzzy or very stretchy yarns, because the letter will lose its sharp outline.
- Cream (main color): 8 g, about 18 m
- Burgundy (border and tulip): 3 g, about 7 m
- Sage green (stem and leaves): 1 g, about 2 m
These amounts include extra yarn for a gauge swatch and for weaving in ends.
Tools:
- 3.25 mm (US D/3) crochet hook
- Tapestry needle
- 2-3 locking stitch markers
- Antique-brass split key ring, about 1 in (2.5 cm), with a short chain
- 1 small jump ring, about 0.31 in (0.8 cm)
- 2 pairs of flat-nose pliers
- Blocking board and rust-proof pins
- Scissors
Abbreviations (US Terms)
- ch – chain
- sl st – slip stitch
- sc – single crochet
- hdc – half double crochet
- dc – double crochet
- sc2tog – single crochet 2 together
- st(s) – stitch(es)
- RS / WS – right side / wrong side
- rnd – round
Special stitch – Bobble (bo): *Yarn over, insert hook in st, yarn over and pull up a loop, yarn over and pull through 2 loops; repeat from * 3 more times in the same st (5 loops on hook), yarn over and pull through all 5 loops. Always work bobbles on WS rows so they pop out on the RS. Each bobble counts as 1 st.
Ch-2 picot: Ch 2, sl st in the first of those 2 ch.
Gauge and Checkpoints
Gauge: 12 sc x 14 rows = 2 x 2 in (5.1 x 5.1 cm), worked in rows. That is 6 sts and 7 rows per inch.
Crochet a small swatch first, then use the lower stem as your test piece. Measure at each checkpoint before you move on:
- Lower stem after Row 8: 5 sts = 0.83 in (2.1 cm) wide, 8 rows = 1.14 in (2.9 cm) tall
- Leg after Row 8: 0.83 in (2.1 cm) wide on every row, slanting 3 sts (0.5 in / 1.3 cm) to the left
- After Row 11: 2.33 in (5.9 cm) wide, 1.57 in (4.0 cm) tall
- Hole: 4 sts x 7 rows = 0.67 x 1.0 in (1.7 x 2.5 cm) before edging
- After Row 21: 2.33 x 3.0 in (5.9 x 7.6 cm)
- After border: 2.67 x 3.33 in (6.8 x 8.5 cm)
If your stem is too big, change to a 3.0 mm hook. If it is too small, change to a 3.5 mm hook. Bobbles add bulk but not width, so measure gauge on the plain stem rows.
Pattern Notes
- The ch 1 at the start of each row does not count as a st.
- RS rows have odd numbers. Mark Row 1 of each section as the RS.
- “Right edge” and “left edge” always mean as seen from the RS. The stem is on the left; the leg and bowl are on the right.
- Columns are numbered 1-14 from the left edge, so you can see where each bobble sits.
Part 1: Lower Stem (Cream)
The lower stem has no bobbles, so the tulip has a flat base.
Ch 6.
Row 1 (RS): Sc in 2nd ch from hook and in each ch across, turn. (5 sts)
Rows 2-8: Ch 1, sc in each st across, turn. (5 sts)
Fasten off and set aside. This strip fills columns 1-5.
Part 2: Leg (Cream)
The leg slants left by moving 1 st over on each RS shaping row. You decrease 1 on the right edge and increase 1 on the left edge, so the count stays at 5.
Ch 6.
Row 1 (RS): Sc in 2nd ch from hook and in each ch across, turn. (5 sts – columns 10-14)
Row 2 (WS): Ch 1, sc 2, bo, sc 2, turn. (5 sts)
Row 3 (RS, shift): Ch 1, sc2tog, sc 2, 2 sc in last st, turn. (5 sts – columns 9-13)
Row 4: Repeat Row 2. (5 sts)
Row 5: Repeat Row 3. (5 sts – columns 8-12)
Row 6: Repeat Row 2. (5 sts)
Row 7: Repeat Row 3. (5 sts – columns 7-11)
Row 8: Repeat Row 2. (5 sts) Do not fasten off.
You now have 4 bobbles stepping diagonally up the leg, and your hook is at the right edge of the leg.
Part 3: Joining Row and Lower Bowl
Row 9 (RS): Ch 4. Sc in 2nd ch from hook and in the next 2 ch (columns 14-12). Sc in each of the 5 leg sts (columns 11-7). Ch 1 (column 6). Then, with the lower stem RS facing, sc in each of its 5 sts (columns 5-1), turn. (14 sts: 13 sc + 1 ch)
The ch 1 bridges the 1-st gap between stem and leg. The open notch below it gets wider toward the bottom.
