
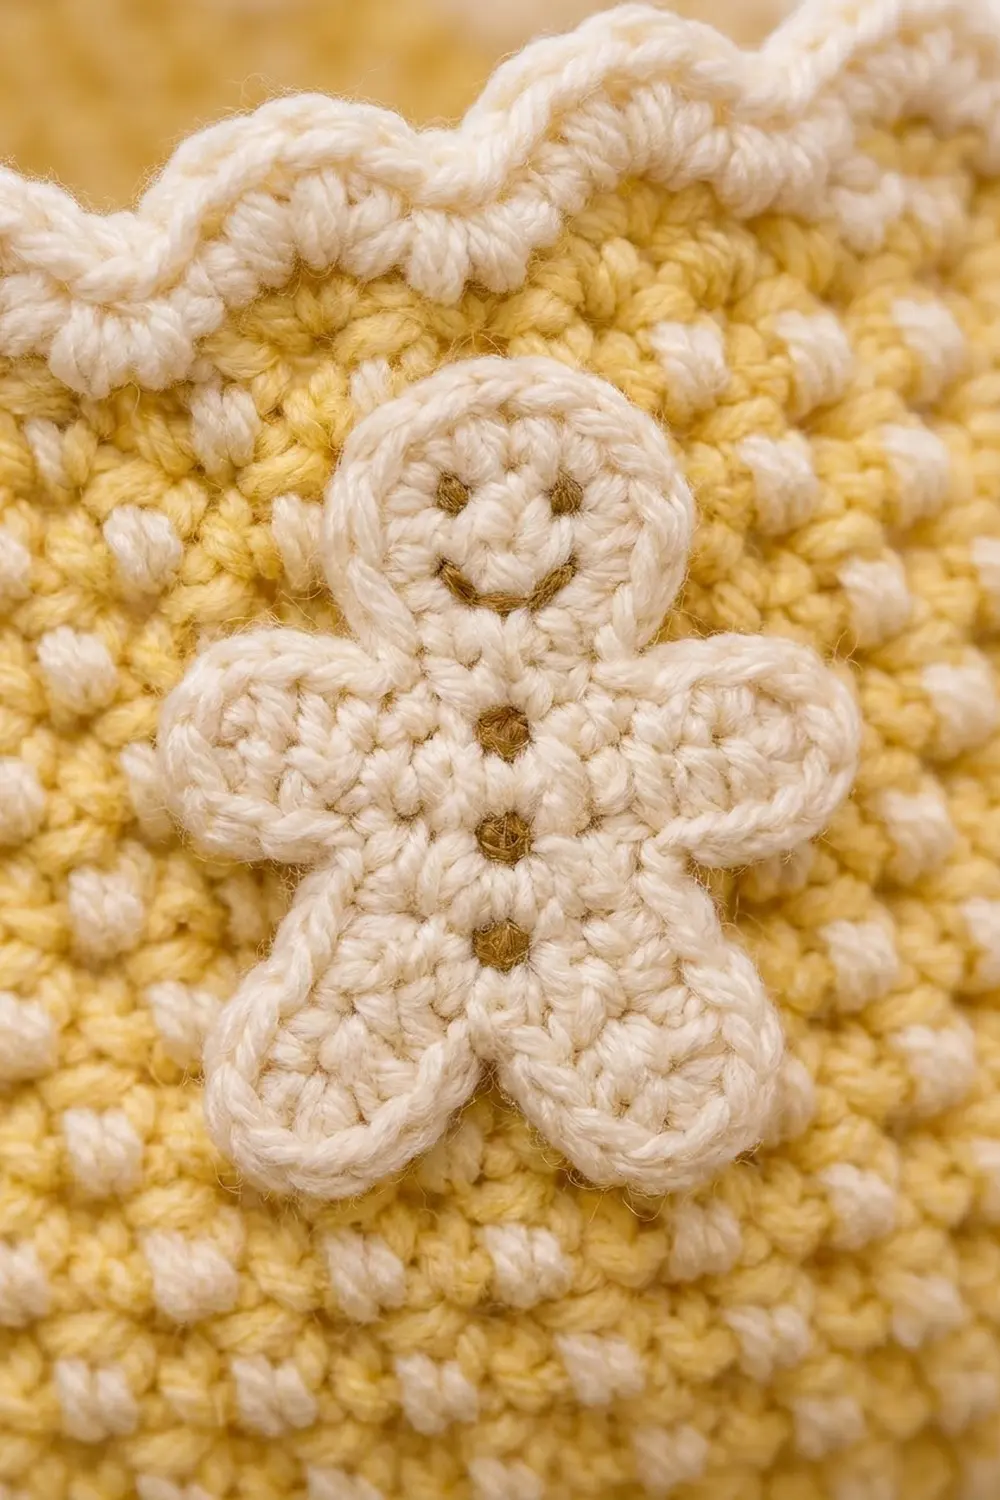
This hanging holder stores three spare rolls in a column of round baskets. Each basket is butter yellow with a bumpy lemon peel texture, a cream scalloped rim and a small cream gingerbread figure on the front. Two yellow straps run up the sides and loop over a wooden ring, so the whole piece hangs from a single hook.
The palette is soft and warm: butter yellow, cream and a little dark brown for the gingerbread faces. It works as a winter or holiday piece but doesn’t look out of place the rest of the year.
The pattern uses US crochet terms. The finished holder is about 8 1/4 in (21.0 cm) wide across each flattened basket and about 25 in (63.5 cm) long from the top of the ring to the bottom basket.
Construction overview: Each basket starts as a flat round base. You turn the wall up with a back-loop round, work it in lemon peel stitch and finish it with a two-round cream border. You make the straps flat in rows and the gingerbread figures separately. Then you sew the appliqués on, stitch the straps along the side of each basket and wrap the strap ends around the ring.
Finished Size and Construction
- Finished size: 8 1/4 in (21.0 cm) wide x 25 in (63.5 cm) long, including the ring
- Skill level: Easy-intermediate
- Terminology: US
- Yarn weight: Worsted (#4)
- Hook: 5 mm (H-8) for the baskets and straps; 4 mm (G-6) for the appliqués
- Number of pieces: 3 baskets, 2 straps, 3 appliqués, plus 1 wooden ring
- Layout: 1 column of 3 baskets, with 1 strap down each side
- Piece size (one basket): base 5 1/4 in (13.3 cm) across; circumference 16 1/2 in (41.9 cm)
- Size before border: wall about 4 1/4 in (10.8 cm) tall
- Border depth: 3/4 in (1.9 cm), so the finished basket is about 5 in (12.7 cm) tall
Materials
Choose a smooth cotton or cotton-blend worsted yarn. Cotton gives firm walls that hold their shape, and lemon peel stitch shows up best in a light, smooth yarn.
- Color A, butter yellow: 200 g / about 400 m (437 yd)
- Color B, cream: 60 g / about 120 m (131 yd)
- Color C, dark brown: 5 g / about 10 m (11 yd), for embroidery
These quantities include a margin of roughly 20 percent.
Tools:
– 5 mm (H-8) and 4 mm (G-6) crochet hooks
– 3 in (7.6 cm) wooden macramé ring
– Tapestry needle
– Stitch markers
– Rustproof pins
– Measuring tape
– Scissors
Abbreviations (US Terms)
- ch – chain
- sc – single crochet
- dc – double crochet
- sl st – slip stitch
- MR – magic ring
- BLO – back loop only
- inc – 2 sc in the same stitch
- sk – skip
- st(s) – stitch(es)
Special stitch – Lemon peel stitch (in the round): This stitch alternates sc and dc. On the next round you work a dc into each sc and a sc into each dc. The short and tall stitches lean against each other, which gives the bumpy, speckled surface.
Shell: 5 dc in the same stitch.
Gauge and Checkpoints
- Sc, 5 mm hook: 16 sts and 18 rounds = 4 in (10.2 cm)
- Lemon peel, 5 mm hook: 16 sts and 14 rounds = 4 in (10.2 cm)
Make one complete basket, through the border, before starting the others. It will be your test piece.
Checkpoints:
– After Rnd 6 (36 sts), the base measures about 2 7/8 in (7.3 cm) across.
– After Rnd 11 (66 sts), the base measures 5 1/4 in (13.3 cm) across.
– After Rnd 19, the wall measures about 2 1/2 in (6.4 cm) up from the BLO ridge.
– After Rnd 26, the wall measures about 4 1/4 in (10.8 cm).
If your base is too big: go down half a hook size. If it’s too small: go up half a hook size. Check by fitting a roll inside. A standard roll is about 4 1/2 in (11.4 cm) across and should slide in with a little room. Keep the stitch counts the same and change only the hook.
Basket (Make 3)
Use Color A and the 5 mm hook. Work the base in continuous rounds and place a marker in the first stitch of each round. Work the wall in joined rounds.
Base
- Rnd 1: In MR, 6 sc. (6)
- Rnd 2: Inc in each st around. (12)
- Rnd 3: Sc 1, inc 6 times. (18)
- Rnd 4: Sc 2, inc 6 times. (24)
- Rnd 5: Sc 3, inc 6 times. (30)
- Rnd 6: Sc 4, inc 6 times. (36)
- Rnd 7: Sc 5, inc 6 times. (42)
- Rnd 8: Sc 6, inc 6 times. (48)
- Rnd 9: Sc 7, inc 6 times. (54)
- Rnd 10: Sc 8, inc 6 times. (60)
- Rnd 11: Sc 9, inc 6 times. (66)
Sl st to the next st to smooth the step, then join. The base is now 5 1/4 in (13.3 cm) across.
Wall
- Rnd 12: Ch 1, sc in BLO of each st around, then sl st to the first sc. (66) This round turns the wall up and leaves a neat ridge around the base.
- Rnd 13: Ch 1 (does not count), sc in next st, dc in next st 33 times, then sl st to the first sc. (66: 33 sc + 33 dc)
- Rnd 14: Ch 1 (does not count), dc in next st (a sc), sc in next st (a dc) 33 times, then sl st to the first dc. (66: 33 dc + 33 sc)
- Rnds 15–25: Repeat Rnds 13 and 14 alternately, ending with a Rnd 13 repeat. You will have 13 lemon peel rounds in total. (66)
- Rnd 26: Ch 1, sc in each st around, then sl st to the first sc. (66) Fasten off.
The joins stack up in one column. Mark it as the seam column, because a strap will cover it later.
Border
Use Color B and the 5 mm hook.
- Border Rnd 1: Join with sc in the seam-column st. Sc in each remaining st, then sl st to the first sc. (66)
- Border Rnd 2: Ch 1, sc in next st, sk 1 st, shell in next st 22 times, then sl st to the first sc. (132: 22 sc + 110 dc, making 22 scallops) Fasten off.
Gingerbread Appliqué (Make 3)
Use Color B and the 4 mm hook. Worked this tightly, the gauge is about 5 sts per 1 in (2.5 cm).
Head
– Rnd 1: In MR, 6 sc, then sl st to the first sc. (6)
– Rnd 2: Ch 1, 2 sc in each st, then sl st to the first sc. (12) Don’t fasten off.
Body (worked in rows from the bottom of the head)
– Row 1: Ch 1, sc in the next 3 sts. (3)
– Row 2 (arms): Ch 4 and turn. Sc in 2nd ch from hook and in the next 2 ch to make the first arm (3). Sc in each of the 3 body sts. Ch 4, then sc in 2nd ch from hook and in the next 2 ch to make the second arm (3). (9 sts total: 3 arm + 3 body + 3 arm)
– Row 3: Ch 1 and turn. Work across the 3 body sts only: 2 sc in the first st, sc 1, 2 sc in the last st. (5)
– Rows 4–5: Ch 1, turn, sc in each st. (5)
Legs
– Rows 6–8 (first leg): Ch 1, turn, sc in the first 2 sts (2). Work 2 more rows of 2 sc. Fasten off.
– Second leg: Skip the center st of Row 5. Join yarn in the next st and work 3 rows of 2 sc over the last 2 sts, as for the first leg. Don’t fasten off.
Edging: Ch 1. Sc evenly around the whole figure, about 40 sts in total. Work 3 sc at each arm tip, at each leg tip and at the top of the head, and sl st into the gap between the legs. Join and fasten off. Leave a 12 in (30.5 cm) tail for sewing.
