
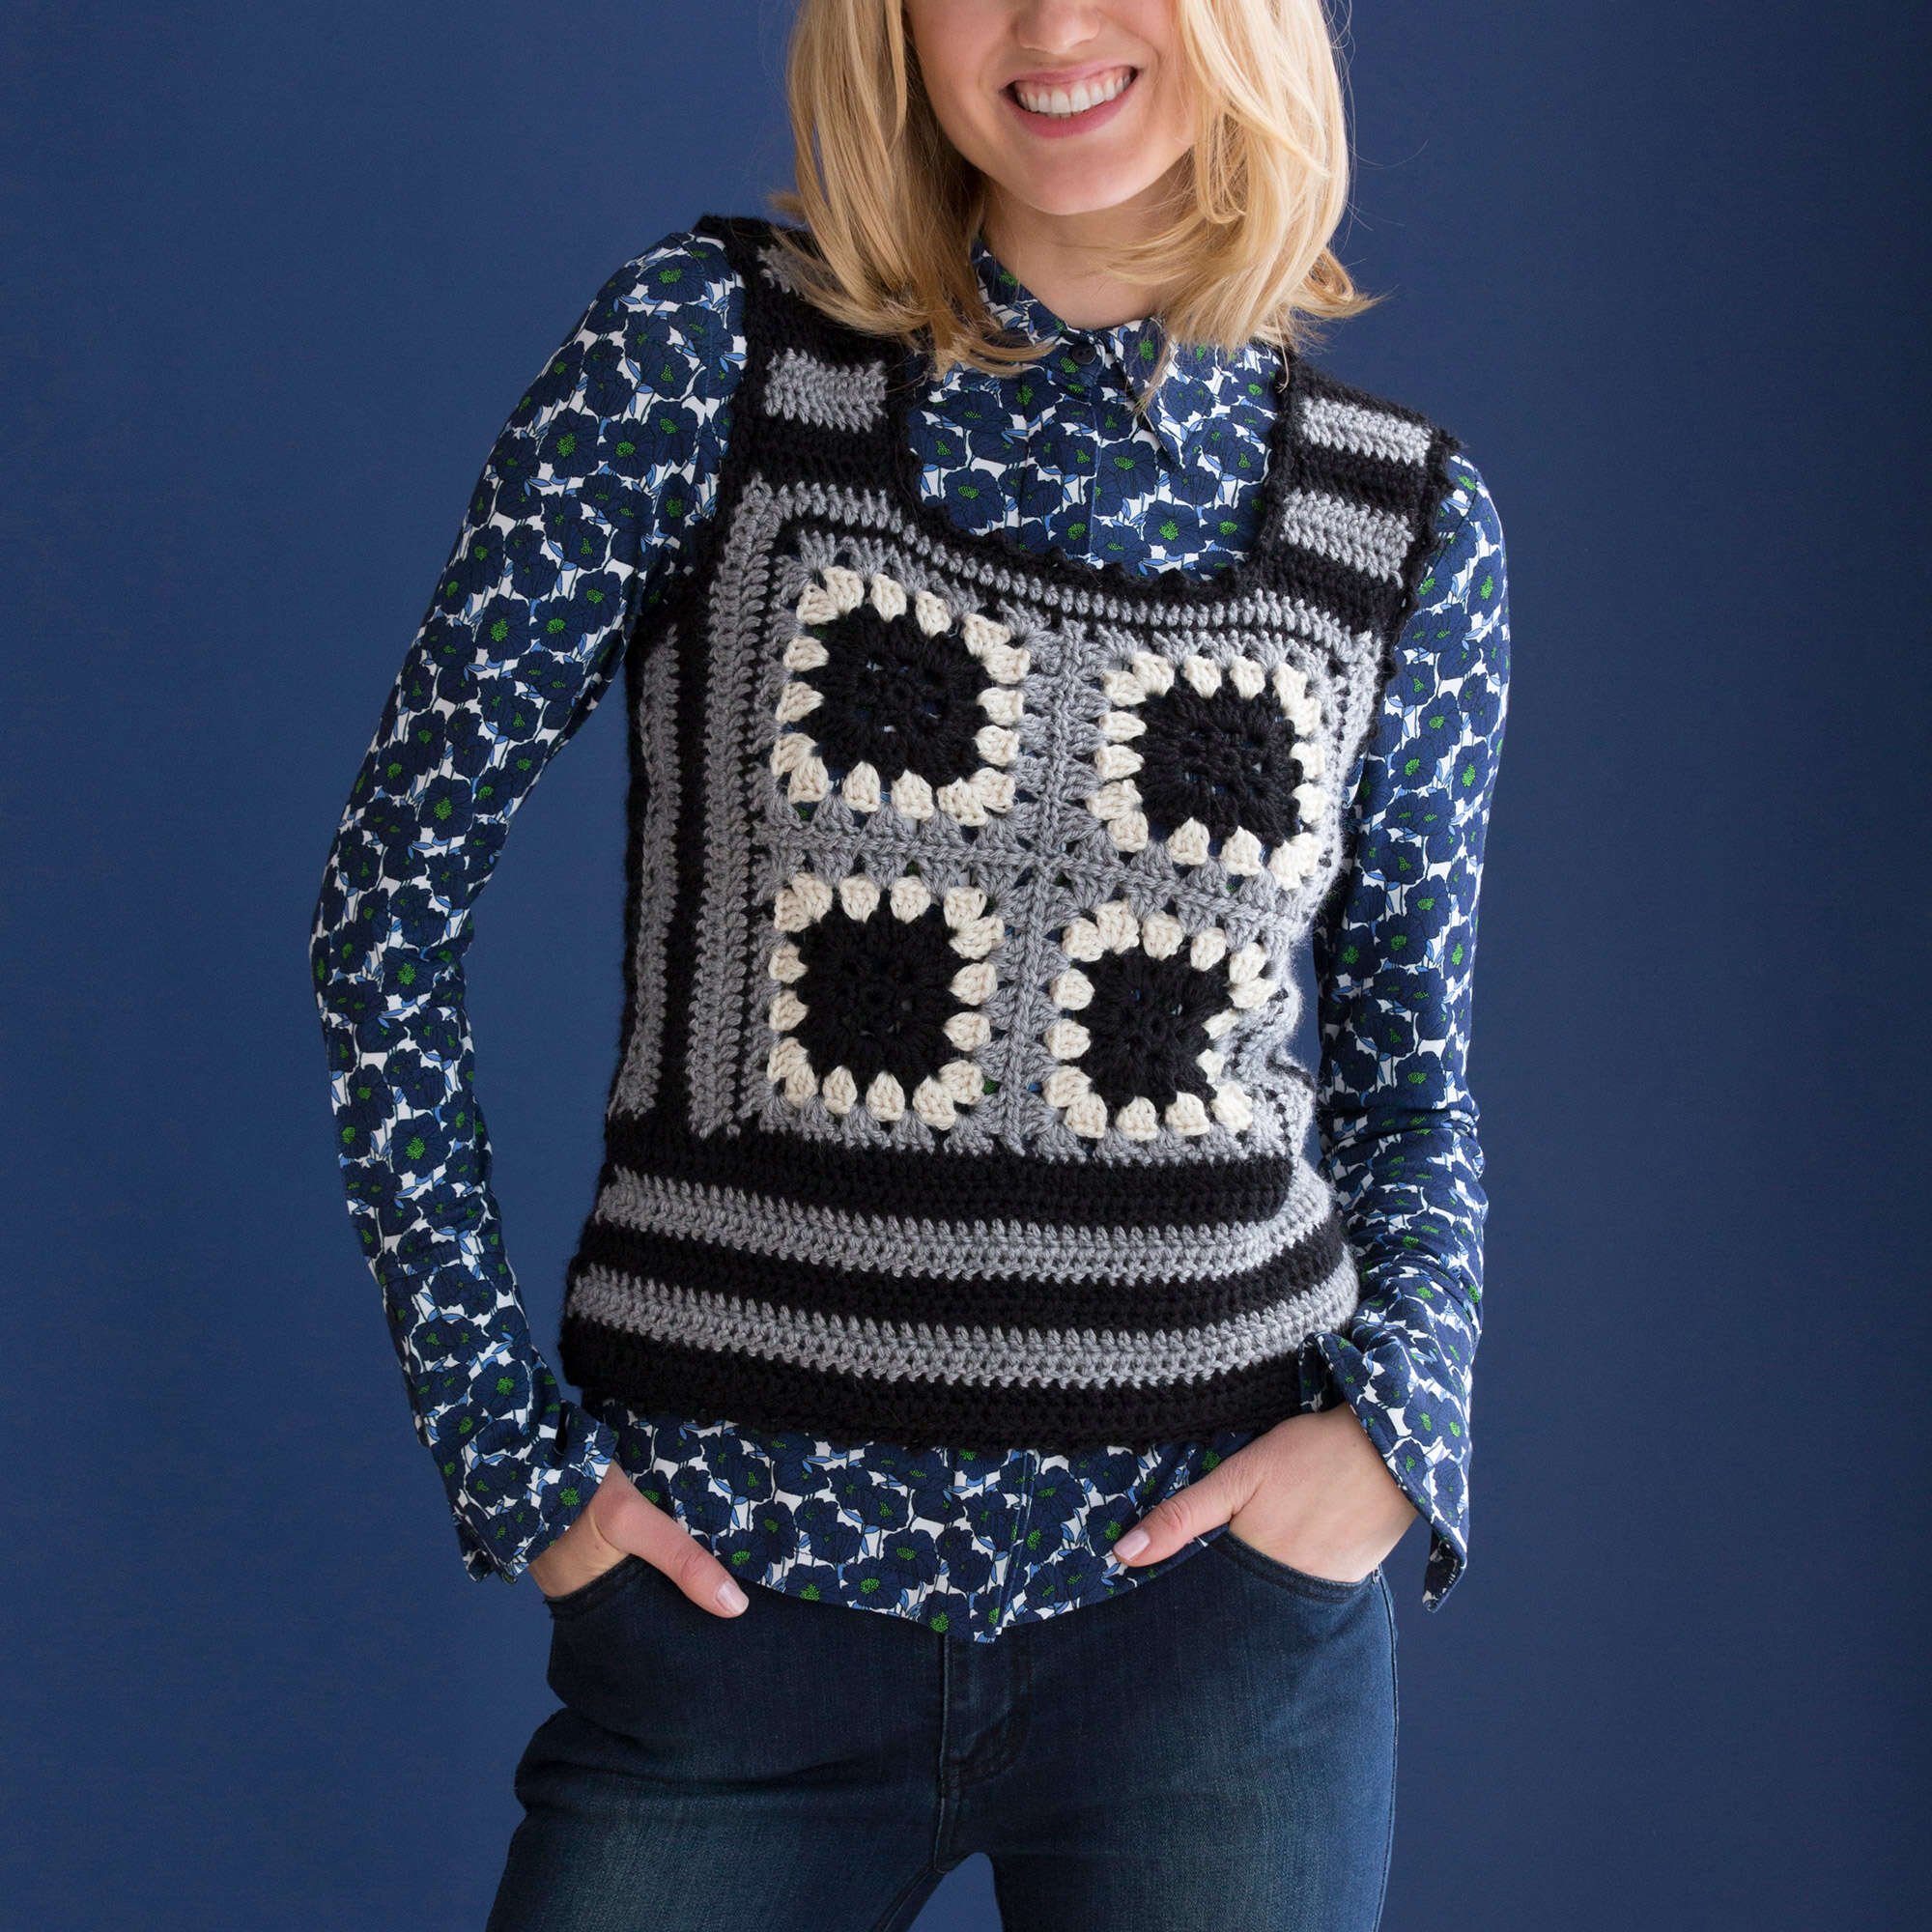
The Crochet Four Square Retro Vest is a stylish and versatile piece that showcases beautiful granny squares, perfect for those looking to add a unique garment to their wardrobe. With its striking color combinations and retro vibe, this vest is not only suitable for casual wear but also makes a statement for more dressed-up occasions. The construction involves creating four granny squares, joining them together, and then adding a tailored body and armhole shaping.
This project is ideal for crocheters with intermediate skills, specifically those familiar with granny square techniques and basic shaping. Follow along with the written instructions, and check the photographs for visual guidance throughout the process.
Project Details
- Crochet terminology: US terms
- Skill level: Intermediate
- Finished size: Varies by size; see below for specifics
- Construction method: Granny squares, panel joining, edging
Materials and Tools
| Yarn option | Yarn and specifications | Amount |
|---|---|---|
| A | RED HEART® Soft® (4614 Black) | 2 (2, 3, 3, 4, 4) balls |
| B | RED HEART® Soft® (4601 Off White) | 1 (1, 1, 1, 1) ball each |
| C | RED HEART® Soft® (9440 Light Grey Heather) | 1 (1, 1, 1, 1) ball each |
- Susan Bates® Crochet Hook: 5mm
- Yarn needle
Crochet Patterns — No Ads. No Clutter.
Browse the Crochet Library →
Note: When substituting yarns, keep in mind that the weight and fiber content can affect the final size and drape of the vest.
Abbreviations
| Abbreviation | Meaning |
|---|---|
| ch | Chain |
| dc | Double Crochet |
| sc | Single Crochet |
| sl st | Slip Stitch |
| hdc | Half Double Crochet |
| dc2tog | Double Crochet Two Together |
Preparation and Techniques
Working in Rows
This pattern requires working in rows and rounds, with joins at the end of each round. Pay close attention to the stitch counts to ensure accurate shaping.
Changing Yarn Colors
When switching colors, ensure you carry the unused yarn loosely along the side of the work to avoid excessive tension. Cut yarn at the end of rounds as specified to prevent any tangled loops.
Complete Pattern Instructions
Granny Square (make 4)
With color A, ch 2.
| Round | Instructions | Stitches |
|---|---|---|
| 1 | Work 8 sc in 2nd ch from hook. Join with slip st in first sc. | 8 sc |
| 2 | Ch 4 *(counts as dc, ch 1)*; dc in next sc; 6 times; ch 1; join with slip st in 3rd ch of beginning ch. | 8 dc and 8 ch-1 spaces |
| 3 | Slip st in first ch-1 space; ch 3 *(counts as first dc); 2 dc in same space; twice; ch 1; (3 dc, ch 3, 3 dc) in last ch-1 space; ch 1; join with slip st in top of beginning ch. | 36 dc, 8 ch-1 spaces, and 4 ch-3 spaces |
| 4 | With right side facing, join B with slip st in any ch-3 space; ch 3, (2 dc, ch 3, 3 dc) in same space; twice; ch 1; (3 dc, ch 3, 3 dc) in next ch-3 space; repeat from * twice; twice; ch 1; join with slip st in top of beginning ch. | 48 dc, 12 ch-1 spaces, and 4 ch-3 spaces |
| 5 | With right side facing, join C with slip st in any ch-3 space; ch 3, (2 dc, ch 3, 3 dc) in same space; 3 times; ch 1; (3 dc, ch 3, 3 dc) in next ch-3 space; repeat from * twice; 3 times; ch 1; join with slip st in top of beginning ch. | 60 dc, 16 ch-1 spaces, and 4 ch-3 spaces |
Front Panel
With right sides facing, sew granny squares together to form the center square.
Edging Round
Join A with sc in any outer ch-3 space corner; 2 sc in same corner; evenly space 32 sc across to next outer corner; 3 sc in corner, evenly space 32 sc across to next outer corner; repeat from * twice; join with slip st in first sc.
Fasten off; total of 128 sc and four 3-sc groups.
Set Up Row (right side)
With right side facing, join C with slip st in center st of 3-sc group at lower corner; ch 3.
Working up first side:
- dc in each st across to center st of next 3-sc group.
- 3 dc in center st.
Working across top edge:
- dc in next 7 sts.
- hdc in next 20 sts.
- dc in each st across to center st of next 3-sc group.
- 3 dc in center st.
Working down the other side:
- dc in each st across to center st of next 3-sc group.
- dc in center st; leave remaining sts unworked; turn.
Result: 20 hdc, 88 dc, and two 3-dc groups.
First Side Edging
| Row | Instructions | Stitches |
|---|---|---|
| 1 | Ch 3; dc in each st to center st of first 3-dc group; dc in center st; leave remaining sts unworked; turn. | 37 dc |
| 2 (Size Medium, Large, 1X, 2X, and 3X only) | Ch 3, dc in each st across, turn; fasten off. | — |
Second Side Edging
| Row | Instructions | Stitches |
|---|---|---|
| 1 | With wrong side facing and working in unworked sts of other edge, join C with slip st in center st of 3-dc group at top corner of Set Up Row; dc in each st across, turn. | 37 dc |
| Remaining Rows | Work remaining rows for all sizes same as first side edging. | — |
First Armhole Shaping
| Row | Instructions | Stitches |
|---|---|---|
| 1 (right side) | With right side facing, join A with slip st in first st of 2nd side edging; ch 3; dc in each st across to last 6 sts; dc2tog; leave remaining sts unworked; turn. | 32 dc |
| 2 | Ch 3, dc2tog, dc in each remaining st; change to C; turn. | 31 dc |
| 3 | Ch 3, dc in each st to last 2 sts; dc2tog; turn. | 30 dc |
| 4 | Ch 3, dc2tog, dc in each remaining st; change to A in sizes Medium, 1X, 2X, and 3X only; turn. | 29 dc |
| 5 | Repeat Row 3. | 28 dc |
| 6 | Repeat Row 4; change to C in sizes 2X and 3X only; turn. | 27 dc |
| 7 (sizes 2X and 3X only) | Repeat Rows 3 and 4 once (twice). | 25 (23) dc |
Second Armhole Shaping
| Row | Instructions | Stitches |
|---|---|---|
| 1 (right side) | With right side of first edge facing, skip ends of rows and first 4 sts; join A with slip st in next st; ch 3; dc2tog; dc in each remaining st across; turn. | 32 dc |
| 2 | Ch 3, dc in each st across to last 2 sts; dc2tog working 2nd “leg” in top of beginning ch; change to C; turn. | 31 dc |
| 3 | Ch 3, dc2tog, dc in each remaining st; turn. | 30 dc |
| 4 | Ch 3, dc in each st across to last 2 sts; dc2tog working 2nd “leg” in top of beginning ch; change to A in sizes Medium, 1X, 2X, and 3X only; turn. | 29 dc |
| 5 | Repeat Row 3. | 28 dc |
| 6 | Repeat Row 4; change to C in sizes 2X and 3X only; turn. | 27 dc |
| 7 (sizes 2X and 3X only) | Repeat Rows 3 and 4 once (twice). | 25 (23) dc |
First Shoulder
| Row | Instructions | Stitches |
|---|---|---|
| 1 (Size Small only) | With right side facing and working in ends of rows, join A with slip st in first row at top edge; ch 3, 2 dc in first st; dc in next 7 sts; leave remaining sts unworked; turn. | 10 dc |
| 1 (Sizes Medium, Large, 1X, 2X, 3X only) | With right side facing and working in ends of rows, join A with slip st in first row at top edge; ch 3, 2 dc in next row; dc in next 0 (3, 4, 4, 4) rows; working in sts, dc in next 7 (4, 3, 3, 3) sts; leave remaining sts unworked; turn. | 10 dc |
| 2 | Ch 3, dc in each st across; change to C; turn. | — |
| 3 and 4 | Ch 3, dc in each st across; change to A at end of Row 4; turn. | — |
| 5 and 6 | Repeat Row 2. | — |
| 7 | Ch 3, dc in each st across. | — |
| 8 (Sizes Large, 1X, 2X, 3X only) | Ch 3, dc in each st across; change to A; turn. | — |
| 9 | Ch 3, dc in each st across. | — |
