
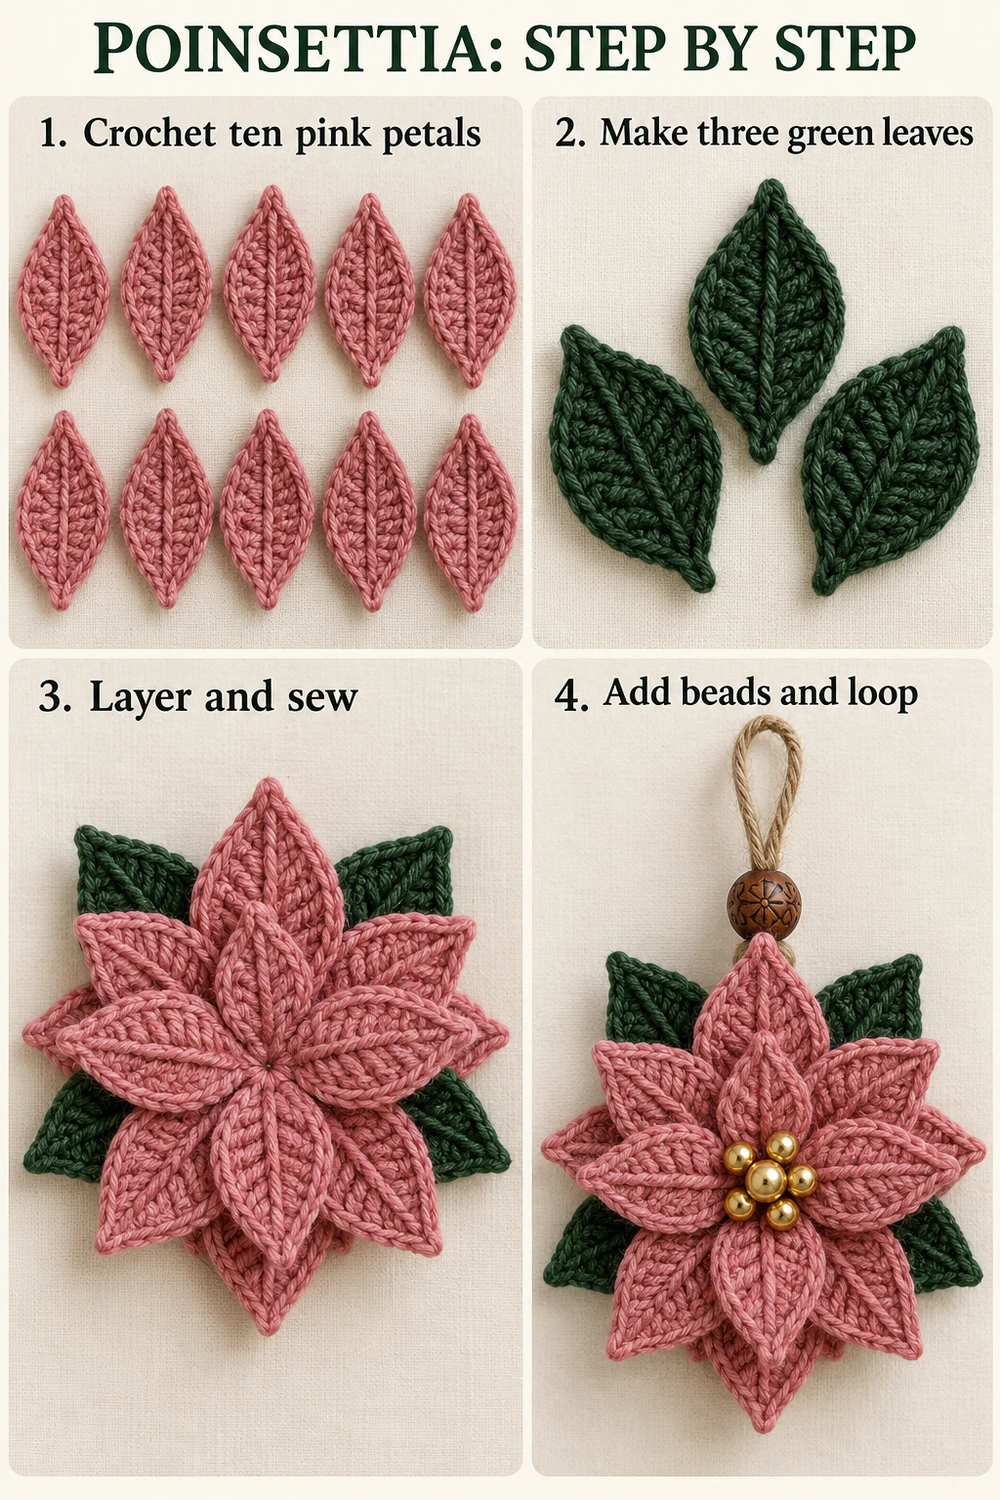
Sew the front bases through the lower petal bases and into the disc with several small passes. Keep the stitching in the central area that will be covered by beads. Do not sew the entire petal perimeter down; the free edges create the layered appearance.
Slide the three green leaves behind the flower: two pointing diagonally upward on the left and right, and one centered between them. Adjust their angle so only the pointed outer portions show. Sew their bases to the backing disc and catch a few lower pink stitches to prevent twisting.
View the flower from both sides. Add a hidden securing pass anywhere a base moves freely. Weave all pink and green tails deeply through the backs of the stitches.
7. Gold Bead Center
Arrange one larger gold bead and four smaller gold beads in a compact cluster over the joined petal bases. Position the large bead slightly above center, with the smaller beads grouped tightly around it, following the reference.
Use doubled strong sewing thread. Sew each bead through its hole and through several dense petal-base and backing stitches, making at least three passes per bead. Secure the thread on the back between beads rather than relying on a single strand for the entire group.
Keep the beads close to the flower surface without pulling the petals inward. Knot and bury the thread ends on the back. The center should cover the assembly seams. For a bead-free version, embroider a compact gold-yarn center instead.
8. Rustic Hanging Loop and Wooden Bead
Cut approximately 30 cm of natural cotton or jute cord. Fold it in half. Thread both free ends through the wooden bead so the folded loop remains above the bead. Adjust the visible loop to about 8–10 cm high, or to your preferred hanging length.
Pass the two cord ends through separate dense areas of the upper backing disc, behind the upper petals. Tie them securely on the back, then stitch the knot and both cord tails to the disc with strong thread. Trim only after checking the attachment.
Slide the wooden bead down to sit just above the flower, with the secured cord behind the pink petals. Lift gently by the loop to check that the flower hangs upright. Spread the attachment points if it leans or rotates.
Reading the Two Complete Charts
Both chart images show the entire assembled flower: ten complete pink petal charts in staggered layers, three green leaf charts behind them, and the central backing position. The five bead positions and cord attachment are assembly guides, not crochet stitches. Dashed lines indicate sewing.
A finished-ornament photograph appears below each full chart. Use the English symbol legend with the written petal counts; the layers are separate pieces sewn together, not one continuous crochet round. The backing disc rounds are given in the text.
Finishing and Care
Gently arrange the tips and smooth the layers with your fingers. Check every bead and the hanging attachment before displaying. This is a decorative ornament with small beads and a long cord; keep it away from young children and pets.
Spot-clean the crochet gently, keeping the wood bead and jute as dry as possible. Reshape and dry flat. Store the ornament in a shallow box so the layered petals are not crushed.
Questions and Tips
Why do the petals twist? Verify that both sides use the eight-stitch sequence and that all three tip sc go into the same final chain. A foundation chain that is too tight can also distort the piece.
How many petals are there? Ten pink petals: five behind and five in front. The front layer is rotated between the back tips. Three green leaves sit behind both layers.
Why is the flower too bulky? Keep seams at the rounded bases and use only the small backing disc. Avoid folding the full petal length into the center.
Can I use red instead of pink? Yes. Dusty rose matches this reference, while red makes a traditional poinsettia. Keep all pieces in the same yarn weight.
More Free Christmas Crochet Patterns
- Red and White Snowflake
- Poinsettia Keychain
- Lace Bell Ornament
Save This Pattern
Save this dusty rose flower for your handmade holiday collection. Happy crocheting from Lovely Amigurumi!
Tutorial, Two Complete Charts, and Pinterest Gallery
The six 1000 × 1500 images are grouped here at the end: one photo tutorial, two full chart-above-photo guides, and three Pinterest images.
More Free Crochet Patterns
Find your next handmade project with these lovely patterns.
Christmas Lace Star Crochet Pattern – Free Five-Point Ornament Guide
View Pattern →
Granny Stitch Gingerbread Crochet Pattern – Free Ornament Guide
View Pattern →
Blue Lace Snowflake Crochet Pattern – Free Ornament Guide
View Pattern →
CONTENT END 1
