
Pin the outer curves gently and keep the central openings aligned. The fans may overlap slightly, which gives the branches their layered appearance. Avoid stretching the chain spaces into long gaps. Allow the tree to dry completely before removing the pins.
4. Make the Matching Green Tassel
- Cut a 25 cm strand for the tassel’s top tie and another 30 cm strand for wrapping its neck.
- Wrap yarn around the 6 cm card approximately 24 times. Keep the strands parallel and use even tension.
- Slide the top tie under all wraps at one edge of the card and tie firmly. Cut the wraps at the opposite edge and remove the card.
- Fold and smooth the strands downward. About 8–10 mm below the top tie, wrap the neck strand around the tassel six to eight times. Knot securely at the back and thread the ends down into the tassel.
- Trim the ends evenly to make a tassel about 5–6 cm long.
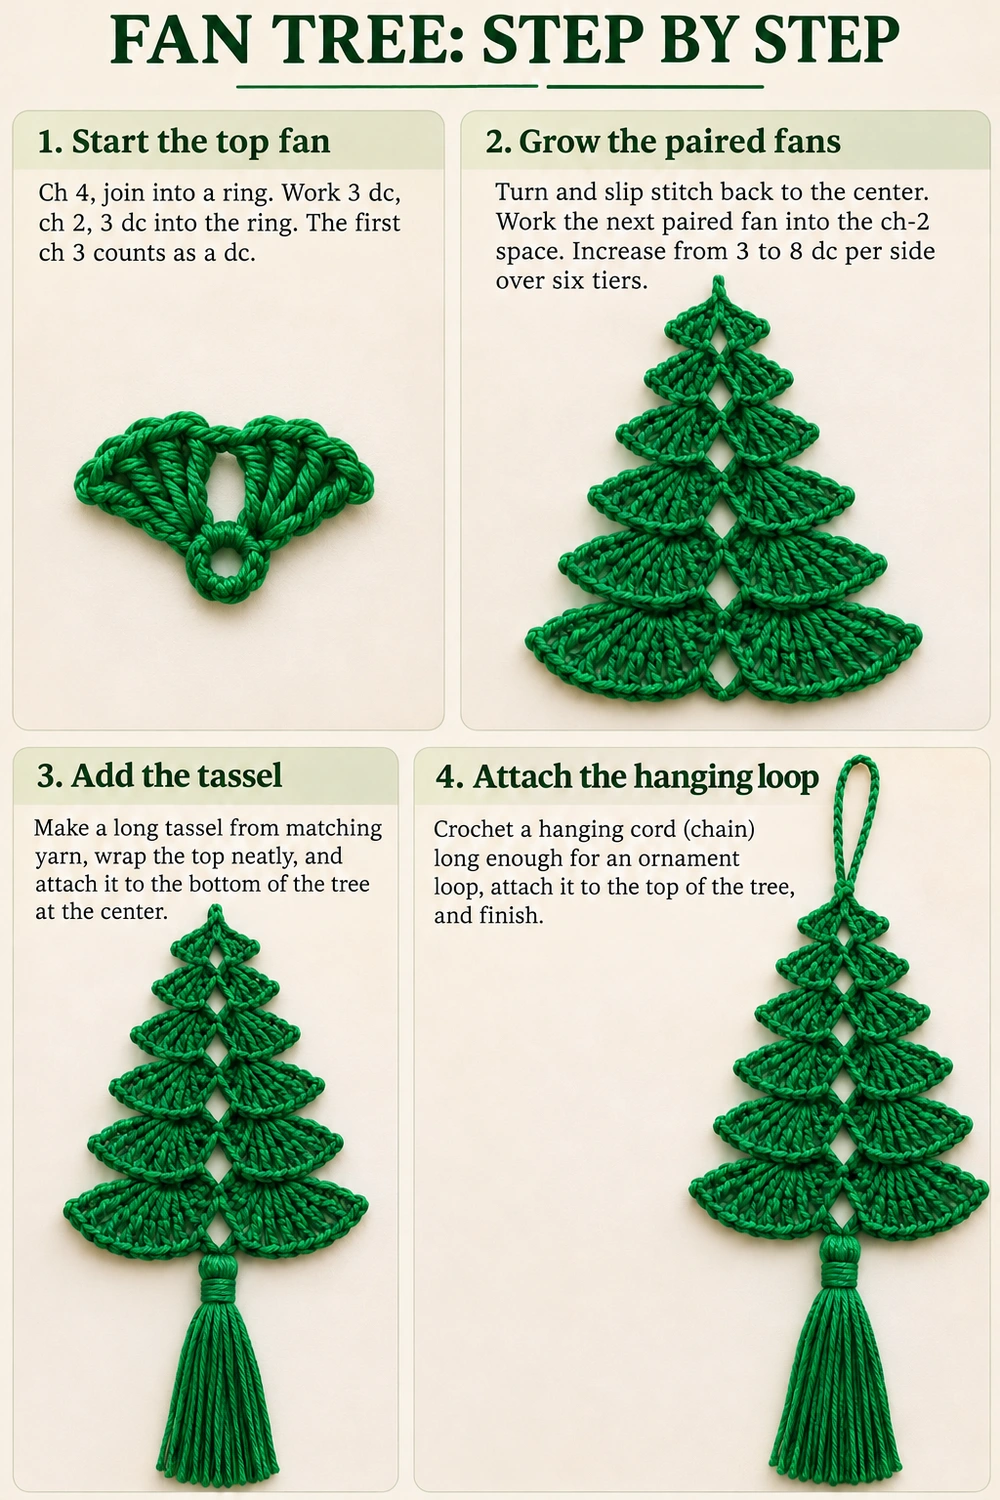
Use the top tie to attach the tassel through the final central ch-2 space at the base of the tree. Tie at the back, then weave the ends through the wrapped neck or through nearby stitches. Use the remaining tree tail to reinforce the attachment if needed.
The tassel should hang from the center between the two lowest fans. Check the ornament upright before trimming again; an off-center attachment can make the whole tree lean.
5. Add the Hanging Loop
With a separate length of green yarn, ch 24. Fasten off, leaving two sewing tails. Bring the chain ends together to make a loop and sew both ends securely through the top foundation ring. Weave the tails through several stitches on the back.
Adjust the loop length for the branch or hook you plan to use. The hanging cord should attach to the small top ring, not to an outside fan edge. Hang the ornament briefly and check that the central spine and tassel fall in one line.
Reading the Two Tabletop Charts
The two chart images show the full tree silhouette above the finished piece on a craft table. Both illustrate the same six-tier construction. Start at the narrow top, identify the ch-2 center of each paired fan, and follow the increasingly wide tiers downward.
Each slashed T represents one dc, an oval represents a chain, and a small filled dot represents a slip stitch. The written counts are 3, 4, 5, 6, 7, and 8 dc per side. The return path brings the hook back to the center before the next tier begins. The tassel is an attached yarn bundle, not a crochet stitch or a joined dc cluster.
Helpful Tips
- Fans curl: loosen the return slip stitches and block the outer lobes gently.
- Tree grows sideways: confirm that every new tier is worked into the previous central ch-2 space.
- Branches look uneven: include the beginning ch 3 in the first group’s dc count.
- Center holes disappear: keep the ch 2 relaxed and avoid sewing through the openings.
- Tassel twists: smooth the strands with your fingers and let them settle before the final trim.
More Free Christmas Crochet Patterns
- Lavender Angel Ornament
- Lace Bell Ornament
- Three Tier Lace Christmas Tree
Save Your Fan Stitch Christmas Tree Crochet Pattern
Save this green fan tree for a quiet holiday crafting afternoon. Its layered branches and soft tassel make a lovely handmade addition to your Christmas decorations. Happy crocheting from Lovely Amigurumi!
Photo Tutorial, Two Tabletop Charts, and Pinterest Images
Find the assembly tutorial, two chart-and-piece tabletop views, and three Pinterest images below.
More Free Crochet Patterns
Find your next handmade project with these lovely patterns.
Christmas Lace Star Crochet Pattern – Free Five-Point Ornament Guide
View Pattern →
Granny Stitch Gingerbread Crochet Pattern – Free Ornament Guide
View Pattern →
Blue Lace Snowflake Crochet Pattern – Free Ornament Guide
View Pattern →
CONTENT END 1
