
Rnd 1 (edging): Ch 1, rotate and work down the short side: sc in next 8 row ends, skip 1 row end, sc in next 8 row ends, skip 1 row end (16 sc). Sc in each foundation ch across (W sc). Work 16 sc down the second short side the same way. Sc in each st across Row 18 (W sc). Sl st to first sc. (2W + 32 sts: 72, 80, or 88)
Rnd 2: Ch 1, sc in BLO of each st around, sl st to first sc. (72, 80, or 88 sts) This round makes the wall fold upward.
Rnd 3: Ch 2 (does not count), dc in each st around, sl st to first dc. (72, 80, or 88 sts)
Rnds 4–5: Ch 2, *FPdc in next 4 sts, BPdc in next 4 sts; rep from * around, sl st to first st. (72, 80, or 88 sts; 9, 10, or 11 repeats)
Rnds 6–7: Ch 2, *BPdc in next 4 sts, FPdc in next 4 sts; rep from * around, sl st to first st. (72, 80, or 88 sts)
Rnds 8–9: Ch 1, sc in each st around, sl st to first sc. (72, 80, or 88 sts) Fasten off.
Checkpoint: the wall is 3.25 in (8.3 cm) tall. A 4.25 in (10.8 cm) roll should stand about 1 in (2.5 cm) above the rim.
The foundation-chain side is the front wall, and the Row 18 side is the back wall.
Ribbon and Bow (Make 3 Sets)
Work all of these pieces in cream.
Ribbon strip: Ch 5. Row 1: Sc in 2nd ch from hook and across, turn. (4 sts) Rows 2–13: Ch 1, sc across, turn. (4 sts) Fasten off. Size: 1.1 in (2.8 cm) x 3.25 in (8.3 cm).
Bow body: Ch 25. Row 1: Sc in 2nd ch from hook and across, turn. (24 sts) Rows 2–4: Ch 1, sc across, turn. (24 sts) Fasten off. Size: 6.9 in (17.5 cm) x 1 in (2.5 cm).
Bow center: Ch 4. Row 1: Sc in 2nd ch from hook and across, turn. (3 sts) Rows 2–8: Ch 1, sc across, turn. (3 sts) Fasten off, leaving a long tail. Size: 0.9 in (2.3 cm) x 2 in (5.1 cm).
Tails: Ch 15. Row 1: Sc in 2nd ch from hook and across, turn. (14 sts) Row 2: Ch 1, sc across. (14 sts) Fasten off. Size: 4 in (10.2 cm) x 0.5 in (1.3 cm).
Assemble the bow: Fold both short ends of the bow body to the center so they overlap slightly. This makes two loops about 3.5 in (8.9 cm) across. Wrap cream yarn around the middle a few times to cinch it. Fold the tail piece in half into an upside-down V and lay it behind the cinch. Wrap the bow center around both, front to back, and sew its ends together at the back.
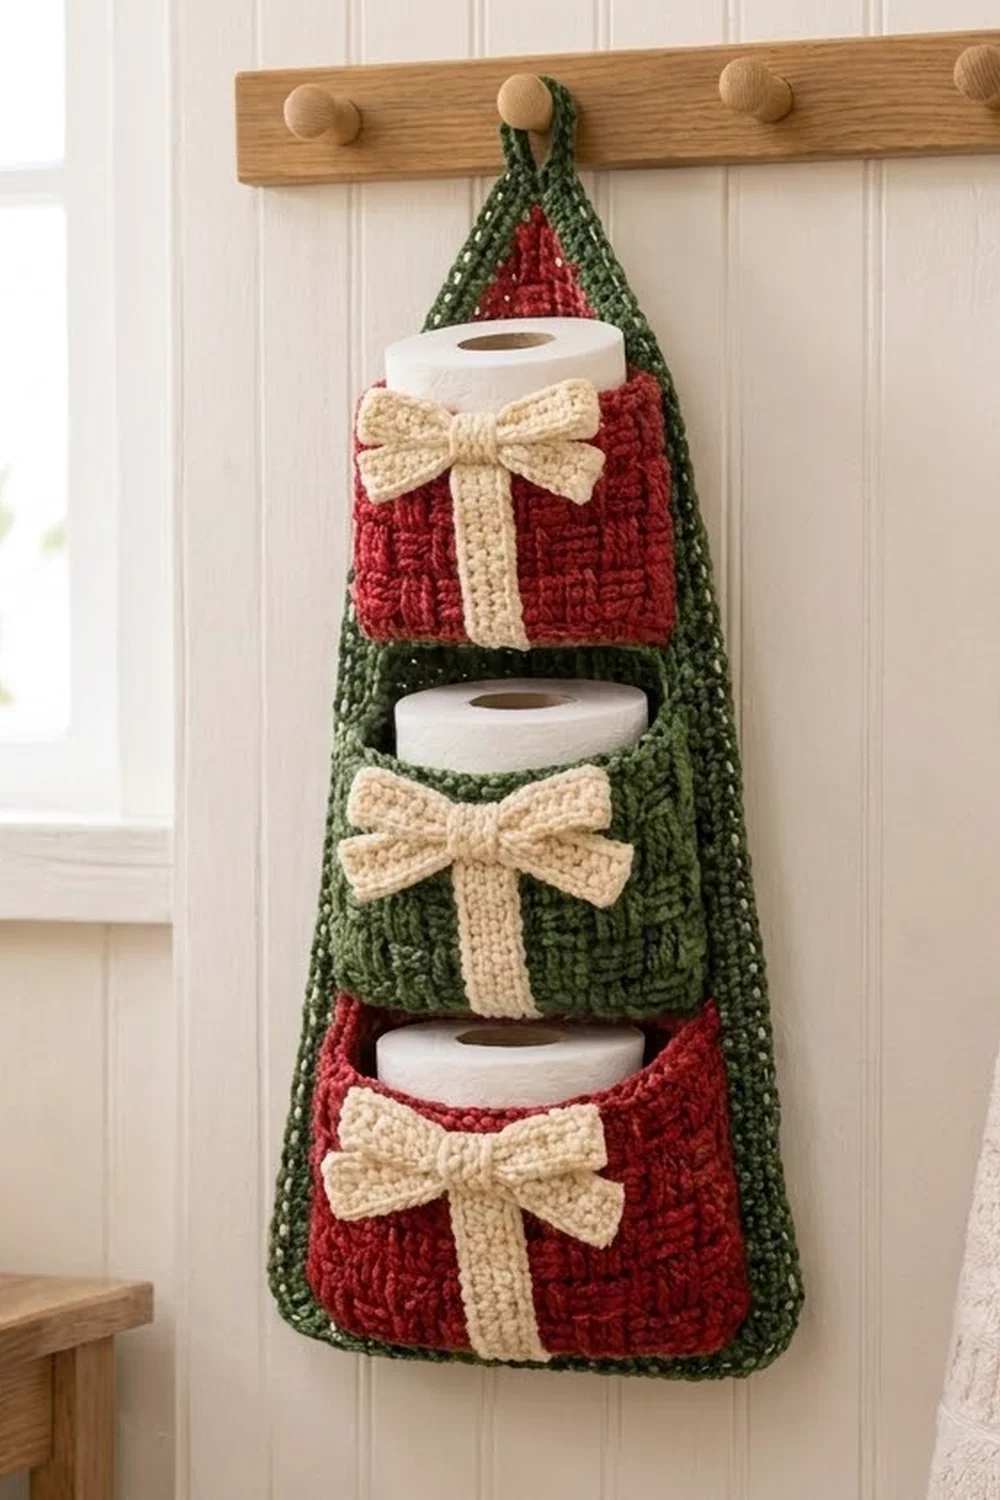
Attach: Center the ribbon strip vertically on the front wall, running from the rim down to the base fold. Whipstitch both long edges. Sew the bow over the top of the ribbon, just below the rim.
Make All Pieces
- Red: backing top section (Rows 57–83), top pocket (W = 20), bottom pocket (W = 28)
- Green: backing body (Rows 1–56), middle pocket (W = 24), border, hanging loop
- Cream: 3 ribbon strips, 3 bow bodies, 3 bow centers, 3 tail pieces
Layout (front view, top to bottom):
Joining
Weave in all ends on the pockets and the ribbon and bow pieces before joining. Using green yarn and a tapestry needle, whipstitch each pocket’s back wall flat against the front of the backing.
Placement (by backing row):
- Bottom pocket: Place the back base edge along the top of Row 4 and the rim along the top of Row 17. All of these rows have 28 sts, matching W = 28.
- Middle pocket: Place the base along the top of Row 24 and the rim along the top of Row 37. Rows 24–29 have 26 sts, so leave 1 st free on each side. Rows 30–37 have 24 sts, matching W = 24.
- Top pocket: Place the base along the top of Row 44 and the rim along the top of Row 57. Rows 44–53 have 22 sts, so leave 1 st free on each side. Rows 54–57 have 20 sts, matching W = 20.
Stitch-to-stitch logic: Both fabrics have 3.5 sts per inch. Sew one back-wall stitch to one backing stitch along the base, and again along the rim. The wall is 3.25 in (8.3 cm) tall, which equals 13 backing rows. Sew the two back corners up with one stitch per backing row.
Tension: Pull each stitch snug but not tight. The backing should stay flat, with no puckers behind the pocket.
Each pocket covers 13 rows. That leaves 7 rows, or 1.75 in (4.4 cm), of backing between pockets. The top pocket’s rim covers Row 57, so the red triangle starts right at its edge.
Checkpoint: the backing is still 8 in (20.3 cm) x 20.75 in (52.7 cm) and lies flat.
Border
Border gauge:
- Bottom: work 1 sc per stitch.
- Near-vertical sides (Rows 1–64): work 7 sc per 8 row ends. This gives 3.5 sc per inch.
- Slanted top (Rows 65–82): work 1 sc per row end. Each slanted row edge is longer than one row is tall, so it needs the extra stitch.
Join green at the bottom right corner, in the first foundation ch.
Rnd 1: Ch 1, 3 sc in first ch (corner), sc in next 26 ch, 3 sc in last ch (corner). Work up the side: sc in next 7 row ends, skip 1 row end 8 times (56 sc over Rows 1–64), then sc in each of the next 18 row ends (Rows 65–82). Work 3 sc in the single stitch of Row 83 (point). Work down the other side the same way in reverse: 18 sc, then 56 sc. Sl st to first sc. (183 sts: bottom 26, each side 74, plus three 3-sc corner groups)
Rnd 2: Ch 1, sc in each st around, working 3 sc in the center st of each corner group. Sl st to first sc. (183 sts worked 1 per stitch + 6 extra at corners = 189 sts: bottom 28, each side 76, plus three 3-sc corner groups)
Hanging loop: Join green in the center sc at the point. Ch 16, sl st in the same st. Ch 1, work 24 sc into the loop, sl st to the first sc. Fasten off.
Why the math works:
- 26 + 74 + 74 + 9 = 183, and 28 + 76 + 76 + 9 = 189.
- In Rnd 2, the bottom border has 28 sts, matching the 28-stitch first row of the backing.
- The side counts work out to 3.5 sts per inch, so the edges lie flat.
- The two sc rounds add 0.5 in (1.3 cm) on every side. That takes the backing from 8 in x 20.75 in to 9 in (22.9 cm) x 21.75 in (55.2 cm).
Final Blocking
- Weave in all remaining ends.
- Lay the holder face up on a blocking mat.
- Pin the backing to 9 in (22.9 cm) wide at the bottom and 21.75 in (55.2 cm) tall. Ease the two bottom corners into a soft curve.
- Mist the backing and border evenly until damp.
- Put a toilet roll or a folded towel in each pocket so the walls stand square.
- Mist the pocket walls lightly. Do not flatten the basketweave.
- Shape each bow loop with your fingers.
- Let it dry completely, then remove the pins and rolls.
Final Quality-Control Checklist
- The backing measures 9 in (22.9 cm) x 21.75 in (55.2 cm).
- Border Rnd 2 has 189 sts.
- Each pocket wall is 3.25 in (8.3 cm) tall.
- The pockets have 72, 80, and 88 sts.
- The basketweave blocks switch cleanly every 2 rnds.
- The ribbons are centered and run straight.
- The bows sit level just below each rim.
- The back walls lie flat, with no puckers.
- The hanging loop is firmly anchored.
Troubleshooting
Backing edges ripple: You picked up too many border stitches. Recheck the 7-per-8 row-end ratio.
Border cups or pulls in: You have too few border stitches, or your tension is too tight. Rework it with a looser hand.
Pocket walls flare: The basketweave is too loose. Go down a hook size for Rnds 3–7.
Pocket walls lean outward: Rnd 2 was not worked in BLO. Redo it to get a crisp fold.
Blocks look staggered: Check that each wall round is a multiple of 8 stitches.
Pocket sags forward: Add a few tacking stitches where the side walls meet the backing.
Care
Hand wash in cool water and lay flat to dry, reshaping the pockets while damp. Do not wring or tumble dry.
Final Notes
Here is the measurement chain:
- The backing starts 8 in (20.3 cm) wide and grows to 20.75 in (52.7 cm) tall over 83 rows.
- Each pocket starts with a 4.5 in (11.4 cm) deep base and rises to a 3.25 in (8.3 cm) wall.
- Each pocket covers 13 backing rows and is sewn on stitch for stitch.
- The two-round border finishes the panel at 9 in (22.9 cm) x 21.75 in (55.2 cm).
Check each checkpoint as you go, and the pieces will fit together without fuss.
Happy crocheting!
