
This hanging holder has three soft pockets stacked in a column, and each one holds a standard toilet roll. The pockets are worked in deep pine-green herringbone half double crochet, which makes a dense fabric that looks woven or knitted. Each pocket has a cream rim and a pointed cream envelope flap, finished with a holly sprig of two green leaves and three red berries.
The style is cozy and festive without being loud. The herringbone fabric also keeps its shape when a roll is inside.
All instructions use US crochet terms. One pocket measures 7.7 in (19.6 cm) wide when flat and 4.4 in (11.2 cm) deep. The three joined pockets make a column 13.2 in (33.5 cm) tall. The strap rises about 4.5 in (11.4 cm) above the column, for a total hanging height of about 17.7 in (45.0 cm).
Each pocket is a small basket with a flat single crochet base, a green herringbone body, two cream rim rounds and a flap worked in rows. You join the pockets back edge to back edge, add the strap and ring, then work a slip-stitch border, fold the flaps down and sew on the holly.
Finished Size and Construction
- Finished size: 7.7 in (19.6 cm) wide x 13.2 in (33.5 cm) tall without the strap; about 17.7 in (45.0 cm) tall with the strap
- Skill level: Intermediate
- Terminology: US
- Yarn weight: Worsted (#4)
- Hook: 5.5 mm (I-9) for the pockets and strap; 4.0 mm (G-6) for the holly
- Number of pieces: 3 pockets, 1 strap, 6 leaves, 9 berries
- Layout: 1 pocket wide x 3 pockets tall, with the strap on top
- Piece size (one pocket): 7.7 in (19.6 cm) flat width, 4.4 in (11.2 cm) deep, 15.4 in (39.1 cm) around
- Size before border: 4.4 in (11.2 cm) deep per pocket
- Border depth: about 0.25 in (0.6 cm)
Materials
Use a smooth worsted yarn in acrylic or a cotton blend so the herringbone texture shows clearly. The amounts below assume about 183 m (200 yd) per 100 g.
- Pine green: 90 g, about 165 m (180 yd) – pocket bodies, strap, leaves
- Cream: 30 g, about 55 m (60 yd) – rims, flaps, borders
- Berry red: 5 g, about 9 m (10 yd) – berries
All amounts include a margin of about 30 percent for your test pocket and any ripping back.
Tools
- 5.5 mm (I-9) and 4.0 mm (G-6) crochet hooks
- One 3 in (7.6 cm) wooden ring
- Stitch markers (at least 4)
- Tapestry needle
- Scissors and a tape measure
- A pinch of fiberfill for the berries (optional)
Abbreviations (US Terms)
- ch – chain
- sl st – slip stitch
- sc – single crochet
- hdc – half double crochet
- dc – double crochet
- inc – 2 sc in the same stitch
- sc2tog / sc3tog – single crochet 2 / 3 together
- hdc3tog – half double crochet 3 together
- BLO / FLO – back loop only / front loop only
- st(s) – stitch(es)
- RS – right side
Special stitch – Herringbone half double crochet (HBhdc): Yarn over and insert the hook into the stitch. Yarn over and pull up a loop, then pull that loop straight through the first loop on the hook, leaving 2 loops on the hook. Yarn over and pull through both loops. Each stitch leaves a slanted bar, and these bars make the herringbone texture.
Picot: Ch 2, then sl st in the 2nd ch from the hook.
Gauge and Checkpoints
Gauge: 14 HBhdc and 10 rounds = 4 in (10.2 cm) with the 5.5 mm hook. Border gauge: 17 sc = 4 in (10.2 cm) in cream.
Make one complete pocket before you start the others, and use it to check your gauge. Measure at each stage:
- After Rnd 9 (base): 4.9 in (12.4 cm) across, lying flat
- After Rnd 14: the body is 2.0 in (5.1 cm) tall
- After Rnd 18: the green body is 3.6 in (9.1 cm) tall and 7.7 in (19.6 cm) wide when flattened
- After Rnd 20: the pocket is 4.4 in (11.2 cm) deep
- Flap: 6.6 in (16.8 cm) across the base and 2.6 in (6.6 cm) tall
If the pocket is too wide, go down a half hook size. If it is too narrow, go up a half size. Test the first pocket with a real roll, about 4.5 in (11.4 cm) across.
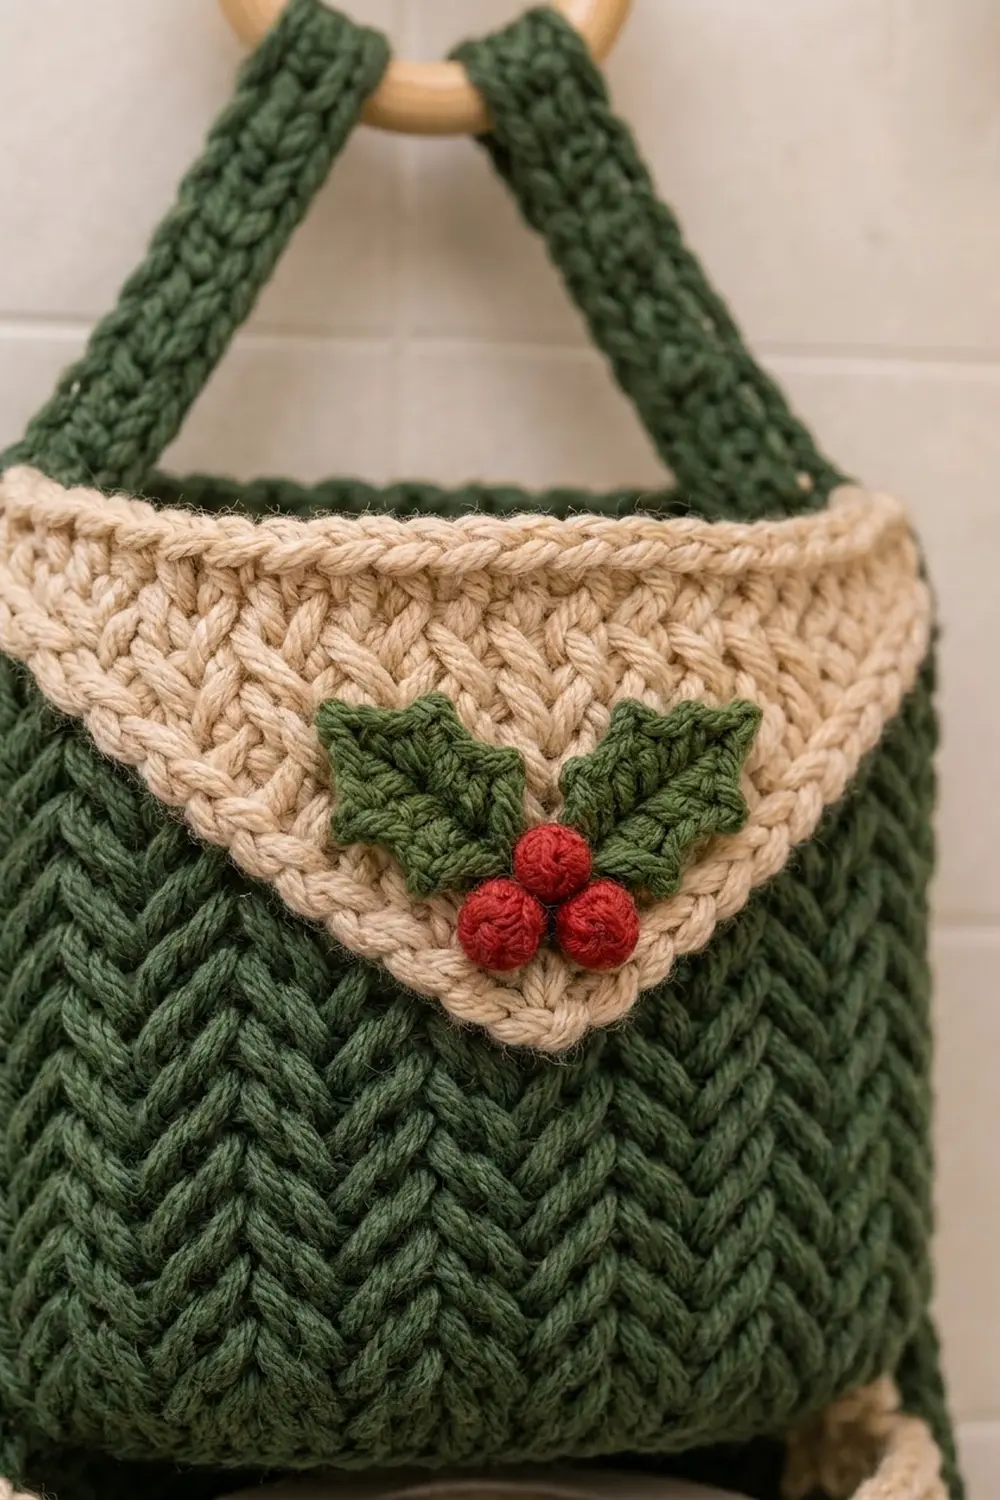
Pocket (make 3)
Base
Use the 5.5 mm hook and green, and work in joined rounds. The ch 1 at the start of each round does not count as a stitch.
Rnd 1: Magic ring, ch 1, 6 sc in ring, sl st to first sc. (6 sts)
Rnd 2: Ch 1, inc in each st around, sl st to first sc. (12 sts)
Rnd 3:Ch 1, 6 times, sl st to first sc. (18 sts)
Rnd 4:Ch 1, 6 times, sl st to first sc. (24 sts)
Rnd 5:Ch 1, 6 times, sl st to first sc. (30 sts)
Rnd 6:Ch 1, 6 times, sl st to first sc. (36 sts)
Rnd 7:Ch 1, 6 times, sl st to first sc. (42 sts)
Rnd 8:Ch 1, 6 times, sl st to first sc. (48 sts)
Rnd 9:Ch 1, 6 times, sl st to first sc. (54 sts)
Checkpoint: the base is 4.9 in (12.4 cm) across.
Body
The ch 2 at the start of each round does not count as a stitch. Sts 1–27 are the front and sts 28–54 are the back. Place markers in st 1 and st 28, and move them up every round.
Rnd 10: Ch 2, HBhdc in BLO of each st around, sl st to first st. (54 sts)
Working in the back loops turns the edge up into a crisp base fold. It also leaves the front loops of Rnd 9 free, and you will use them for joining.
Rnds 11–18: Ch 2, HBhdc in each st around, sl st to first st. (54 sts each round)
Switch to cream on the final sl st of Rnd 18, then fasten off green. Checkpoint: the green body is 3.6 in (9.1 cm) tall.
Cream Rim
Rnds 19–20: Ch 2, HBhdc in each st around, sl st to first st. (54 sts each round)
Fasten off. Checkpoint: the pocket is 4.4 in (11.2 cm) deep.
Envelope Flap
You work the flap upward from the front of the rim and fold it down later. With RS facing, join cream in st 3 of Rnd 20. This leaves 2 front sts free on each side of the flap.
Row 1: Ch 2 (does not count), HBhdc in same st and in next 22 sts (sts 3–25). Turn. (23 sts)
Row 2: Ch 1 (does not count), hdc3tog over first 3 sts, HBhdc in each st to last 3 sts, hdc3tog over last 3 sts. Turn. (1 + 17 + 1 = 19 sts)
Each hdc3tog turns 3 sts into 1, so each row loses 4 sts.
Row 3: Repeat Row 2. (1 + 13 + 1 = 15 sts)
Row 4: Repeat Row 2. (1 + 9 + 1 = 11 sts)
Row 5: Repeat Row 2. (1 + 5 + 1 = 7 sts)
Row 6: Repeat Row 2. (1 + 1 + 1 = 3 sts)
Row 7: Ch 1, sc3tog. (1 st)
