
6. Layer and Sew the Tree
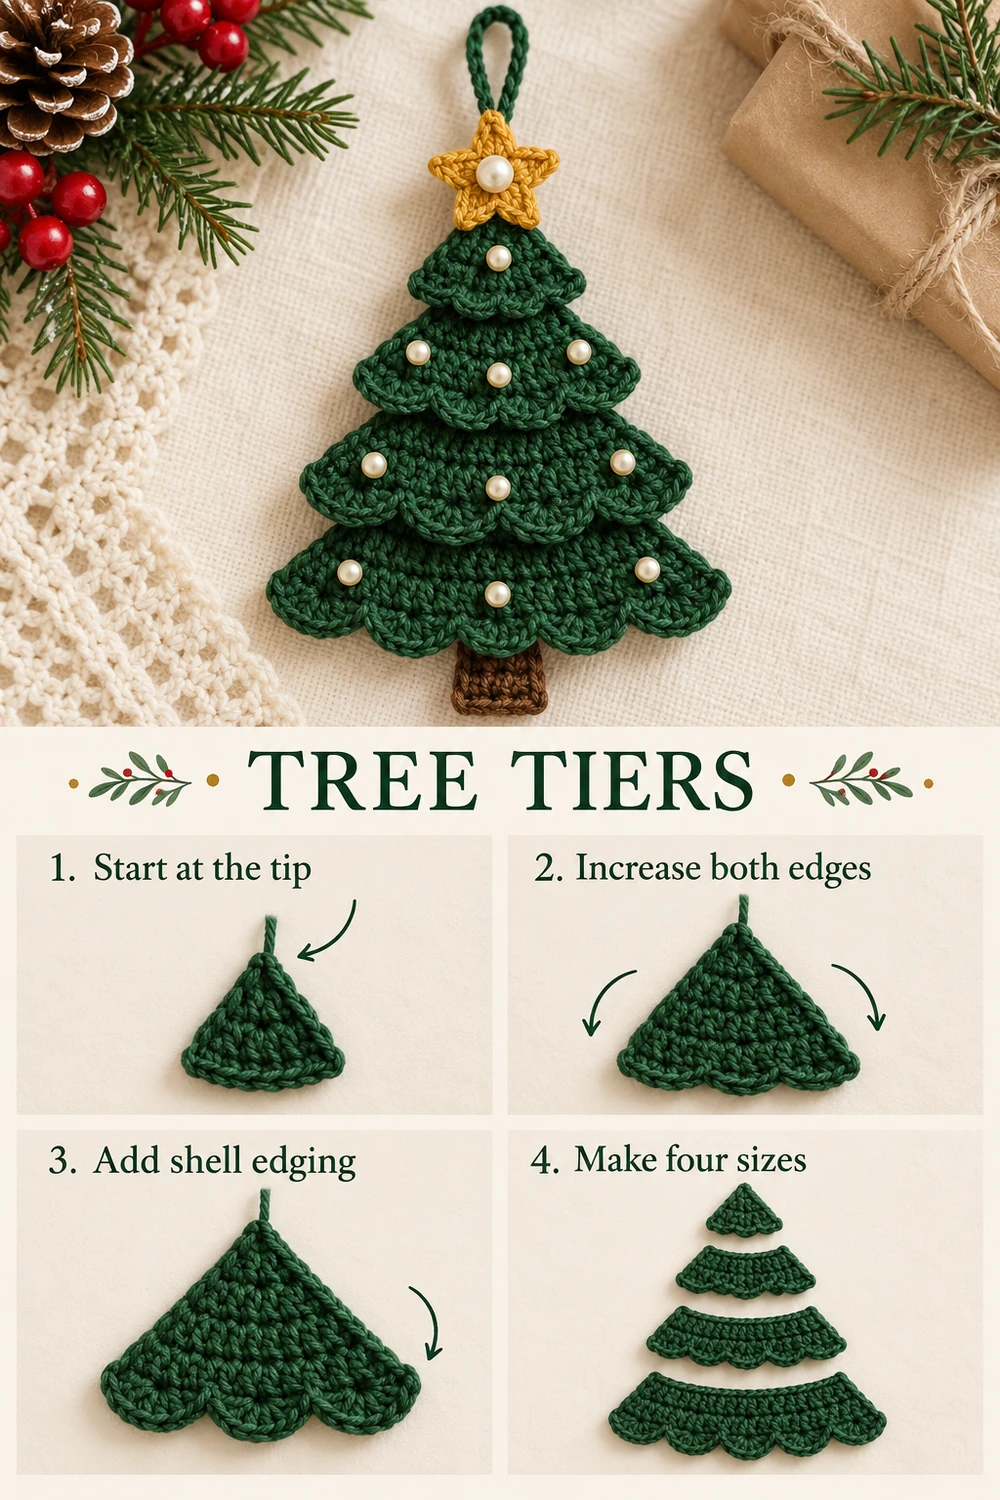
Lay Tier D upright, with its tip at the top and scallops at the bottom. Center Tier C over it so the lower shells of C fall around the middle of D. Add Tier B and then Tier A, each centered on the same vertical line. Adjust the overlap until four distinct scalloped bands show and the bottom tier remains the widest.
Pin all layers first. Sew each upper triangle to the one behind it through the dense central stitches near its tip and upper sides. Take small stitches on the back and keep the shell edges loose. Do not stitch all four bottom borders together: the separate hanging shells create the layered branch shape.
Sew the top two rows of the brown trunk to the back of Tier D, centered below the tree. Stitch across the trunk width and along its two upper corners. Place the gold star over the top triangle tip and sew its center and the bases of two lower points to the green fabric. Leave the outer star points free.
7. Pearls and Hanging Loop
Sew ivory pearls to dense stitches on the green tiers. A balanced arrangement is two on the top tier, three on the next, three on the third, and four on the bottom tier. Avoid putting a heavy pearl at the very tip of an unsupported shell. Secure each bead with several passes of strong thread and hide the ends on the back.
Add one pearl to the gold star center. For the loop, ch 30 with green and fasten off with two long tails. Fold the chain into a loop and sew both ends to several dense stitches behind the top triangle and star center. Use at least four passes in different directions. The green fabric should support the loop; do not rely on a single star point or pearl thread for hanging.
For a fully yarn-based version, embroider ivory knots or tiny satin-stitch dots in place of the pearls. This ornament is a display decoration with small beads and a long hanging loop; keep it away from young children and pets.
Finishing and Care
Weave in every yarn end, then hold the ornament by its loop and check that the tiers hang on one center line. Add a discreet stitch behind a tier if it rotates. Spot-clean gently and reshape flat while damp. Store flat between tissue so the shells and star points keep their shape.
Frequently Asked Questions
Can I make it larger? Use thicker yarn and a matching hook while keeping the stitch counts. Sample the smallest triangle first to check its firmness. Increasing only the number of rows changes the shell-border repeat requirements.
Why is my triangle leaning? Count the starting ch 3 as a dc, work the first extra dc into the same stitch, and place the final two dc in the top of the previous starting chain. Missing either edge increase makes the triangle uneven.
Is this worked as one continuous tree? This adaptation uses four separate triangles. Their overlap produces the layered branches while keeping the construction easy to follow and the full chart readable.
Photo and Complete Crochet Chart
The image has one assembled tree-shaped symbol chart at the top and the finished tree photograph below. It shows the four overlapping tiers, trunk, and star in their final positions. Concealed stitches are hidden in this assembly view; make each separate component with the complete written row counts above.
More Free Christmas Crochet Patterns
- Layered Rainbow Christmas Tree
- Ivory Lace Christmas Tree
- Ivory Holly Berry Ornament
Save This Pattern
Save this pearl and star tree for your handmade holiday decorations. Happy crocheting from Lovely Amigurumi!
Photo Tutorials, Full Chart, and Pinterest Gallery
Find the two photo tutorials and the assembled tree chart above its finished-piece photo first, followed by three Pinterest images. All six images are grouped here at the end.
More Free Crochet Patterns
Find your next handmade project with these lovely patterns.
Christmas Lace Star Crochet Pattern – Free Five-Point Ornament Guide
View Pattern →
Granny Stitch Gingerbread Crochet Pattern – Free Ornament Guide
View Pattern →
Blue Lace Snowflake Crochet Pattern – Free Ornament Guide
View Pattern →
CONTENT END 1
