
Row 1: Ch 2, work 3 sc in the 2nd ch from the hook. (3 sts)
Row 2: Ch 1, sc in each st. (3 sts)
Row 3: Ch 1, 2 sc in the first st, sc to the last st, 2 sc in the last st. (5 sts)
Rows 4–23: Repeat Rows 2–3. Each odd row adds 2 sts, so Row 23 has 25 sts.
Row 24: Ch 1, sc in each st. (25 sts)
Rows 25–76: Repeat Row 24. (25 sts)
This straight middle section is about 11.5 in (29.2 cm) long.
Row 77: Ch 1, sc2tog, sc to the last 2 sts, sc2tog. (23 sts)
Row 78: Ch 1, sc in each st. (23 sts)
Rows 79–97: Repeat Rows 77–78, ending with a Row 77 repeat. Row 97 has 3 sts.
Row 98: Ch 1, sc in each st. (3 sts)
Row 99: Ch 1, sc3tog. (1 st)
Fasten off.
The bottom taper (Rows 1–24) is about 5.3 in (13.5 cm) long. The top taper (Rows 77–99) is about 5.1 in (13.0 cm) long. In total, the 99 rows measure 22 in (55.9 cm).
Make All Pieces
- Panel x 1: A for the body, B for the border and loop
- Pockets x 3: A for Rnds 1–20, B for Rnds 21–22
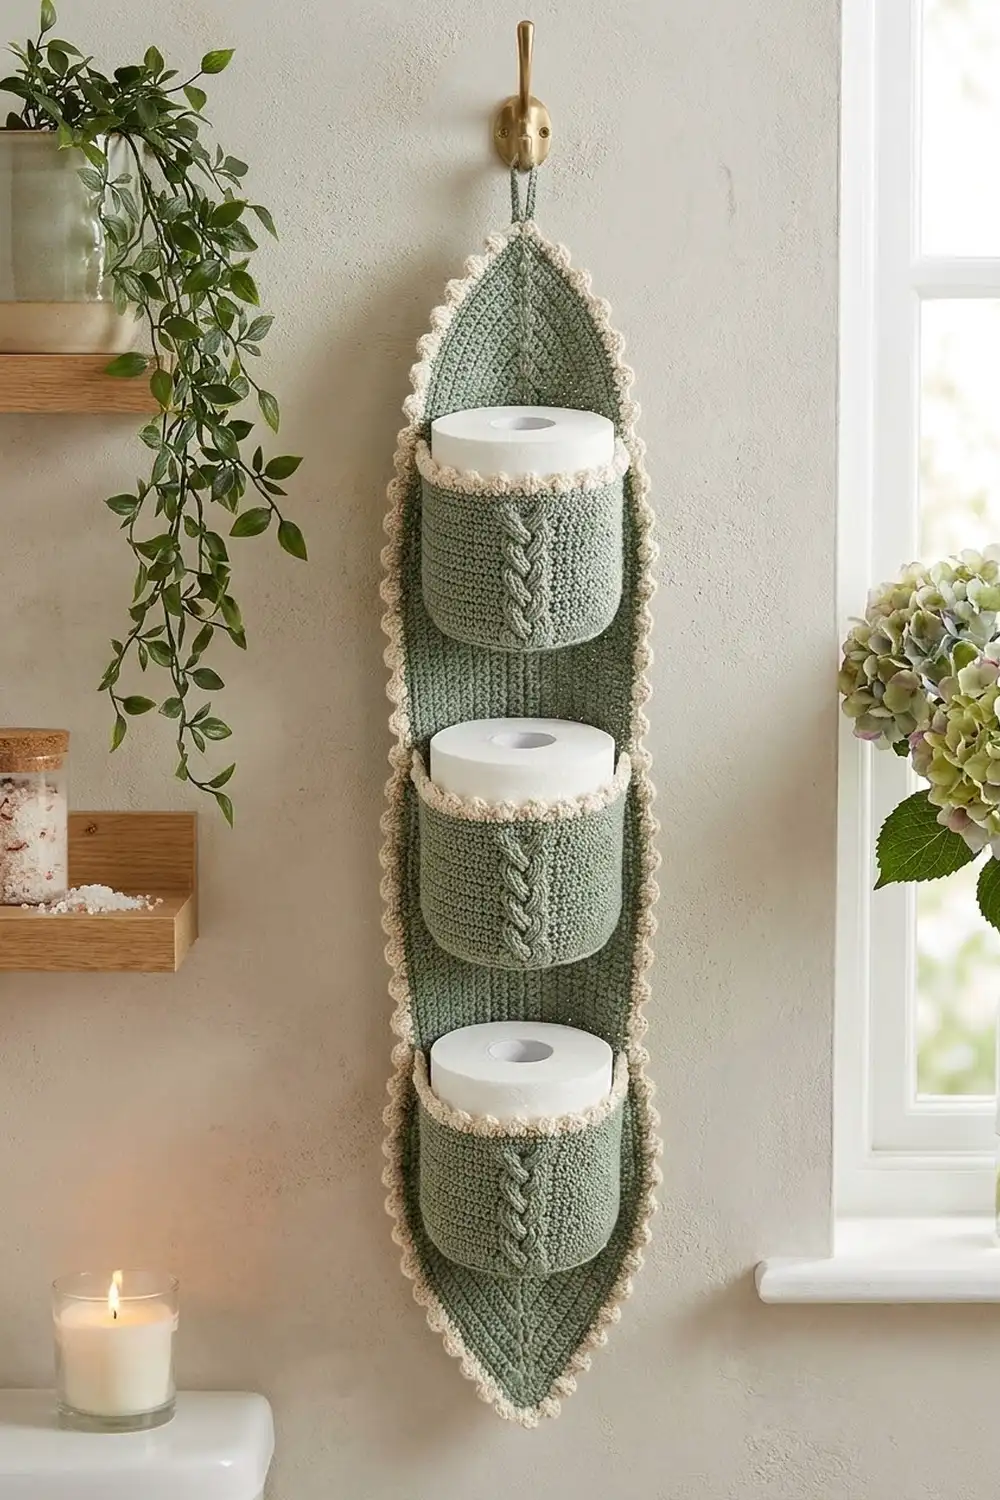
Layout (from top to bottom):
Border
Add the border before you sew on the pockets. That way, the panel edge stays easy to reach.
Border gauge: Work 1 sc in each row end. With sc rows, that comes to about 4.2 sts per inch along the slanted and straight edges.
Rnd 1: Join B in the top point st (Row 99).
– Ch 1, then work (sc, ch 2, sc) in the top point.
– Work 98 sc down the side, 1 in each row end from Row 98 to Row 1.
– At the bottom point, work (sc, ch 2, sc) in the underside of the center st of Row 1.
– Work 98 sc up the other side.
– Join.
This gives 200 sc and 2 ch-2 sps. Each side has 100 sts between the ch-2 sps: 98 row-end sts plus the 2 point sc. The point sc are counted once, as part of these 100.
Rnd 2: Sl st into the top ch-2 sp.
– Ch 1, then work (sc, ch 14, sc) in the sp. The ch-14 becomes the hanging loop.
– Side:sc in next st, 49 times, mbp, sc in next st. That is 100 sc and 50 mbp.
– At the bottom point, work (sc, mbp, sc) in the ch-2 sp.
– Work the second side the same as the first.
– Join.
This gives 204 sc, 101 mbp and 1 ch-14 loop.
Loop: Sl st into the ch-14 loop and work 22 sc over it. Sl st to the next st and fasten off.
Why the math works:Each long edge, counting both tapers, is about 23.7 in (60.2 cm) long. Spread over that edge, 100 sts come to about 4.2 sts per inch, very close to the 4 sts per inch gauge. So the edge lies flat without cupping or ruffling. The repeat with 1 sc at each end uses exactly 100 sts and leaves 2 sc between neighboring picots everywhere, including at the points.
The border adds 0.5 in (1.3 cm) on every edge. That takes the panel to 7.25 in x 23 in (18.4 cm x 58.4 cm).
Joining
Method: Whipstitch with the B tail for the rim and a length of A for the base, matching stitch to stitch.
Stitch-to-stitch logic: The 21 back sts of a pocket (sts 50–10) match the center 21 sts of a 25-st panel row (sts 3–23), with 2 sts free on each side.
For each pocket:
- Rim: With the pocket’s back against the panel, whipstitch the 21 marked sts of Rnd 21 to sts 3–23 of the rim row.
- Base: Whipstitch the 21 marked front loops of Rnd 11 to the base row, which is 15 rows below the rim row.
| Base row | Rim row | |
|---|---|---|
| Bottom pocket | Row 20 | Row 35 |
| Middle pocket | Row 40 | Row 55 |
| Top pocket | Row 60 | Row 75 |
Row 20 has exactly 21 sts, so the base of the bottom pocket spans the full width of the panel at that point.
Tension: Pull each stitch snug, but don’t pull so hard that the panel puckers. The 15 rows between base and rim measure about 3.3 in (8.4 cm). That matches the pocket wall, so the back of the pocket lies flat.
Size checkpoint: The bottom of the pockets sit about 4.4 in (11.2 cm), 8.9 in (22.6 cm) and 13.3 in (33.8 cm) up from the bottom point, measured before the border. The gap between one pocket’s rim and the next pocket’s base is about 1.1 in (2.8 cm).
Final Blocking
- Wet the holder or mist it well, then press out the extra water in a towel.
- Lay the panel flat. Pin it to 7.25 in x 23 in (18.4 cm x 58.4 cm), placing a pin at each point.
- Pin out every picot along the border.
- Fill each pocket with a roll in a plastic bag, or a rolled hand towel, so the cups dry round.
- Let it dry completely, at least 24 hours.
- Take out the pins and fillers, and hang the holder on a hook.
Final Quality-Control Checklist
- [ ] Panel stitch counts check out: 25 sts at the widest point, 99 rows, 1 st at each point
- [ ] Every pocket has 60 sts in Rnds 10–21 and 30 picots in Rnd 22
- [ ] The cables cross left, right, left, right, with 4 crosses per pocket
- [ ] Each side of the border has 100 sc and 50 mbp
- [ ] The cables are centered and the pockets line up straight down the center
- [ ] All ends are woven in and the hanging loop is firm
- [ ] A roll slides in and out easily
Troubleshooting
- The pocket base cups or ripples: check that you have 60 sts after Rnd 10, and change hook size if needed.
- A roll won’t fit in the pocket: go up a hook size, or add Rnd 11 of the base in sc with 6 increases (66 sts). If you do that, also add 6 hdc to the back section of the walls.
- The cable sinks into the fabric: use FPtr for the crosses, not FPdc, and keep the post stitches loose.
- The border ruffles: skip 1 row end out of every 10 on the long straight section. Adjust the picot repeat to match.
- The panel sags under the rolls: tighten your tension, or sew the base rows again a little more firmly.
Care
Hand wash in cool water and lay flat to dry. Reshape the pockets around a roll while they are still damp.
Final Notes
Here is how the measurements build on each other. The pocket base is 60 sts, about 4.75 in (12.1 cm) across. The walls are 9 rounds of hdc plus cable, about 3.75 in (9.5 cm) tall with the rim. The panel is 25 sts by 99 rows, or 6.25 x 22 in (15.9 x 55.9 cm). The border has 100 sts per side and brings the holder to 7.25 x 23 in (18.4 x 58.4 cm). Each pocket’s 21 back sts match 21 panel sts, which keeps the column straight and the rolls secure.
Happy crocheting!
