
This hanging toilet paper holder has three leaf-shaped pockets stacked down a long backing panel. It hangs from a single hook and keeps three standard rolls on display. The main fabric is sage green single crochet. Cream yarn picks out the leaf veins, the scalloped trims and the hanging strap.
Each pocket is a wide leaf with a V-shaped top edge that dips at the center and a rounded bottom. A cream center vein runs from the V point to the bottom, with three pairs of angled side veins that follow the line of the top edge. The bottom of each pocket nests into the V of the pocket below, so the column reads like a stem of leaves.
The pattern uses US crochet terms. The finished holder measures 6 in (15.2 cm) wide and 21 in (53.3 cm) long, not counting the strap. With the strap it’s about 24.5 in (62.2 cm) from the bottom edge to the top of the loop.
You will make one oval backing worked in rounds, three pockets worked in rows as wide circle segments, and one strap. The pockets are sewn onto the front of the backing. Then the backing gets a two-round cream border, and the strap is sewn on last.
Finished Size and Construction
- Finished size: 6 x 21 in (15.2 x 53.3 cm), plus the strap
- Skill level: Intermediate
- Terminology: US
- Yarn weight: Worsted (#4)
- Hook: 4.5 mm (US 7)
- Number of pieces: 5 (1 backing, 3 pockets, 1 strap)
- Layout: 1 column of 3 pockets on a vertical backing
- Pocket size: about 8.5 in (21.6 cm) wide and 6.5 in (16.5 cm) tall, flat
- Backing before border: 5 x 20 in (12.7 x 50.8 cm)
- Border depth: 0.5 in (1.3 cm)
Materials
Use a smooth worsted cotton or cotton blend, about 200 yd (183 m) per 100 g. Cotton holds its shape well and doesn’t pill much in a bathroom. Choose a firm yarn, because the pockets have to carry the weight of the rolls.
- Sage green (MC): 230 g, about 421 m
- Cream (CC): 60 g, about 110 m
These quantities include a margin of about 15%.
Tools
- 4.5 mm (US 7) crochet hook
- Tapestry needle
- 8 locking stitch markers
- Sewing pins
- Measuring tape
- Scissors
- Blocking mat and rustproof pins
- Spray bottle
Abbreviations (US Terms)
- ch – chain
- sc – single crochet
- hdc – half double crochet
- dc – double crochet
- sl st – slip stitch
- sc2tog – single crochet 2 together
- st(s) – stitch(es)
- sk – skip
- RS / WS – right side / wrong side
- MC / CC – main color / contrast color
Special stitches
- Shell: (hdc, dc, hdc) all in the same stitch.
- Surface slip stitch: With RS facing, hold the yarn behind the work. Insert the hook from front to back through the fabric and pull up a loop through the loop on your hook. Each new stitch moves one stitch or one row along your vein line.
Gauge and Checkpoints
Gauge: 16 sc and 16 rows/rounds = 4 in (10.2 cm) with a 4.5 mm hook. That means 4 sc and 4 rows per 1 in (2.5 cm).
Make one pocket first. It’s the quickest piece and it shows your gauge in both directions.
Checkpoints
- Pocket after Row 8: radius 2 in (5.1 cm) from the center of the ring to the edge
- Pocket after Row 16: radius 4 in (10.2 cm)
- Backing after Rnd 5: 2.5 x 17.5 in (6.4 x 44.5 cm)
- Backing after Rnd 10: 5 x 20 in (12.7 x 50.8 cm)
If your piece comes out too big, go down half a hook size. If it’s too small, go up half a size. Don’t add or remove rows to fix gauge, because the pocket placement depends on these measurements.
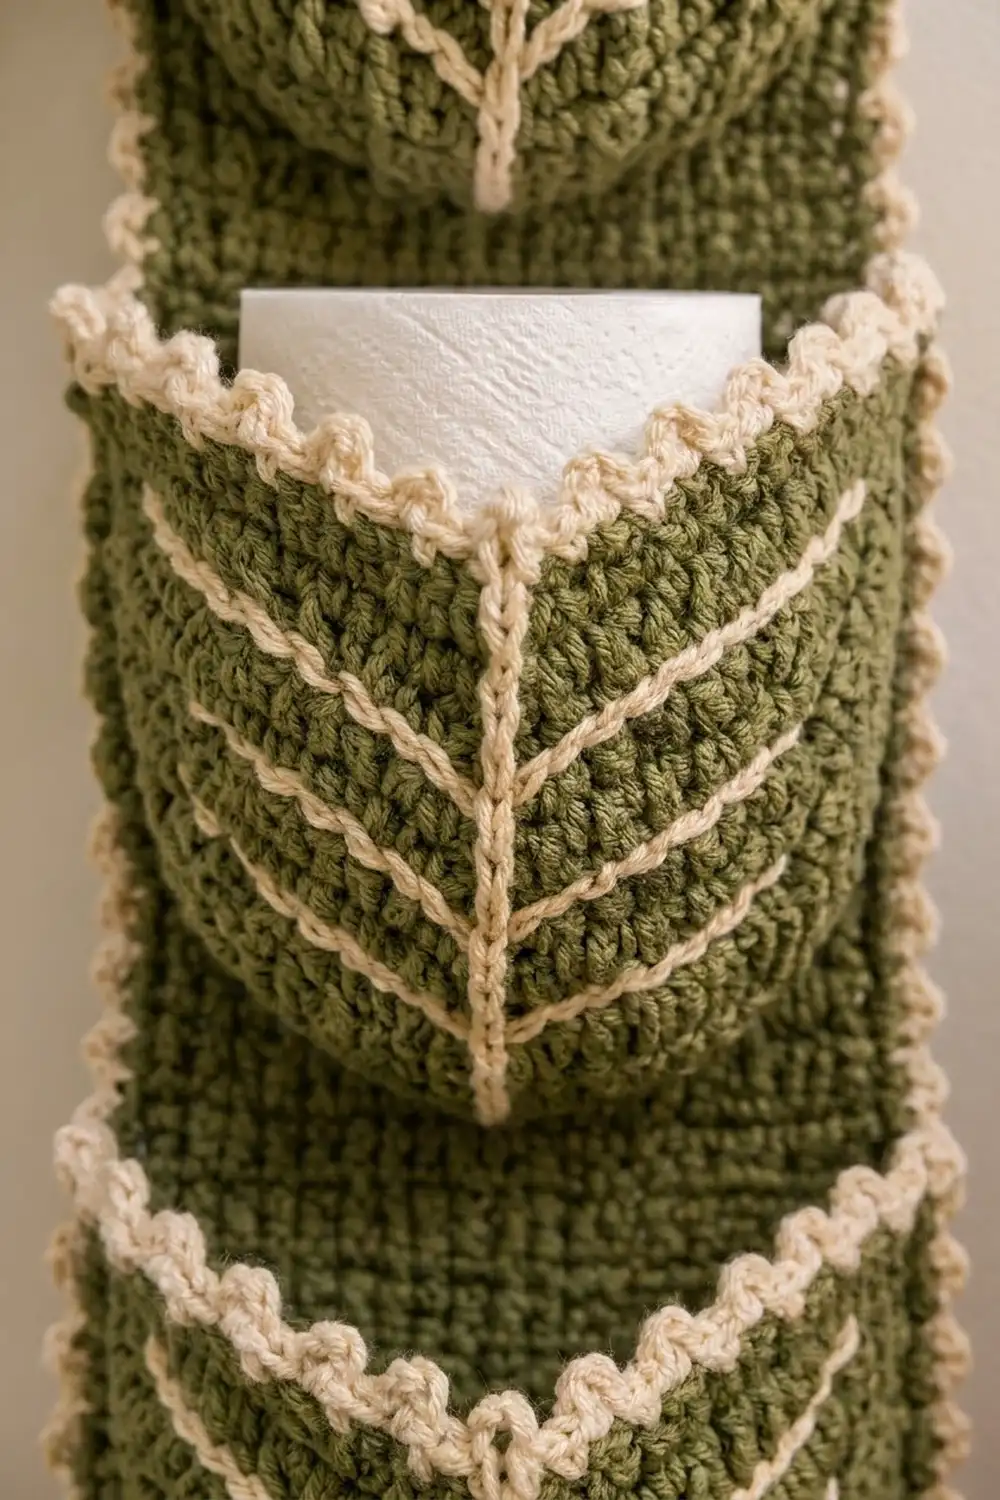
Pocket (Make 3)
Each pocket is two-thirds of a circle, worked flat in rows from a magic ring. The four increases per row make a 240-degree wedge. When the wedge lies flat, its two straight edges rise from the center in a V, and that V is the top edge of the pocket. The curved outer edge becomes the rounded bottom and sides.
Ch 1 at the start of each row does not count as a stitch.
Row 1 (RS): With MC, make a magic ring, ch 1, 4 sc in ring, turn. (4)
Row 2: Ch 1, 2 sc in each st across, turn. (8)
Row 3:Ch 1, 4 times, turn. (12)
Rows 4–16:Ch 1, 4 times, turn. Each row has 4 times the row number in stitches.
Stitch counts: Row 4 (16), Row 5 (20), Row 6 (24), Row 7 (28), Row 8 (32), Row 9 (36), Row 10 (40), Row 11 (44), Row 12 (48), Row 13 (52), Row 14 (56), Row 15 (60), Row 16 (64).
Pull the ring closed tight. Fasten off MC.
The first and last stitches of Row 16 are the two outer corners. The center of the ring is the V point.
Pocket Edging
Rnd 1 (RS): Join CC in the last st of Row 16 (corner 1). Ch 1, 3 sc in the same st. Work 1 sc in the end of each row from Row 15 down to Row 2 (14 sc). Sc2tog over the end of Row 1 on this side and the end of Row 1 on the other side (1 st at the V point). Work 1 sc in the end of each row from Row 2 up to Row 15 (14 sc). Work 3 sc in the first st of Row 16 (corner 2). Sc in the next 62 sts of Row 16. Join with a sl st to the first sc. (97 sts: 3 + 14 + 1 + 14 + 3 + 62)
Row 2 (top scallops): Sl st in the next st (the center st of corner 1). You’ll now work only along the V-shaped top edge, which has 33 sts from the center of corner 1 to the center of corner 2. Ch 1, sc in the same st, sk 1, shell in next st, sk 1, sc in next st. Repeat from * to * 7 more times. The last sc lands in the center st of corner 2. (8 shells: 4 on each side of the V, with an sc at the V point.) Fasten off.
The top edge has 4 x 8 + 1 = 33 sts, which is why an sc falls right at the V point.
Leaf Veins
Use CC and surface slip stitch on the RS.
Center vein: Start at the V point. Work down the center line of the pocket, between the two middle sts of each row (sts 2 and 3 in Row 1, and between sts 32 and 33 in Row 16). Make 1 surface sl st per row, for 16 sl sts. Fasten off at the bottom edge.
Side veins: Make 3 on each side. They start on the center vein at Row 4, Row 8 and Row 12, which is 1, 2 and 3 in (2.5, 5.1 and 7.6 cm) below the V point.
Work each vein diagonally up and outward, parallel to the nearest top edge, so the veins form chevrons. Make each vein about 12 surface sl sts, or 3 in (7.6 cm), and stop about 1 in (2.5 cm) short of the edge. Fasten off each vein and weave in the ends on the WS.
