
- Row 1: sc in the second chain and each remaining chain. (9)
- Row 2: ch 1, turn, dec, sc in next 5 sts, dec. (7)
- Row 3: ch 1, turn, sc in all 7 sts. (7)
- Row 4: ch 1, turn, dec, sc in next 3 sts, dec. (5)
- Row 5: ch 1, turn, dec, sc in next st, dec. (3)
- Row 6: ch 1, turn, dec, sc in next st. (2)
- Row 7: ch 1, turn, dec. (1)
Work a border around the sides, placing one sc into each row-end space and 9 sc across the starting edge. At the bottom tip, work (sc, ch 2, sl st in the second chain from hook, sc) in the same tip space to accent the point. Join and fasten off with a sewing tail.
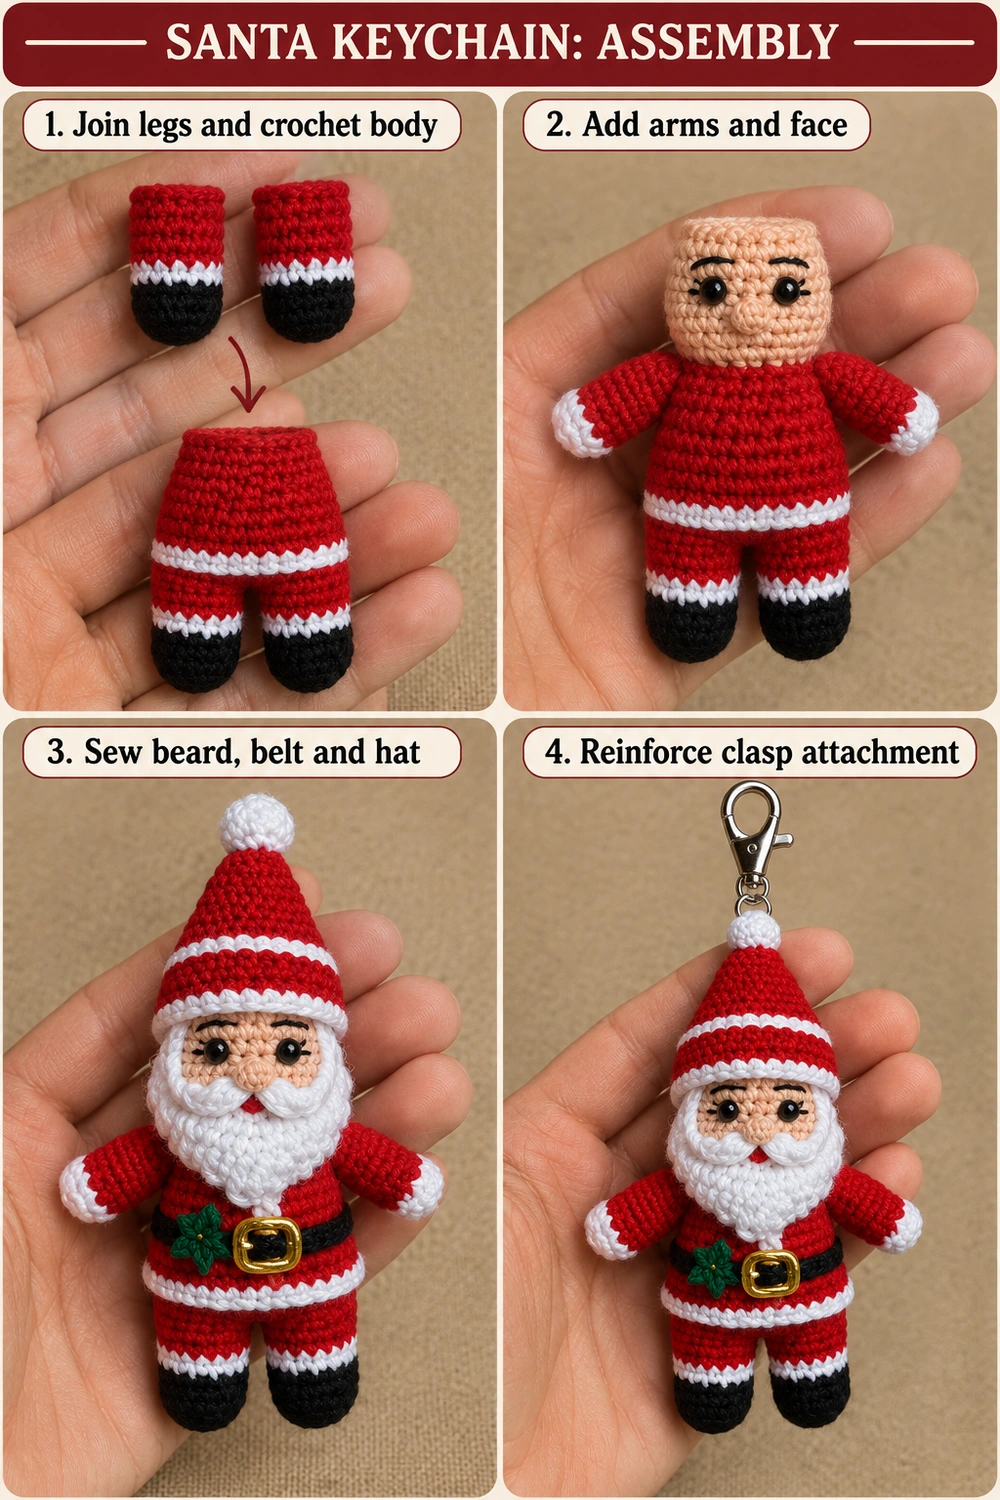
Sew the straight upper edge across the lower face. Tack the sides down lightly and let the tip extend over the upper coat. Keep the belt visible below the beard. Use white yarn to add a short line of small backstitches around the lower sides of the face if you want a fuller side-beard outline.
7. Make Two Moustache Lobes
With white yarn, ch 5. Starting in the second chain, work sc, hdc, dc, then 3 hdc in the last chain. Continue along the underside with dc, hdc, and 2 sc in the first chain used. (10 stitches)
Join and fasten off with a sewing tail. Make two identical lobes and position them as mirror images under the nose. Sew the inner ends firmly and tack the outer ends slightly upward. These small flat pieces sit over the upper beard.
8. Crochet the Tall Striped Hat
Start at the tip in red yarn.
- R1: 4 sc in MR. (4)
- R2: (sc, inc) × 2. (6)
- R3: (sc in next 2 sts, inc) × 2. (8)
- R4: (sc in next 3 sts, inc) × 2. (10)
- R5: (sc in next 4 sts, inc) × 2. (12)
- R6: (sc, inc) × 6. (18)
- R7: sc in each st. (18)
- R8: (sc in next 2 sts, inc) × 6. (24)
- R9, white: sc in each st. (24)
- R10–R11, red: sc in each st. (24 each round)
- R12: (sc in next 3 sts, inc) × 6. (30)
- R13, white: sc in each st. (30)
Join with a sl st and leave a long sewing tail. The white R9 makes the higher stripe, while white R13 forms the brim. Put the hat over the top of the head, keeping the eyes visible. Sew the lower edge around the head without gathering it tightly.
Keep the hat mostly unstuffed so it stays tall without becoming heavy. If the tip folds more than you want, add a very small wisp of stuffing near the tip before sewing.
9. Add the White Pompom
With white yarn, work 6 sc in MR, one round of 6 sc, then 3 dec. Add a tiny amount of stuffing before closing. Draw the last opening closed and sew the pompom to the hat tip.
The clasp attachment should pass through reinforced yarn stitches beside or beneath the pompom. The small pompom itself should not carry the entire keychain’s weight.
10. Embroider the Buckle and Holly
Use gold yarn to embroider a small rectangle at the center front of the black belt. Make the upper and lower edges horizontal and add two short vertical sides. Work a second pass for a thicker gold outline, leaving black visible inside. Add a short gold center bar if desired.
For the small holly leaf, use dark green yarn and ch 4. Starting in the second chain, work sc, hdc, then 3 sc in the last chain. Continue along the underside with hdc and 2 sc in the first chain used. (8 stitches)
Join, leave a sewing tail, and stitch the leaf next to the buckle on Santa’s left-front coat area as viewed in the reference. Keep the leaf small enough that the gold buckle remains clear.
11. Reinforce and Attach the Clasp
Use a doubled strand of strong matching yarn to make a small sewn loop at the top. Pass through several hat stitches, then take the strand down through the hat into the top of the head. Secure it through multiple head stitches and bring it back up. Repeat to spread the load.
Attach the hardware through this reinforced loop using its connecting ring. Close the ring fully with appropriate jewelry pliers. Give the keychain a gentle tug over a soft surface and check that the hardware stays secure and the hat seam does not stretch.
Final Checks and Chart Notes
Check that both legs hang evenly, both arms sit at the same height, and the beard leaves the belt visible. Secure all sewing ends inside the doll. Spot clean gently and dry completely before use; avoid soaking metal hardware.
The two tabletop images below show one complete Santa silhouette above the finished keychain. They are component construction and assembly guides: dashed seams indicate pieces to sew, and stitch symbols identify the crochet fabric. Follow the written rounds for increases, decreases, color changes, and exact totals. The separately sewn parts do not form one continuous flat crochet chart.
More Christmas Crochet Patterns
Try the Mini Santa Bell, the Santa Star Ornament, or the Red Snowflake Bauble for more handmade Christmas gifts.
Photo Tutorial, Tabletop Guides and Pinterest Images
The six images below include one assembly tutorial, two tabletop construction charts, and three project images to save for later.
More Free Crochet Patterns
Find your next handmade project with these lovely patterns.
Christmas Lace Star Crochet Pattern – Free Five-Point Ornament Guide
View Pattern →
Granny Stitch Gingerbread Crochet Pattern – Free Ornament Guide
View Pattern →
Blue Lace Snowflake Crochet Pattern – Free Ornament Guide
View Pattern →
CONTENT END 1
