
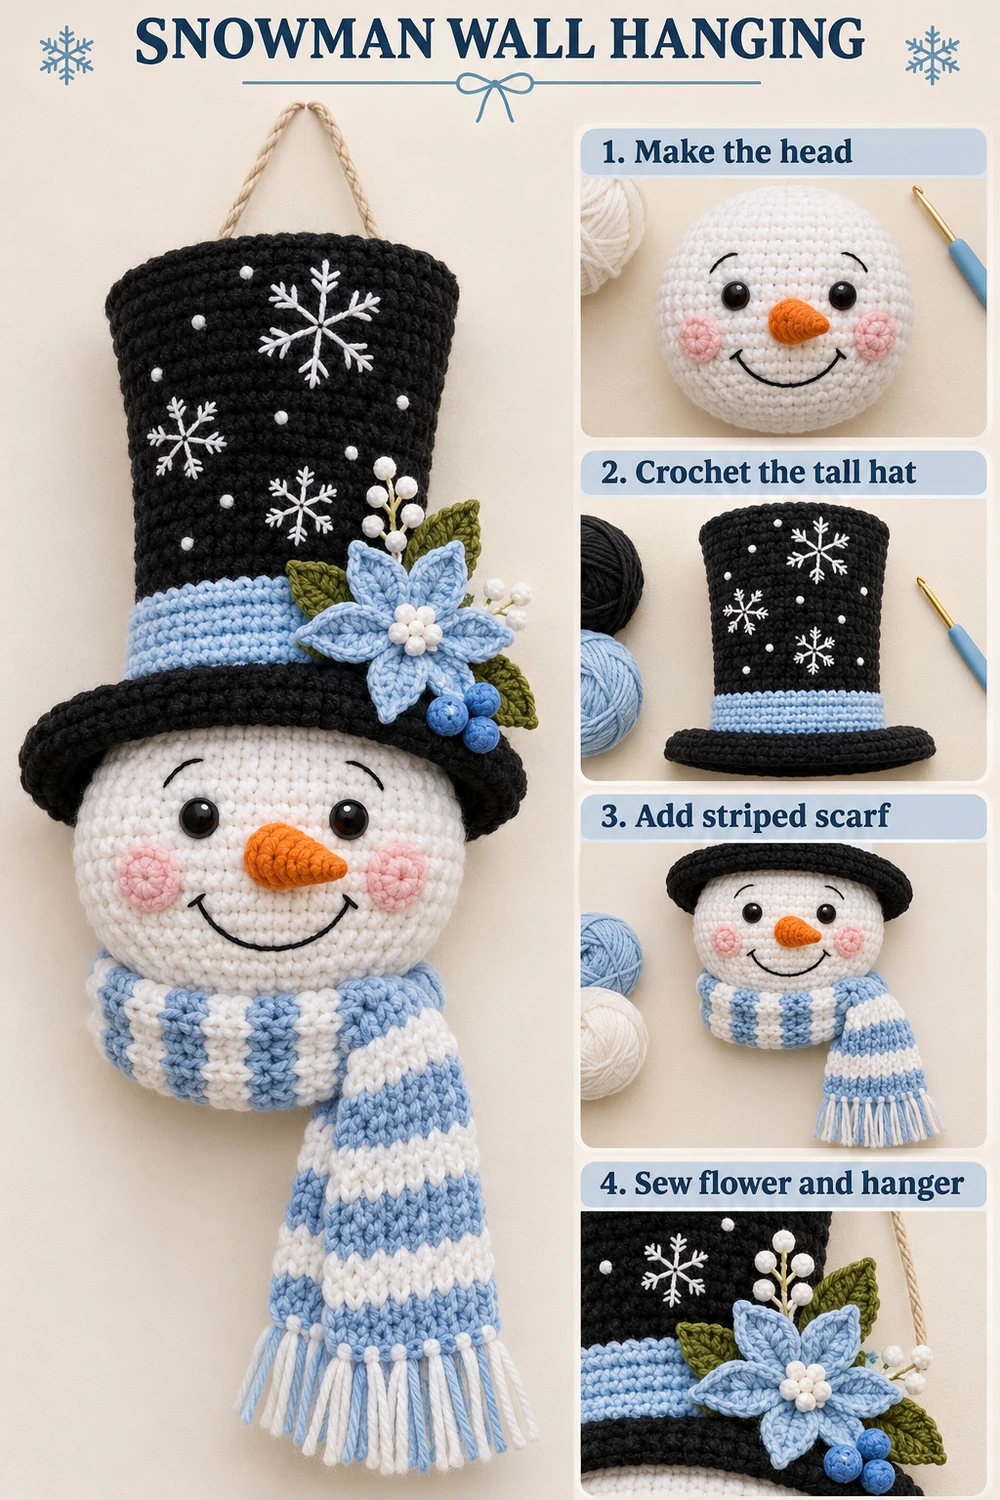
Make three matching pieces in olive green for leaves. Arrange the six blue petal bases in a flower, sew their bases together, then place the green leaves behind with their points projecting. Keep the tips free. Sew the whole flower at the right side of the blue hat band, spreading the attachment across several dense hat stitches.
For the white flower center, make 6 sc in MR, join, and fasten off. Sew it over the petal bases and embroider several small white knots over it for a pearl-like cluster. No loose metal or plastic beads are required.
Small Blue Berries and White Sprays
Make three blue berries: R1, 6 sc in MR; R2, 6 sc; R3, dec three times . Fasten off, close the remaining loops, and leave unstuffed. Sew the three berries beside the flower, close to the hat band.
For each of two white sprays, make a ch-10 stem and sl st back from the second chain . Add three short ch-4 branches, each slip-stitched back from the second chain . Sew the branch bases to the stem. Make three tiny white berries per spray using the same 6 / 6 / 3 rounds as the blue berries, and sew one to each branch tip.
Place the sprays behind the flower and leaves. Tack every stem and branch to the hat so nothing hangs as a long loose strand. Keep the blue petals and green leaf tips visible.
Natural Cord Hanger and Final Assembly
Fold approximately 30 cm of soft natural cotton cord into a loop. Anchor its ends to two separate dense areas on the upper back of the hat, folding the ends back and sewing them through several stitches. Reinforce the connection between hat and head so the hanger supports the whole ornament.
Check that the tall hat stays upright, the blue flower sits on the right, and the scarf tail hangs straight below the head. Add hidden tacks at any moving seam. The head-only silhouette has no arms, legs, or torso. Gently flatten the back to sit against a door or wall.
Reading the Two Whole-Ornament Charts
Each image shows the entire finished silhouette above its matching product photo. The colored stitch symbols and component labels identify the head, hat, scarf, and accessories at their assembly positions. Dense repeated fabric is shown as a symbol schematic; exact row and round counts are given in the written instructions. Dashed marks show sewn joins, cord paths show textile cords, and snowflakes show embroidery. This is an assembly chart, not a claim that all separate pieces form one continuous crochet pattern.
Finishing, Care, and Tips
Check the head stuffing before closing: small tufts keep the face smooth. Pin every accessory before sewing and compare the front with the reference. Keep scarf folds relaxed rather than tightening them around the head. Embroider the face before the last accessory seams so you can hide the thread ends.
Spot-clean gently, reshape, and dry completely. Avoid soaking the pompom, fringes, or twisted cord unnecessarily. Store the ornament in a shallow box so the hat and flower or dangling accessories are not crushed. These are decorative hangings with cords and attached parts, not tested children’s toys; display them away from young children and pets.
More Free Christmas Crochet Patterns
- Christmas Owl Granny Square
- Dusty Rose House
- Cute Golden Christmas Bell
Save This Pattern
Save this festive snowman for your handmade winter decorations. Happy crocheting from Lovely Amigurumi!
Tutorial, Two Whole-Ornament Charts, and Pinterest Gallery
The six 1000 × 1500 images are grouped at the end: one photo tutorial, two whole-ornament chart-above-photo guides, and three Pinterest images.
More Free Crochet Patterns
Find your next handmade project with these lovely patterns.
Christmas Lace Star Crochet Pattern – Free Five-Point Ornament Guide
View Pattern →
Granny Stitch Gingerbread Crochet Pattern – Free Ornament Guide
View Pattern →
Blue Lace Snowflake Crochet Pattern – Free Ornament Guide
View Pattern →
CONTENT END 1
