
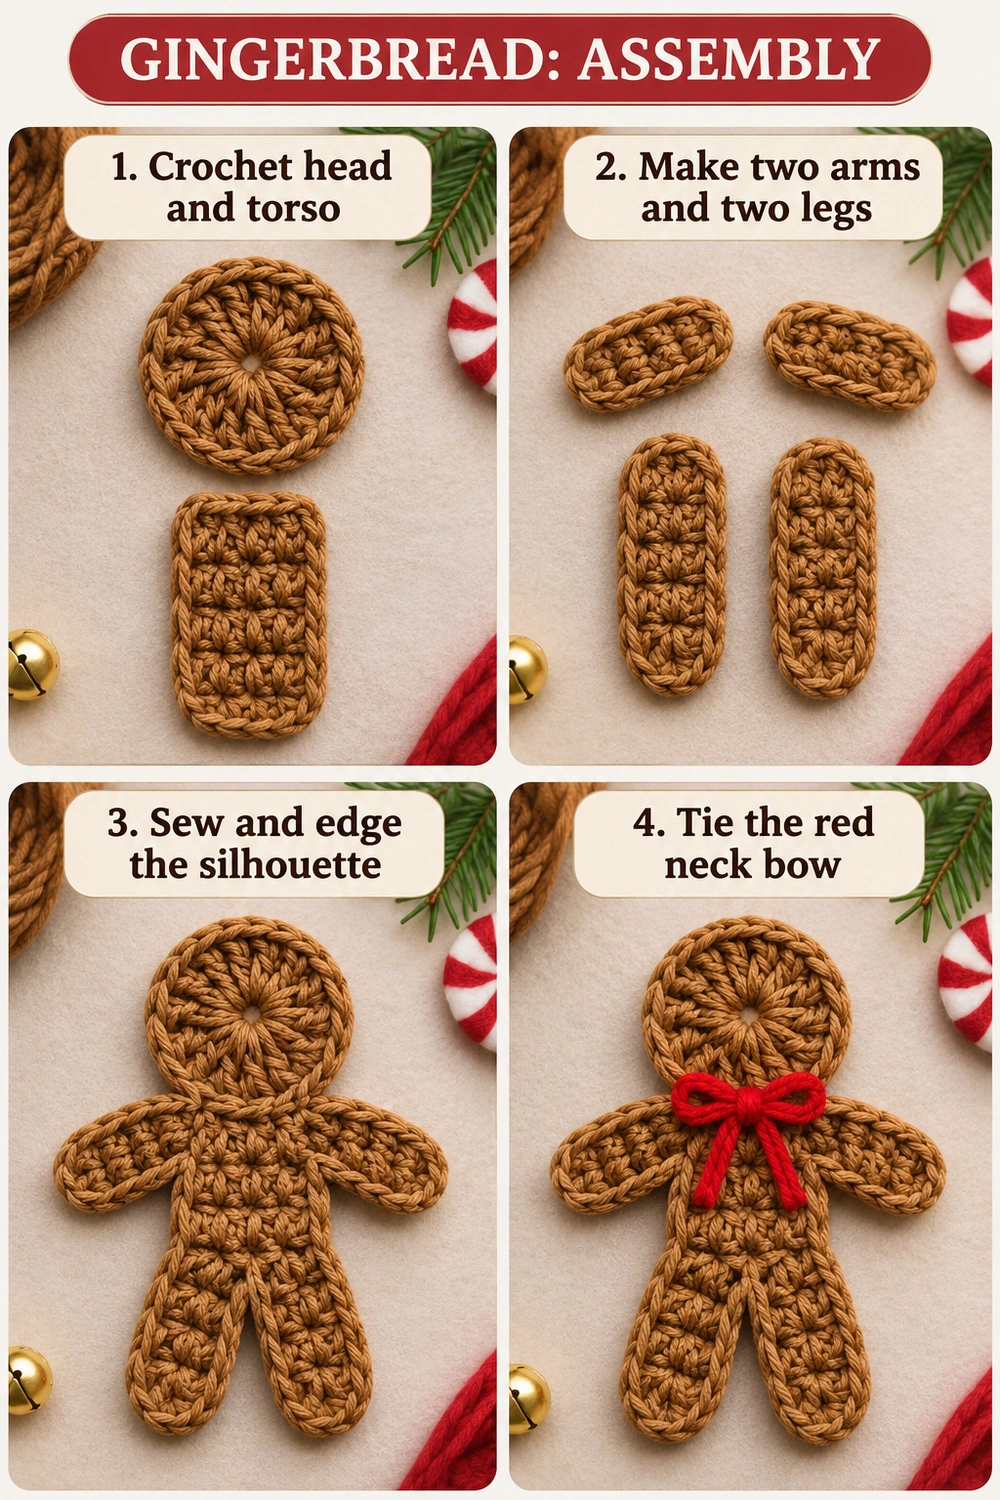
Place the arms at the upper left and upper right sides of the torso, angled outward and slightly downward. Overlap each shoulder end onto the torso by about one or two stitches.
Place the legs at the bottom of the torso, with their upper ends side by side and the rounded lower ends pointing down and slightly apart. Keep a small visible gap between the legs to preserve the gingerbread-person outline.
Pin all six pieces and view the figure from a short distance. Both arms should have a similar angle, and both legs should extend the same distance below the body. Adjust the overlaps before making permanent seams.
6. Sew the Components Together
Use the brown tails and small whipstitches to attach the head to the torso across the overlapping section. Catch both layers without pulling the fabric into a ridge.
Sew each arm shoulder to the upper torso side. Take several small passes across the overlap so the join remains secure while the hand end stays free and flat.
Sew each leg to one half of the lower torso edge. Work through the overlapped stitches and add a second short seam on the wrong side if needed. Do not stitch the two legs together down their length.
Check the figure after every seam. Lay it flat to make sure the head is centered, the limbs are even, and the joins have not tightened into lumps.
7. Add the Brown Outline
Join brown yarn at an inconspicuous point on the outside edge, such as the lower side of a leg. Ch 1 and work sc around the entire assembled silhouette, keeping the right side facing you.
Work one sc into each exposed stitch along the head and oval limbs. Along the torso’s row ends, work one sc into each row-end space. Do not crochet across hidden edges inside the sewn overlaps.
At an outer corner where the direction changes sharply, work an additional sc into the same space if needed to keep the outline flat. At the inner arm or leg valleys, take a small slip stitch into the deepest accessible join before continuing along the next edge. Avoid adding a dense cluster of stitches inside the valley.
Continue until you reach the beginning, join with a sl st, and fasten off. This finishing edge should create a tidy braided outline rather than a ruffle. If it waves, remove a few extra edge stitches; if it pulls inward, relax the tension or add a stitch at the tight outer turn.
The final edge count varies with the exact overlap and the number of exposed stitches. The head still began with 24 dc, each arm with 10 sc per round, and each leg with 16 sc per round.
8. Tie and Secure the Red Bow
Cut a short length of red yarn, leaving enough to tie a small bow comfortably. Wrap it once around the narrow neck area between the head and torso, then tie a neat bow with two loops.
Adjust the loops and tails to match the reference: the loops sit close to the neck, with the tails extending over the upper body. Trim the ends evenly after checking the size.
Use a few small red sewing stitches through the bow knot and the crochet underneath to prevent the bow from slipping off. Do not tighten the yarn around the neck so firmly that it distorts the head or torso.
Finishing and Using the Motif
Weave every brown tail securely through the wrong side, changing direction before trimming. Smooth the head and limbs. If needed, dampen the brown crochet and dry it flat with the arms and legs arranged in the intended position.
Keep the face plain for the understated style of this project. The red neck bow is the only contrasting decoration, so the brown texture and simple silhouette remain the focus.
Sew the motif to a gift bag, a seasonal banner, or a fabric decoration through the brown back stitches. For a hanging ornament, you may add a separate reinforced loop behind the head after finishing; it is not part of the basic flat motif.
Reading the Tabletop Construction Guides
The two chart photographs below show one complete gingerbread-person silhouette above the finished motif resting on a table. The round head uses double crochet, the torso and limbs use single crochet, and dashed lines indicate sewing joins.
These are component construction and placement guides. Follow the written instructions for exact counts, the different oval chain lengths, and the final outline. The separate pieces are sewn together rather than worked as one continuous flat chart.
More Handmade Christmas Projects
Pair this motif with the Wrapped Swirl Candy, the Flat Snowman Applique, or the Santa Gift Basket for a handmade holiday collection.
Photo Tutorial, Tabletop Guides and Pinterest Images
The six images below include one assembly tutorial, two tabletop construction guides, and three gingerbread project images to save for later.
More Free Crochet Patterns
Find your next handmade project with these lovely patterns.
Christmas Lace Star Crochet Pattern – Free Five-Point Ornament Guide
View Pattern →
Granny Stitch Gingerbread Crochet Pattern – Free Ornament Guide
View Pattern →
Blue Lace Snowflake Crochet Pattern – Free Ornament Guide
View Pattern →
CONTENT END 1
