
Secure the tail on the back and weave it through dense stitch areas before trimming. Check the attachment with a gentle pull. Keep the front seam hidden under the white pom-pom.
Weave in the Ends
Weave the red starting and finishing tails into the back of the red panel, changing direction before trimming. Keep red tails away from the white brim so they do not show through.
Weave white tails through the back of the brim and pom-pom. Avoid long strands across the back, especially if the applique will be sewn onto a garment or card.
Shape the Applique
Lay the hat on a flat surface. Smooth the red panel into a tapered triangle, round the lower white corners, and arrange the pom-pom over the tip.
If the red edges curl, dampen the panel lightly and pin it flat without stretching. Leave the raised white ribs and textured pom-pom unpressed. Let it dry completely before using or sewing it onto another project.
The finished hat should stay flat and unstuffed below the pom-pom. Do not sew the side edges together.
Photo Tutorials and Stitch Chart
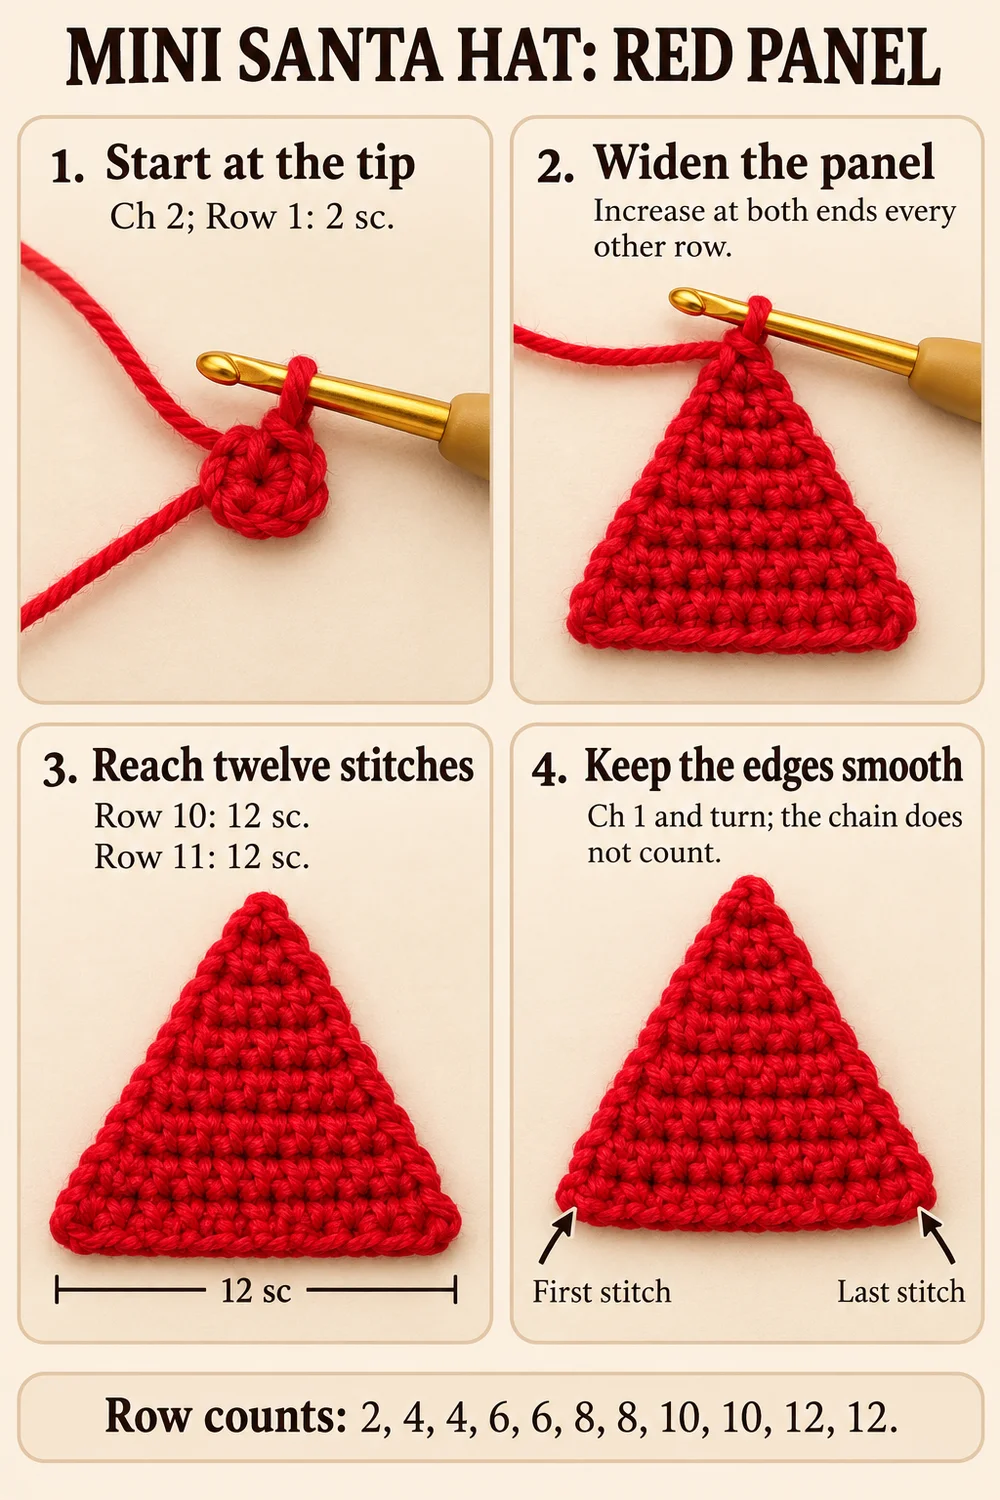
The final gallery contains two step-by-step photo guides and a third image with the finished hat above a stitch-symbol chart and English legend. The chart covers the red panel, Rows 1–11.
The chart is a stitch-count guide: each plus sign represents one finished single crochet, with row totals shown at the side. Follow the written directions for the increases on Rows 2, 4, 6, 8, and 10, and for the white post-stitch brim and pom-pom.
Ways to Use Your Mini Santa Hats
- Sew one onto a fabric gift bag or stocking.
- Attach one to a handmade holiday card using a method suitable for the card material.
- Sew several onto a crochet chain to make a garland.
- Add a separate hanging cord anchored through several red stitches below the pom-pom for an ornament.
For sewn decorations, use small stitches around the panel and brim while leaving the pom-pom raised. Do not use the pom-pom alone as the hanging attachment.
Tips and Troubleshooting
The red panel is uneven
Count every row and mark both edges. Increase only on Rows 2, 4, 6, 8, and 10, working twice into the first and last stitches.
The brim has thirteen stitches
The turning chains do not count. Row 12 has twelve dc, and Row 13 works around those twelve posts only.
The white ribs look flat
Work around the vertical posts rather than into the top loops. Alternate front and back post stitches all the way across.
The pom-pom looks too large
Use less stuffing and keep its stitches firm. A slightly smaller hook for the pom-pom can help if the yarn is fluffy.
FAQ
Is this a wearable hat?
No. It is a small flat applique shaped like a Santa hat.
Does the red panel need stuffing?
No. Only the separate pom-pom may need a tiny amount.
Can I use thicker yarn?
Yes. Keep the same yarn weight for both colors and use a matching hook. The applique will become larger.
More Free Christmas Crochet Patterns
- Six-Point Star Ornament Crochet Pattern
- Poinsettia Keychain Crochet Pattern
- Christmas Wreath Ornament Crochet Pattern
Save This Pattern
Save this Mini Santa Hat Applique Crochet Pattern for your next handmade holiday project. Happy crocheting from Lovely Amigurumi!
Mini Santa Hat Tutorials, Stitch Chart, and Pinterest Gallery
Two photo tutorials and one photo-and-chart guide come first, followed by three Pinterest images.
More Free Crochet Patterns
Find your next handmade project with these lovely patterns.
Christmas Lace Star Crochet Pattern – Free Five-Point Ornament Guide
View Pattern →
Granny Stitch Gingerbread Crochet Pattern – Free Ornament Guide
View Pattern →
Blue Lace Snowflake Crochet Pattern – Free Ornament Guide
View Pattern →
CONTENT END 1
