
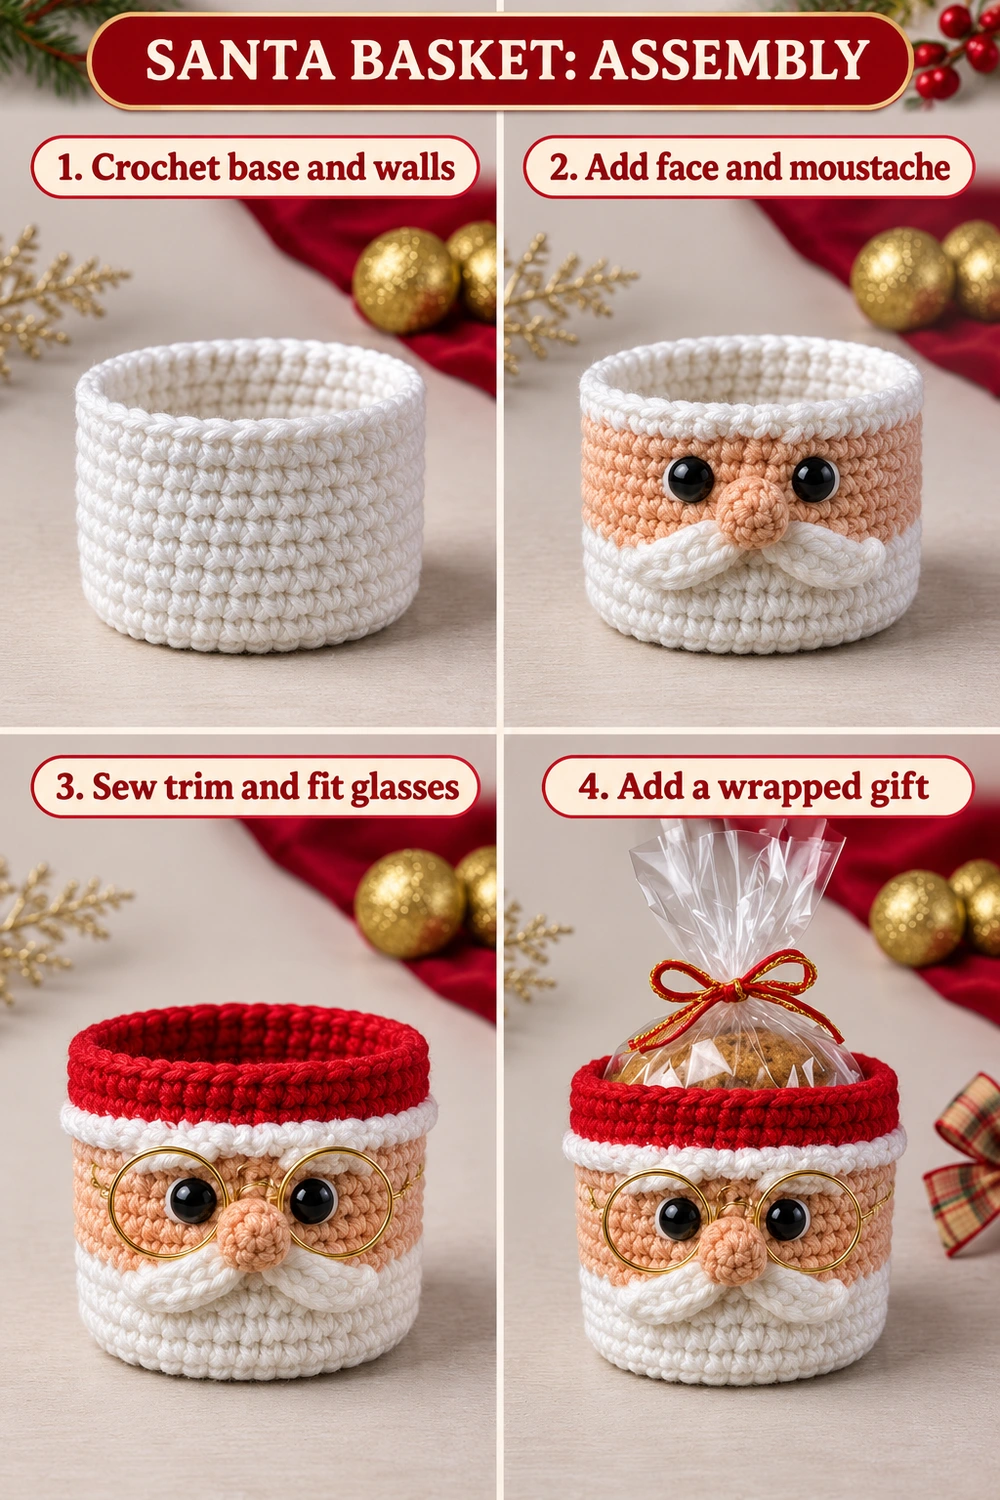
Sew the peach patch around its edge with small stitches. Avoid pulling the stitches tight enough to gather the white wall. Keep the face smooth and let the basket retain its cylindrical shape.
6. Make the Raised Nose
With peach yarn, work:
- R1: 6 sc in MR. (6)
- R2: inc in every st. (12)
- R3: sc in every st. (12)
- R4: dec × 6. (6)
Add a tiny amount of stuffing before closing. Fasten off with a long tail, pass through the front loops of the last six stitches, and draw closed. Sew the nose between the eyes, a little below their center line.
The nose should sit directly beneath the glasses bridge. Pin the glasses temporarily while checking this position so the nose does not push the frames away from the face.
7. Crochet Two White Moustache Lobes
For each lobe, use white yarn and ch 7. Starting in the second chain, work sc, hdc, dc in each of the next 2 chains, hdc, then 3 hdc in the last chain. Continue along the underside with hdc, dc in each of the next 2 chains, hdc, and 2 sc in the first chain used. (14 stitches)
Join with a sl st and fasten off with a long sewing tail. Make two identical pieces. Place them as mirror images under the nose, with their inner ends touching and their outer tips pointing slightly upward.
Sew the inner ends firmly, then tack the outer edges with a few light stitches. Leave some of the curved lower edge free so the moustache has gentle relief. The white basket wall below it acts as the beard, so there is no separate long beard panel to add.
8. Fit the Round Glasses
Place the round frames around the eyes and rest the bridge above the nose. Use fine matching thread to make tiny securing stitches around the frame at the outer sides and near the bridge. Catch the crochet fabric underneath without covering the lenses.
If your premade glasses have long arms, tuck them carefully along the basket sides only if the shape allows it. Choose a smaller pair rather than forcing the frame to bend sharply or protrude into the opening. The glasses should sit securely and comfortably against the face.
For embroidered glasses, outline two circles in gold yarn with short backstitches. Connect them with one small curved bridge and add short side lines. Keep the eye stitches visible inside the circles.
9. Neaten the Inside and Shape the Basket
Turn the opening toward you and secure every sewing tail. Weave each tail through several stitches and change direction before trimming. Keep the finishing flat so the gift packaging will not snag on loose loops.
Shape the empty basket with your hands. If needed, dampen the crochet lightly and dry it around a smooth cylindrical form of a suitable size. Remove the form when dry. Do not iron plastic eyes or metal glasses.
The basket is designed for a small lightweight gift. If the sides collapse, use firmer cotton or a smaller hook for the next version. A suitable removable inner container can also support the shape, provided it fits without stretching the crochet.
10. Add a Wrapped Christmas Gift
Place a small sealed treat or wrapped gift inside. Keep the contents below or just above the rim, with the decorative cellophane rising above the basket. Tie the packaging itself with a red ribbon or red-and-gold cord.
Do not stitch the packaging closed through the basket opening. The red rim should stay open and reusable. Check that the ribbon and wrapping do not cover Santa’s eyes or pull the glasses out of position.
Reading the Tabletop Construction Charts
The two chart photographs below show one complete Santa basket silhouette above the finished basket resting on a table. The single crochet symbols represent the base and walls, while dashed outlines mark separately sewn facial pieces.
Follow the written round list for exact counts: the base increases from 6 to 48 stitches over eight rounds, followed by one back-loop corner round, twelve white wall rounds, and four red rim rounds. The face patch, nose, and moustache have their own instructions. Glasses are an accessory or an embroidered detail rather than crochet stitches.
More Christmas Crochet Projects
For more handmade gift ideas, try the Santa Claus Keychain, the Mini Santa Bell, or the Red Snowflake Bauble.
Photo Tutorial, Tabletop Charts and Pinterest Images
The complete written pattern is followed by six images: one assembly tutorial, two tabletop construction guides, and three Christmas gift images to save for later.
More Free Crochet Patterns
Find your next handmade project with these lovely patterns.
Christmas Lace Star Crochet Pattern – Free Five-Point Ornament Guide
View Pattern →
Granny Stitch Gingerbread Crochet Pattern – Free Ornament Guide
View Pattern →
Blue Lace Snowflake Crochet Pattern – Free Ornament Guide
View Pattern →
CONTENT END 1
