
Ch 6. Work around both sides of the chain. Starting in the second chain from the hook, work sc, hdc, dc in each of the next 2 chains, then 3 hdc in the last chain. Rotate the chain and work along its underside: dc in each of the next 2 chains, hdc in the next chain, then 2 sc into the starting chain. Join with a sl st to the first sc.
Fasten off with a sewing tail. Make a second piece. Place the two ovals horizontally beneath the nose, with their outer ends angled slightly upward. Use the sewing stitches to curve the ends gently, creating the curled moustache appearance.
7. Crochet the Red Hat
Ch 2. Sc in the second chain from the hook for Row 1. Turn.
- Row 2:Ch 1, inc. Turn.
- Row 3:Ch 1, inc in both sts. Turn.
- Row 4:Ch 1, sc across. Turn.
- Row 5:Ch 1, inc, 2 sc, inc. Turn.
- Row 6:Ch 1, sc across. Turn.
- Row 7:Ch 1, inc, 4 sc, inc. Turn.
- Row 8:Ch 1, sc across. Turn.
- Row 9:Ch 1, inc, 6 sc, inc. Turn.
- Row 10:Ch 1, sc across. Turn.
- Row 11:Ch 1, inc, 8 sc, inc. Turn.
- Row 12:Ch 1, sc across. Turn.
- Row 13:Ch 1, inc, 10 sc, inc. Turn.
- Row 14:Ch 1, sc across. Turn.
- Row 15:Ch 1, inc, 12 sc, inc. Turn.
- Row 16:Ch 1, sc across.
Fasten off with a sewing tail. Lay the triangle with its narrow starting tip upward. Do not add a pom-pom; the reference has a plain pointed red hat.
8. Make the Light Gray Brim
Ch 18. Starting in the second chain from the hook, hdc in each chain. Turn. Ch 1 and hdc across for Row 2. Fasten off with a sewing tail.
Curve the strip gently across the hat’s broad lower edge. Its small overhang softens the join around the face. Sew it over the red base, keeping the two ends even.
9. Layer and Sew the Ornament
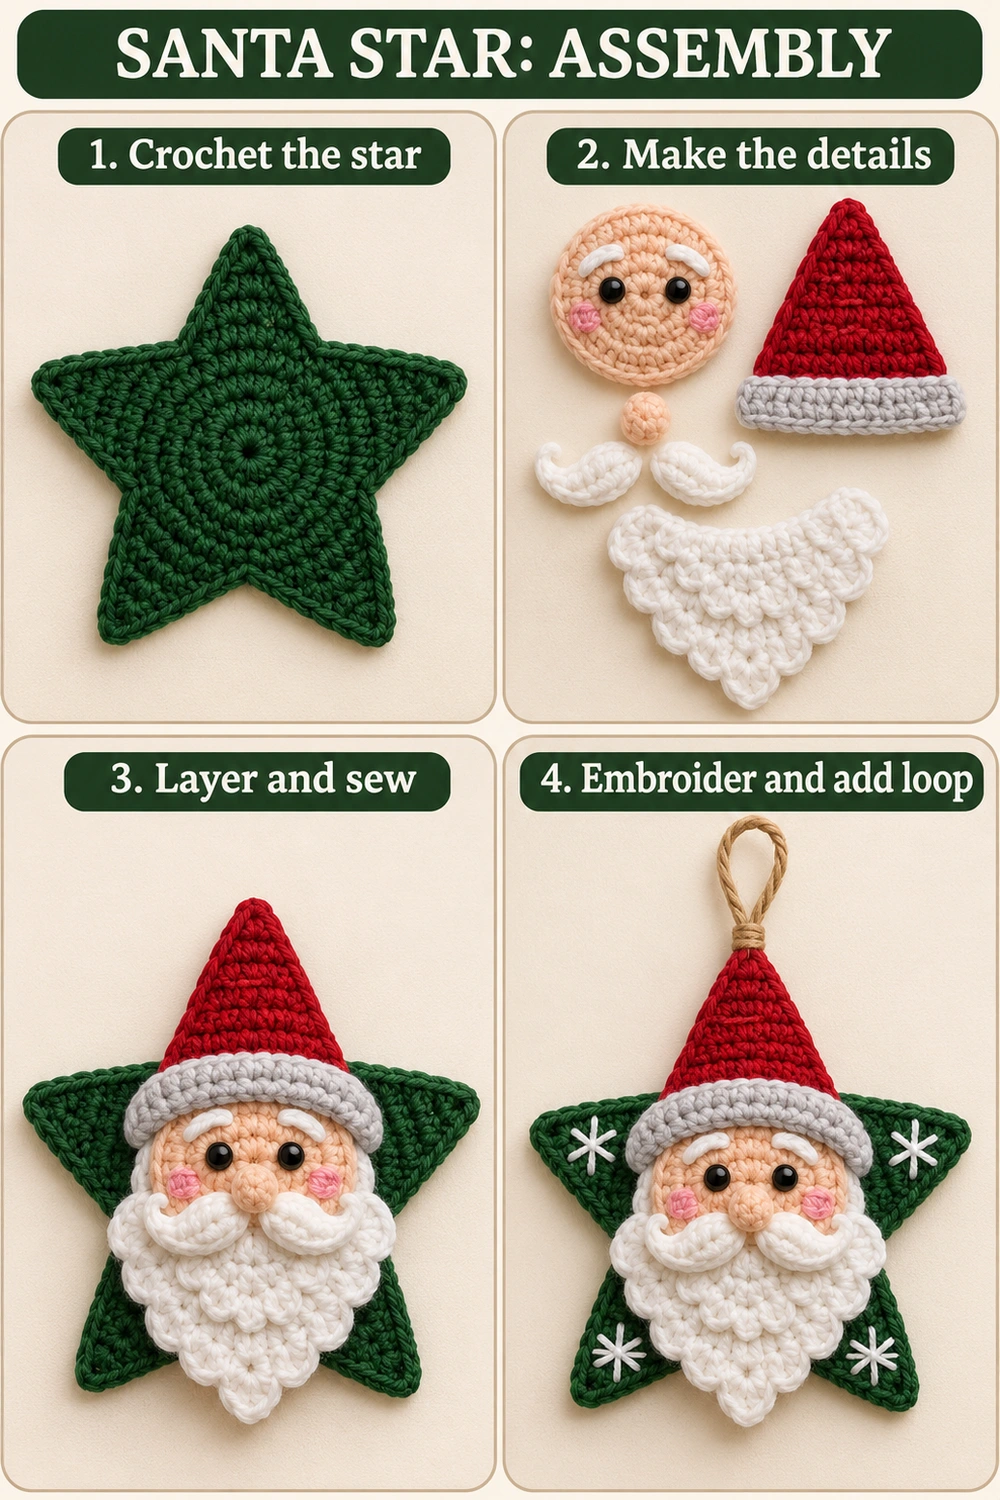
- Lay the blocked green star with one point upward. Center the face over the middle, slightly above the star’s center line.
- Sew around most of the face edge, add a thin layer of stuffing behind it, and close the remaining opening.
- Place the beard over the lower face, tapering toward the space between the two bottom star points. Sew the straight upper edge and a few hidden points along its sides.
- Arrange the moustache pieces beneath the nose, overlapping the upper beard. Sew them in place, then finish securing the nose over their inner ends.
- Place the red hat over the upper green point with its gray brim just above the eyes. Sew the hat to the backing and tack the brim ends neatly beside the face.
- Check that the four side and lower green points remain visible and that the beard sits centrally.
10. Embroider Snowflakes and Attach the Hanger
Embroider one small white asterisk on each of the four visible green points. Make three crossing straight stitches through the same center to form six rays. Keep the stitches on the green fabric, clear of the star edges.
Fold the twine into a loop and sew both ends firmly to the back of the hat tip, catching the green star point as well as the red fabric. Tie the ends securely at the back. The hanger should support the backing and hat together. Weave in all yarn ends and check the ornament upright.
Using the Tabletop Stitch and Assembly Guides
The two guides show the complete Santa-star arrangement on paper above the finished ornament lying on a craft table. The star, face, hat, beard, nose, and moustache are separately shaped pieces. Dashed marks indicate sewing. Use the written row and round lists for increases, decreases, and the small stuffed parts.
The green backing has five points, although the upper point is mostly covered by the hat. Four embroidered snowflakes belong on the four visible points. The brim is light gray, and the red hat has no pom-pom.
Helpful Finishing Tips
- Uneven star: check five groups of eight center stitches and the point counts 8, 6, 4, 2, 1.
- Face looks too puffy: use only a thin layer of stuffing behind the shallow cup.
- Moustache hides the eyes: lower the inner ends beneath the nose before sewing.
- Beard curls: loosen the border stitches and block gently before attaching.
- Hat tilts: align its tip with the upper star point and center its brim above the eyes.
More Free Christmas Crochet Patterns
- Green and White Christmas Tree
- White Lace Angel Ornament
- Christmas Bell Ornament
Save Your Santa Star Ornament Crochet Pattern
Make a cheerful Santa star for your Christmas tree or a special handmade gift. Happy crocheting from Lovely Amigurumi!
Photo Tutorial, Two Tabletop Charts, and Pinterest Images
Find the assembly tutorial, two stitch-and-assembly tabletop guides, and three Pinterest images below.
More Free Crochet Patterns
Find your next handmade project with these lovely patterns.
Christmas Lace Star Crochet Pattern – Free Five-Point Ornament Guide
View Pattern →
Granny Stitch Gingerbread Crochet Pattern – Free Ornament Guide
View Pattern →
Blue Lace Snowflake Crochet Pattern – Free Ornament Guide
View Pattern →
CONTENT END 1
