
Block the Six Points
Dampen the star lightly and press out excess moisture without twisting. Lay it on a blocking mat with one point up, one point down, and four diagonal points.
Pin the six tips approximately 60 degrees apart. Match their distance from the center so the points have equal length. Round the small center opening and gently spread the six larger windows.
Arrange each fan so its sides rise evenly toward the picot tip. Add pins near the windows if necessary, without stretching the chains into long narrow strands. Let the star dry completely before removing the pins.
For a firmer ornament, test a yarn-compatible fabric stiffener on a scrap and follow its label. Apply it to the motif before adding the hanging cord, then shape the star flat while it dries.
Add the Cream Hanging Loop
Choose the neatest point as the top. Thread a separate 20–25 cm length of cream yarn through several firm stitches just below its tip picot, keeping the front neat.
Pass through the attachment area twice to spread the load, then bring both ends together above the star. Tie them securely to make a loop and trim the ends evenly.
The hanger should rest on the worked stitches below the tip, not on a single thin picot chain alone. Hang the star and check that its points remain flat and its top does not stretch.
Photo, Stitch Chart, and Visual Tutorials
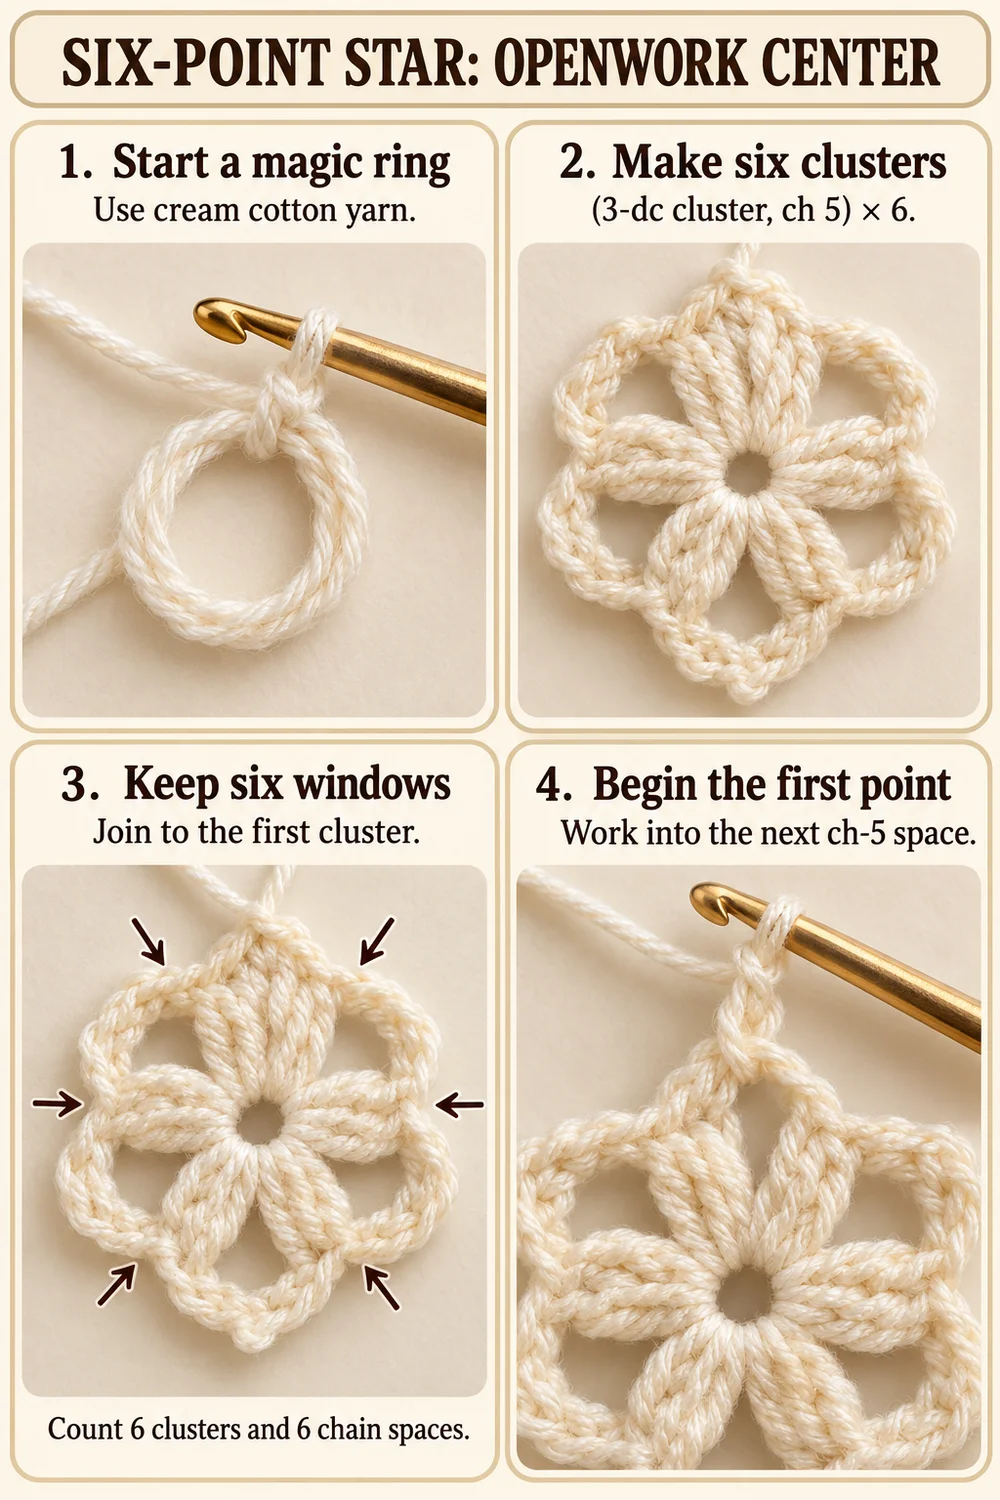
The final gallery includes two step-by-step photo guides and one image with the finished star above a stitch-symbol chart and English legend. The chart shows Rounds 1–2; follow the written Round 3 directions for the single crochet and picot edging.
Read the chart from the center outward. Each ch-5 arch separates two clusters and receives one complete fan in Round 2. The six repeated sections correspond to the six points of the finished star.
Tips and Troubleshooting
I have five or seven points
Count the six clusters and six chain spaces in Round 1. Work one fan into each chain space, with none in the cluster tops or joining slip stitch.
The windows have disappeared
Make sure the Round 1 spaces contain five chains. Work the Round 2 fans around those spaces, and block the openings gently after finishing.
The edging pulls inward
Relax the single crochet tension and check that every point has eight side stitches plus two stitches in its tip space.
The center ring changes size
Secure the starting tail through several cluster bases after setting the opening. Do not rely on trimming the magic-ring tail close to the center.
FAQ
Is this a five-point Christmas star?
No. This version follows the reference’s six-point silhouette, with six open windows around the center.
Does it need stuffing?
No. This is a flat openwork motif. Blocking helps it hold its shape.
Can I use white yarn?
Yes. Cream follows the warm reference color; white gives a brighter snowy finish.
More Free Christmas Crochet Patterns
- Christmas Wreath Ornament Crochet Pattern
- Christmas Bell Ornament Crochet Pattern
- Poinsettia Keychain Crochet Pattern
Save This Pattern
Save this Six-Point Star Ornament Crochet Pattern for your next handmade holiday project. Happy crocheting from Lovely Amigurumi!
Six-Point Star Tutorials, Stitch Chart, and Pinterest Gallery
Two photo tutorials and one photo-and-chart guide come first, followed by three Pinterest images.
More Free Crochet Patterns
Find your next handmade project with these lovely patterns.
Christmas Lace Star Crochet Pattern – Free Five-Point Ornament Guide
View Pattern →
Granny Stitch Gingerbread Crochet Pattern – Free Ornament Guide
View Pattern →
Blue Lace Snowflake Crochet Pattern – Free Ornament Guide
View Pattern →
CONTENT END 1
