
If your bead is plain, add two small black eyes, a gentle curved smile, and pink cheek dots. Keep the hole running vertically from top to bottom and center the face on the front. Let all paint or ink dry fully before assembly.
Test the head against the dress neck. The bead should sit above the folds without sinking inside them. If the opening is too wide, add a few small gathering stitches across the back of the neck, keeping the front folds smooth.
6. Crochet the Small Blue Halo Disk
With turquoise yarn, ch 4 and join to the first chain to make a small ring. Ch 1 and work 12 sc into the ring. Join to the first sc, fasten off, and leave a sewing tail. (12 sc)
This little flat ring sits on top of the wooden head like a halo cap. Its center opening allows the head-attachment thread to pass through. Do not stuff it or turn it into a tall hat.
7. Make the Hanging Loop
With turquoise yarn, ch 30. Fasten off, leaving long tails. Fold the chain into a narrow loop and bring its ends together at the halo center.
Secure the two ends to opposite sides of the halo’s center opening. Keep the loop upright and check that the chain is not twisted. The final head-attachment thread will also pass through this area to reinforce the connection.
8. Attach Head, Halo and Loop
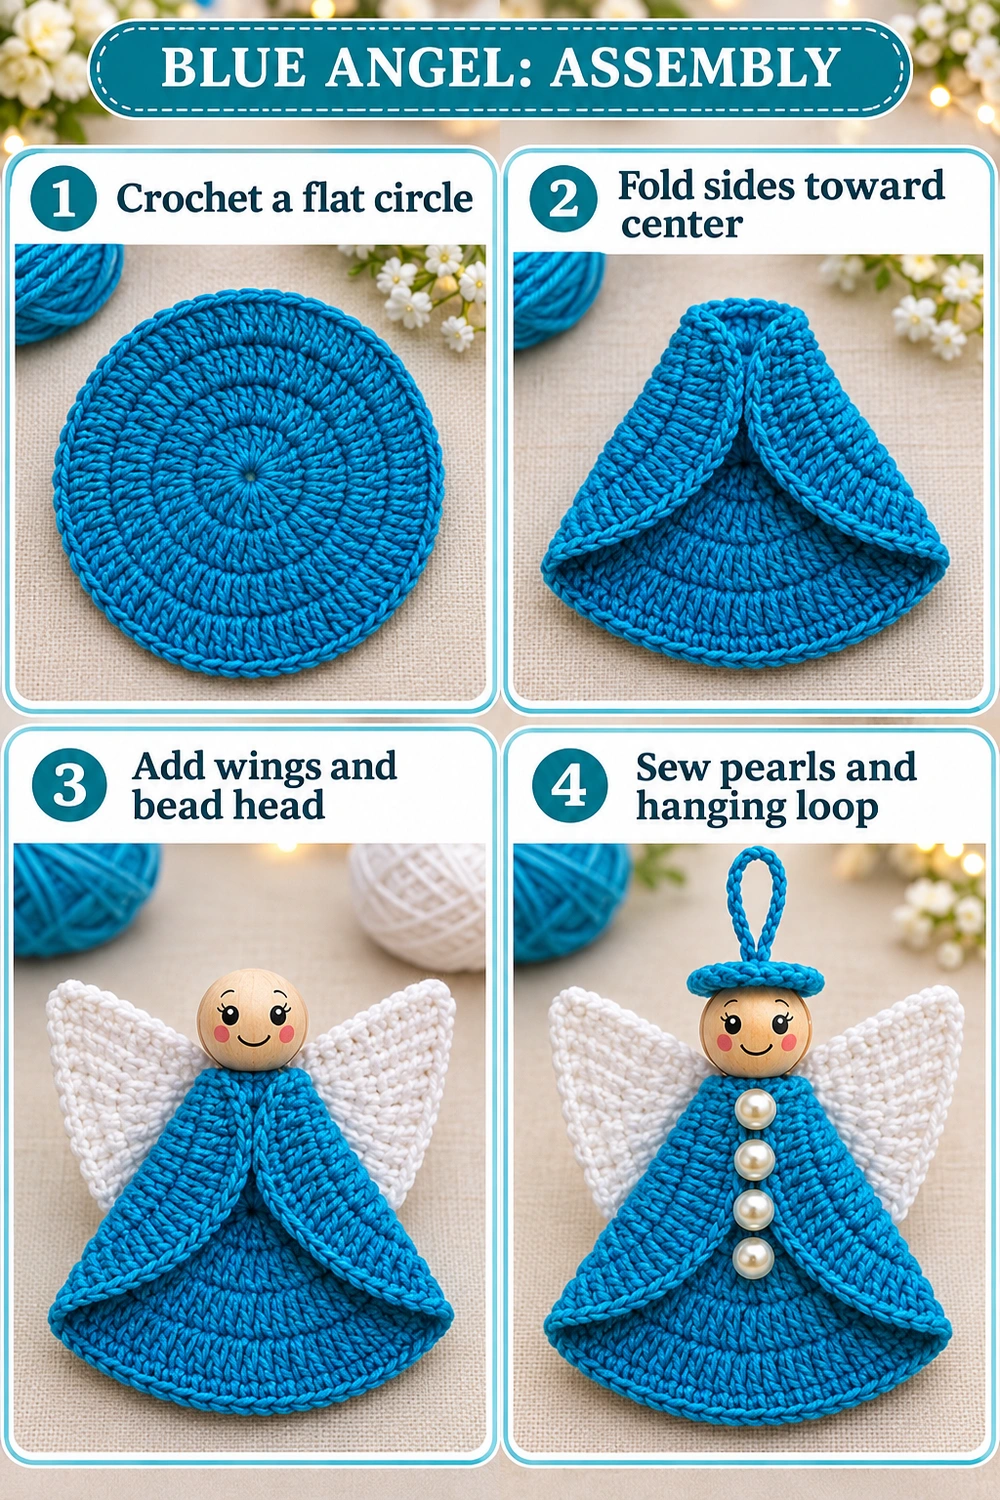
Use a doubled strong sewing thread. Anchor it through several stitches at the dress neck and the inner wing tips. Pass upward through the wooden bead hole, through the halo center, and around the base of the hanging loop.
Return down through the bead to the dress neck. Repeat the upward and downward pass at least once more, then secure the ends through several neck stitches. Tighten just enough to hold the head steady without crushing the dress folds.
Arrange the halo flat on the head with the loop centered above it. The thread should carry the ornament through the bead and into the dress; do not rely on the small halo edge alone as the hanger attachment.
9. Sew on Four Pearl Buttons
Arrange four small pearls in a vertical line down the upper front seam. Start just below the head and leave equal spaces between them. The lowest pearl should sit above the point where the curved flaps separate.
Sew each pearl individually through both front layers where they overlap. Make several passes through the bead hole and secure the thread on the inside. This decorates the front and helps keep the upper folds together.
For a bead-free version, embroider four small white circles or knots in the same positions. Keep the same front arrangement so the overall look remains close to the reference.
Finishing and Shaping
Hide all sewing ends inside the dress. Check that the head faces forward, the wings sit at matching heights, and the loop is centered. Give the hanger a gentle test over a soft surface before using it on a tree.
If the dress or wings need shaping, dampen only the crochet and let it dry in the desired position. Keep the painted wooden head and pearl finish dry where possible. Spot clean gently and store without crushing the wings.
Tabletop Construction Guide Notes
The two chart photographs below show one complete angel silhouette above the finished ornament resting on a table. They explain the folded dress and the placement of the separate wings, bead head, halo, loop, and pearls.
The dress itself begins as a flat circle: 12, 24, 36, 48, 60, and 72 dc, followed by 72 sc around the edge. Fold and sew it as described in the written instructions. Dashed guide lines indicate folding or sewing, not extra crochet stitches. The head and four pearls are non-crochet components.
More Handmade Christmas Ideas
Try the White Lace Angel, the Santa Gift Basket, or the Santa Claus Keychain for more handmade Christmas decorations and gifts.
Photo Tutorial, Tabletop Guides and Pinterest Images
The six images below include one folding and assembly tutorial, two tabletop construction guides, and three angel project images to save for later.
More Free Crochet Patterns
Find your next handmade project with these lovely patterns.
Christmas Lace Star Crochet Pattern – Free Five-Point Ornament Guide
View Pattern →
Granny Stitch Gingerbread Crochet Pattern – Free Ornament Guide
View Pattern →
Blue Lace Snowflake Crochet Pattern – Free Ornament Guide
View Pattern →
CONTENT END 1
