
Red Petal — Make Twelve
Ch 7 in red. From the second chain: sc, hdc, dc, dc, hdc; in the final chain work (sc, ch 2, sc). Return along the opposite side: hdc, dc, dc, hdc, sc. Sl st at the base and fasten off with a sewing tail. Make six petals per flower.
Arrange three petals as a lower layer and three more between them as the upper layer. Sew all bases together firmly. Add a green holly leaf behind two or three outer petals, using additional leaves made as above. Sew a cluster of tiny gold beads at the center, or substitute gold French knots. Sew through all petal bases when attaching the flower to the hanging.
8. Tiny Green Christmas Tree
Work in rows with green. Ch 2. R1: 2 sc in second ch . R2: inc in each stitch . R3: 4 sc . R4: inc, 2 sc, inc . R5: 6 sc . R6: inc, 4 sc, inc . R7: 8 sc . R8: inc, 6 sc, inc . R9: 10 sc . Fasten off. Join brown to the fourth stitch of the bottom row and work 4 sc. Turn and work 4 sc for a second trunk row. Fasten off. Add small gold and red embroidery knots or securely sewn beads. This is a flat tree appliqué; lightly block it before assembly.
9. Red-and-White Candy Cane
Use continuous rounds. In red, make 6 sc in MR, then work 6 sc for two more rounds. Change to white for three rounds of 6 sc. Repeat three red rounds and three white rounds until there are 24 rounds total, including the MR round. Stuff lightly as you go; keep the last third flexible. Gather closed. Bend the top third into a hook and hold the curve with a few hidden stitches between the inside edges. Do not insert wire.
10. Miniature Red Gift
Work in red. Ch 7. R1: starting in the second chain, 5 sc, 3 sc in the last chain; along the other side work 4 sc and 2 sc in the first chain. R2: (6 sc, inc) × 2 . R3: 16 sc BLO. R4–8: 16 sc each round. Stuff lightly; flatten the opening so the front and back each have 8 stitches. Join the edges with 8 sc through both layers. Fasten off. Sew a green chain or narrow green ribbon vertically around the gift and another horizontally; add a small green bow on top.
11. Reinforced Hanging Cord and Assembly
Lay the whole project flat before sewing. Make a strong cord loop above the hat, long enough for your chosen door hook. Run a doubled cord down the back of the hat and head, anchoring it through several dense crochet stitches with multiple passes of strong thread. Continue the cord loosely down the back of the hanging. It should follow the vertical axis and support the lower bells and gift; the cream spiral curls around it.
Sew the upper end of the cream strip to the underside of the head with several passes across its width. Tack the inside chain edge of the corkscrew to the supporting cord at intervals of approximately 8–10 cm. Keep enough slack in the cord to preserve the intended curves without letting the crocheted strip bear the weight of the bells.
- Below the scarf: attach one holly cluster and the first snowflake.
- Next section: place the tree to one side and the first poinsettia on the other.
- Middle section: add the candy cane, second snowflake, and second holly cluster.
- Lower section: add the second poinsettia, third holly cluster, and third snowflake.
- At the bottom: suspend the red gift from the support cord and attach a gold bell on each side.
Pin every motif before sewing so the face and decorative fronts point toward the viewer. Sew through the motif base and the cream strip at several points, catching the support cord where practical. Add red and green beads to selected curves if desired, securing each with at least three thread passes. Keep all connecting threads hidden at the back. Tie and sew the lower cord attachments securely, then test the whole hanging above a soft surface with a gentle tug.
Photo and Full Stitch Chart
The third tutorial image below combines a finished-project photo with a connected stitch chart for the entire cream spiral strip. Every one of its 120 foundation positions, all 360 dc, and all 360 sc are shown in six consecutive sections. A section break is only a page-layout break: keep working the same row. The head and all decorations follow their separate written instructions above. The English legend explains the chain, dc, and sc symbols.
Finishing Tips
- If the spiral is too long, relax fewer turns and move the attachment points closer together; make a shorter foundation for a smaller version.
- If motifs rotate, secure them at two or three separated points rather than one central stitch.
- Avoid heavy stuffing in the hat and candy cane so they retain their curves.
- Keep the bottom bells lightweight, with their weight supported by the strong cord.
- Spot-clean gently and let the hanging dry flat; protect metal bells and beads from soaking.
Frequently Asked Questions
Can I leave off the bells and beads?
Yes. Replace the beads with embroidery and omit the bells for a lighter, fully yarn-based decoration. Keep the reinforcing cord for the long spiral.
Can I make it shorter?
Yes. Reduce the spiral foundation chain and space fewer motifs along it. Keep two extra turning chains and work three dc into every remaining foundation chain. The head pattern can remain unchanged.
Does the spiral need wire?
No. The increased dc row creates the curl. Shaping and discrete cord attachment points keep the arrangement stable.
More Free Christmas Crochet Patterns
- Christmas Bell Ornament Crochet Pattern
- Poinsettia Keychain Crochet Pattern
- Two-Tone Christmas Bauble Crochet Pattern
Save This Pattern
Save this Snowman Christmas Door Hanging Crochet Pattern for your holiday decorating. Happy crocheting from Lovely Amigurumi!
Photo Tutorials, Full Spiral Chart, and Pinterest Gallery
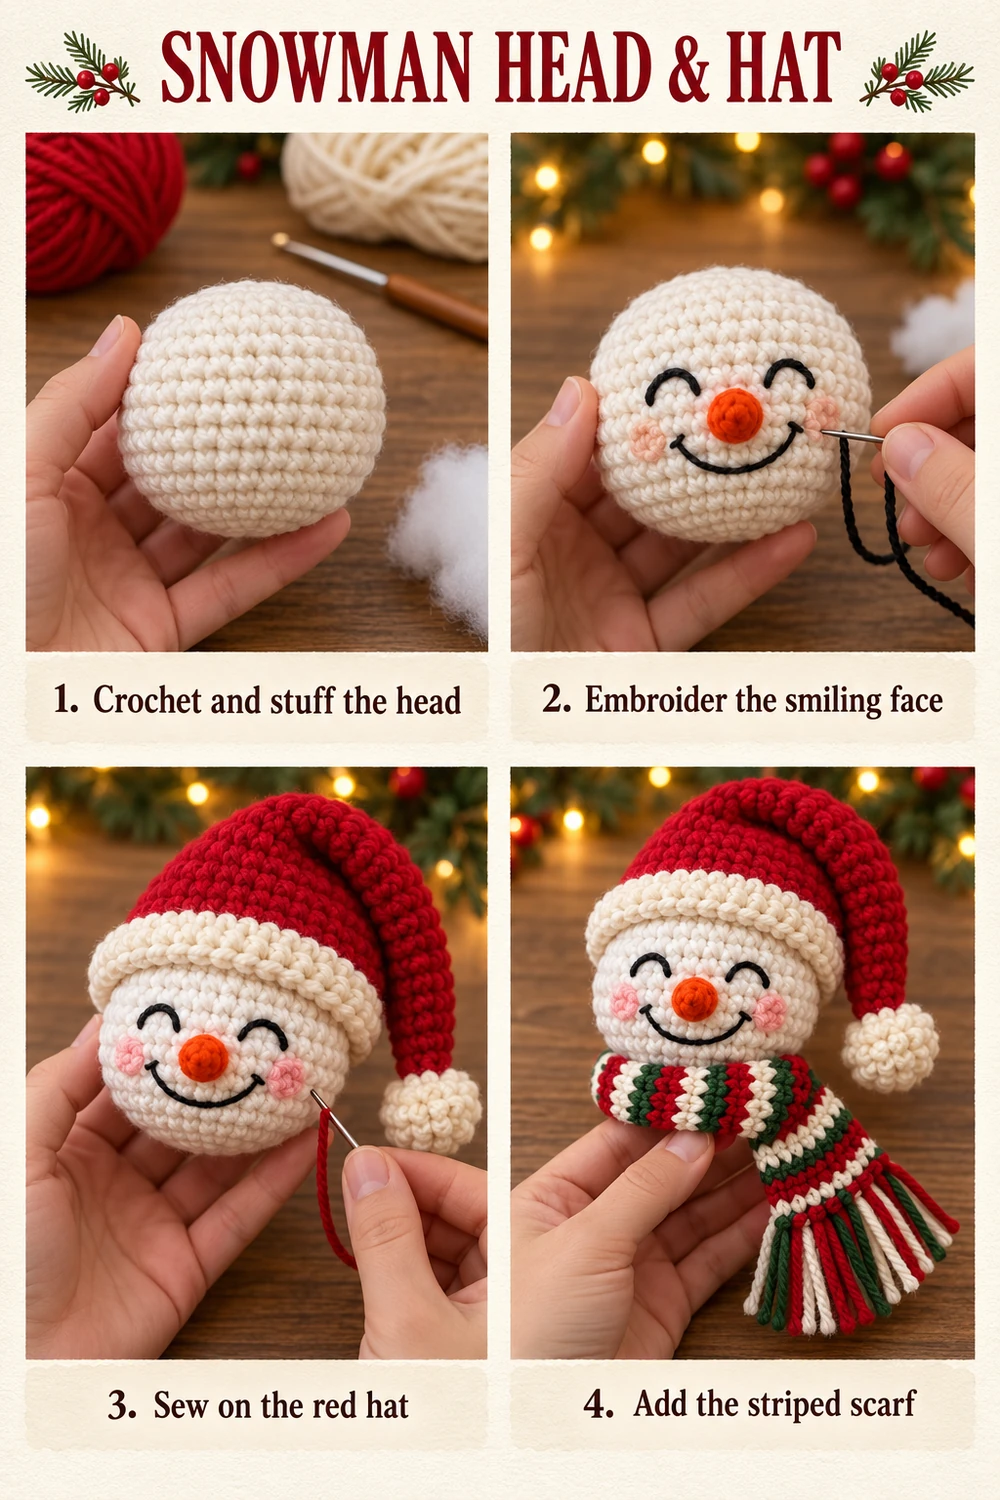
The two photo tutorials and the finished-project photo with its full spiral stitch chart are followed by three Pinterest images. All six images are grouped here at the end.
More Free Crochet Patterns
Find your next handmade project with these lovely patterns.
Christmas Lace Star Crochet Pattern – Free Five-Point Ornament Guide
View Pattern →
Granny Stitch Gingerbread Crochet Pattern – Free Ornament Guide
View Pattern →
Blue Lace Snowflake Crochet Pattern – Free Ornament Guide
View Pattern →
CONTENT END 1
